Home |  Index |  Submit Request |  Share Photos |  Share Tips |  Active Topics |  New Feedback  |  Contact Us  |  Search
 User Login:  Username:    Password:      Forgot It?  | Join ThriftyFun!

 Popular Topics
 - Beauty
 - Budget and Finance
 - Christmas *
 - Cleaning
 - Consumer Advice
 - Craft Projects
 - Craft Tips
 - Food Tips
 - Garage Sales
 - Gardening
 - Gifts
 - Green Living
 - Home Improvement
 - Organizing
 - Parenting
 - Parties
 - Pest Control
 - Pets
 - Product Reviews
 - Recipes
 - Repair
 - Thanksgiving
 - Weddings for Less

More Topics

Google Search:

Web thriftyfun.com

About:
RSS Feed
About Us
Media
Advertising
Contact Us
Privacy Statement
Disclaimer

Paper Plate Suncatchers

By Rebecca Lanham
1x1
Date: 04/11/2006 Topic: Craft Projects > Crafts for Kids  
1x1
1x1
Post Feedback! | Email Friend | Print | Get Responses | Bookmark | del.icio.us | Link | Rate: Thumbs Up Thumbs Down
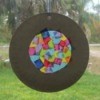
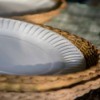
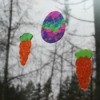
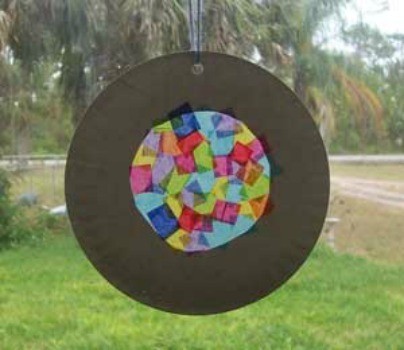
You and children of any age can make these simple suncatchers with just some mini paper plates, tissue paper, clear contact paper, scissors, a hole punch and yarn.

Paper Plate Suncatchers

Items Needed:

  • Mini Paper Plates
  • Tissue Paper
  • Clear Contact Paper
  • Scissors
  • Single Hole Punch and Yarn

Optional Items:

  • Markers
  • Crayons
  • Stickers
  • Glue & Glitter, Etc.

    Paper Plate Suncatchers

    Instructions:

    Step 1: Give each child a mini paper plate.

    Step 2: Cut out the center circle on the paper plate with the scissors. (If the children have safety scissors, the centers of the plates can be cut out before step 1.)

    Step 3: Give each child several sheets of tissue paper. Have them cut the tissue into small pieces.

    Step 4: Cover the hole in the center of the paper plate with contact paper.

    Step 5: Cover the sticky surface of the contact paper with tissue paper pieces.

    Step 6: Cover the tissue paper with a second piece of contact paper.

    Step 7: Make a hole with the hole punch in the paper plate.

    Step 8: Tie the yarn through the hole so the suncatcher can be hung on a window.

    *Optional Step 9: Decorate the white plate around the edge with crayons, markers, glue and glitter or stickers.

    A very simple craft for even the youngest child.

    Paper Plate Suncatchers

  • Jump to Feedback | Post feedback
    Related Links:
    Previous: Breed Information: Bichon Frise ThriftyFun Next: Bathing Your Dog
    1x1
     Feedback
    1x1
    1x1
    1x1
    1x1
     Sponsors
    1x1
    1x1

    Post By G.T. (Guest Post) (05/15/2006)
    WE made these in Sunday School Class for Mother's Day with their picture in the middle. EVERYONE LOVED IT!!!!
    great and easy to do...


    Post By sheri darling (Guest Post) (04/13/2006)
    Wow, this is a great, simple and inexpensive craft! I plan on doing this craft with my Grandchildren on Easter Sunday after church. I might cut the shape in the middle as a cross. Thank you for boosting my creativity!


    Post by dpcw (108) | (04/12/2006)
    Profile |Contact
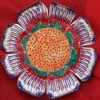
    You can also make the center hole other shapes besides a circle. My son did something very similar in school only the center of his was a heart. His teacher then put a small picture of him in the center of the heart before putting the final piece of contact paper over the top. Very cute. It hangs in the window by my kitchen sink.


    Post by mobo (170) | (04/12/2006)
    Profile |Contact
    this would be a great project for mother's day!! my mom would just love this from her grandson!!


    Post By IMAQT1962 (Guest Post) (04/12/2006)
    I LOVE IT !!!!


    1x1

    Post Feedback:
    Login using the form on the top of the page to post feedback if you have registered with ThriftyFun. If you have not yet registered, click here. It's FREE!. If you are not registered you can post feedback as a guest below. Please don't use your email address for your name because spam robots can dredge it from our site. Please do not post your feedback more than ONCE. We need to approve all guest feedback and it may take from minutes to hours for that to happen.
    (1x1 graphic )
    Your Name

    Subject

    Feedback

    text tool text tool text tool text tool

    Image Upload: Add an image to your post! Click the "Browse" button below and select an image from your hard drive. Please only select gifs or jpegs. If you have any problems, just email the image to images@thriftyfun.com


    If you want to post your email address for responses from readers, obscure it in some way like put spaces between the name and @ sign and service address with (remove spaces) behind it or name (at) server (dot) com . This is for your protection from those creepy Robots.

    (1x1 graphic )

    © 1997-2008ThriftyFun.com - Design by Cumuli Design
    Disclaimer: ThriftyFun.com cannot accept any responsibility for any injury or damage that you may cause to yourself, others, or property when following any advice given on this site. Read the full disclaimer. If you find any information on ThriftyFun.com or in our newsletters that is either erroneous and/or potentially harmful to others, please Contact Us, immediately.