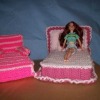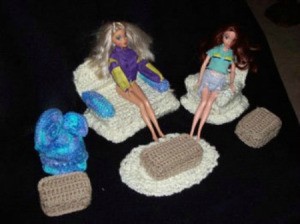
Calling all little girls that love their Barbies or that have little dolls that need some furniture. Have I got a deal for you! This is number 1 in a three part series of articles about easy doll house furniture. Next week will be a crocheted kitchen and the week after that her bedroom.
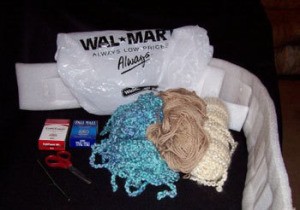
These directions are easy enough for a beginner or as a project to teach different stitches. I am a pretty fast crocheter and these can be made in a couple of evenings for the average crocheter, a little longer for a beginner. This is a great project to do while watching TV as there are not many different stitches to the pattern so you can make them really fast. You will be recycling those obnoxious Walmart bags that seem to multiply in your cabinet and polystyrene packing material that does not break down in our landfills. You can also recycle cardboard or foam meat trays or Styrofoam for this project, it just needs to be pretty stiff to give your furniture some shape. If you don't know what Polystyrene is, please refer to the picture of materials. This comes in boxes with computer parts as the packing material. I tried to choose materials that everyone would have on hand so that you would not have to spend any money on making these.
Of course if you would rather buy yarn than to use scraps, I would think you could get the living room couch and chairs out of one Super Saver skein of yarn and the tables and rugs out of a regular skein of yarn. Sheets of Polystyrene can be bought at any pack and ship store.
Color combinations are up to you. I just used what I had in my yarn box. You could change colors for the arms or make the skirts different from the main body. You could also slip stitch the parts together with a different color which would look nice also as the slip stitching of the different parts really stands out. I also would not be afraid to make these with a textured yarn as the couch and chair were made with a really soft yarn that had bumps in it. Maybe let your budding interior designer help with your color selections.
Abbreviations:
Dc Double crochet
Sc Single Crochet
HDC Half double crochet
Back: Make 2
Row 1: Chain 24 in third chain from hook Dc and in each stitch across. Chain 2 turn.
Row 3: (Chain 2 counts as first stitch) Dc in each stitch across. Chain 2 turn.
Seat: Make 2
Following same directions as above work 5 rows instead of four.
Band for inside of two seat covers: Make 1
Chain 5 in second chain from hook Dc in each stitch across. (3 Dc) Chain 2 turn.
Rows 2-28: Continue in pattern until the 28 row. Cut and work in ends.
Arms: Make 2
Chain 22: In second chain from hook Dc in back loop only and in each chain across. Chain 2 turn.
Rows 2-8: Continue Dc in back loop only until eight rows are complete. Cut and work in ends.
Assembly:
Back:
Seat:
Arms:
You will be crocheting this in the back loops only.
Seat:
Ch 2, 7 SC in first chain, join, ch2 counts as first stitch in next row. (7 SC)
Row two Crochet entire seat from here on out in the back loops only. 2 HDC in each stitch around join chain 3 (14 HDC)
Row 3: 2 DC in each stitch around Join chain 2
Row 4: HDC in each stitch around, Join chain 1
Row 5 :Crochet in back two loops- 1 sc in each 2 stitch around, join, chain 2 (this can be a tricky stitch but what you are doing is SC ing to stitches together. So stick your needle into the first stitch and then with the first stitch still on your needle put on the second stitch and single crochet them together.) This is a decrease.
Row 6 : HDC in each stitch around, Join, Chain 3.
Rows 7-8: Dc in each stitch around, Join Chain 3
Row 9: HDC in each stitch around, Join, Chain 3
Row 10: DC in each stitch around, Stuff tightly with Walmart bag and then a piece of the Polystyrene and the slip stitch across bottom to close. Cut and work in ends.
Bottom Ruffle:
Attach yarn and 4 DC ( Shell made) skip a stitch 4 dc all the way around.
Back:
Make two pieces
Repeat rows 1 through 4 of seat. Fasten off after row 4. Cut polystyrene to fit and then slip stitch half way around back and then slide in polystyrene and finish slipstitching closed.
Arms: Make 4
Row 1: Chain 5, slip stitch to form ring, chain 1, 12 sc in ring, join Chain 3.
Row 2: 4 Dc in same space as Chain 3, sc in next stitch, *5 double crochet in next stitch, Sc next stitch Repeat from * 3 times (4 shells) Leave 4 stitches not crocheted.
Fasten off and work in ends. Slip stitch two arm pieces together.
Assembly: Slip stitch back to seat. Slip stitch arms to back and seat.
Back: make 2
Row 1 Chain 13 in second chain from hook Dc and then Dc in each stitch across. Chain 2
Row 2-4: Dc across row
Fasten off and work in ends.
Row 1 Make 2
Row 1 Chain 13 in second chain from hook Dc and then Dc in each stitch across. Chain 2 Turn.
Row 2-4: Dc across row Chain 2 turn.
Center Band: Make 1
Row 1: Chain 5 in second chain from hook Dc and in each stitch across. (3 Dc) Chain 2
Row 2-28: Dc in each stitch across Chain 2 turn.
Fasten off and work in ends.
Arms: Make 2
Row 1: Chain 12 in second chain from hook Dc and in each stitch across. Chain 2 turn.
Rows 1-6: Dc in each stitch across.
Fasten off and work in ends.
Assembly: Same as for living room couch.
Top and Bottom: 2 total
Row 1: Chain 16 in second chain from hook Sc and in each stitch across. Chain 1 turn.
Rows 2-6 Sc in each stitch across Chain 1 turn.
Fasten off and work in ends.
Center Band: Make 1
Row 1: Chain 6 in second chain from hook Sc and in each stitch across. Ch1 Turn. (4 Sc)
Row 2-32 Sc in each stitch across. Chain 1 turn.
Fasten off and work in ends.
Assembly:
Row 1: Chain 12, Sc in second chain from hook and in next 9 stitches 3 sc in next chain for corner. Continue to crochet up other side of chain, 9 Sc, 2 sc in end stitch, Join Chain 1 turn.
Now crochet in back loops only
Row 2: Sc in each stitch around. Chain 1 turn
Row 3:* 2 sc in each of next 3 stitches, 9 sc Repeat from * once join and chain 1 turn.
Row 4: Sc in each stitch around. Chain 1 turn.
Picot edging: *Chain 4 and skip next stitch slip stitch to next stitch Chain 4 Repeat from * around.
Fasten off and work in ends.
Top and Bottom
Row 1-6: Chain 12, in second chain from hook Sc and in each stitch across. Chain 1 turn
Center Band
Row 1-26 Chain 5 in second chain from hook Sc and in each stitch across Chain 1 turn.
Assembly: Same as large table.
HOW ADORABLE !!
Good Job! Thanks for sharing your photos and patterns. Any girl would love this.
Hi Debra! These are great! My son has been building a doll house for his daughter, (my granddaughter), and these will be great to make for her! Thanks! Sue
How sweet to "soften" those stiff dolls! Can you get the furniture down to accommodate the average dollhouse dolls? I believe that you could market it or at least begin to make rugs, comforters, clothing, and then take special sized orders for dolls? Good luck and God bless you. : )