If you're short on space or the soil in your area is riddled by sand or clay, building raised beds may be the best solution to your gardening woes. You'll trade the time, money and effort required amending poor quality soil for maximum yields in a minimum amount of space.
Once built, raised beds don't compact as easy as conventional garden beds so they are easy to work by hand and never require tilling. In the spring, they warm up more quickly than regular garden soil, which is a real advantage for cold climate gardeners. Pests can be spot treated and fertilizers applied only where you need them, saving time, money and resources. Beds built tall enough reduce attack and damage by moles, rabbits and other small animals. If your building beds from the ground up, you can experiment with soils and plants not normally suited to your soil.
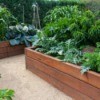
Raised beds easily adapt to any site and can be constructed in any size or shape-triangles, rectangles-even arches. The most important consideration is to construct beds to a height and width comfortable for working. The taller the bed, the more materials and dirt you'll need to construct it. Construct the beds to a width that allows you to reach halfway across them from each side. Most people can easily reach across 3 feet so a six-foot bed works well.
There are several ways to construct raised beds, but before you begin, make sure to remove any weeds or sod from the site you select. It can be helpful to place a barrier like plastic landscape edging around the inside perimeter of the bed to prevent grass from encroaching in the future.
To create raised beds from already existing beds, simply loosen up the soil and heap compost and other organic matter on top. Rake it all together to create a mound. If your soil is poor add in some purchased topsoil and amend it as needed.
Till up your garden site to a depth of 6-8 inches. Mark off areas designated for raised beds with rope or stakes, making sure to leave space for pathways. Now dig down the pathway areas and use that dirt to mound up the beds. If you live in a dry, windy climate, try creating sunken beds-beds dug down lower than the pathways. These beds will protect seedlings from wind and hold on to moisture more efficiently.
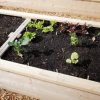
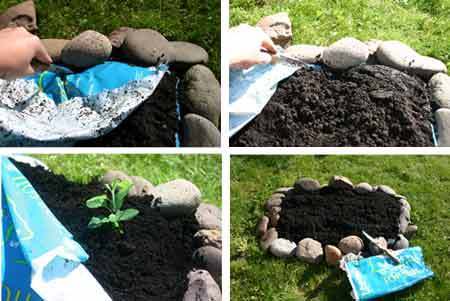
This is a really fast and easy way to make raised beds. Purchase a large bag of topsoil (50lb bags work great) and lay it out flat and unopened in the area you've prepared for your beds. With a sharp knife or scissors, cut open and removed the topside of the plastic bag. Mix in a little compost and you have a ready-made bed for planting! Leave the bottom portion of the plastic bag in place to kill off any weeds. Punch a few holes in it for drainage, and simply remove it at the end of the season to prepare for next years crops. Easy!
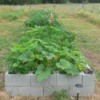
Bricks, rocks and stone pavers all work well for framing raised beds. Wood works well, but will eventually rot. Cedar and redwood are naturally less resistant to rotting than most other wood and will hold up the longest. Pressure-treated or chemically treated woods are rot resistant, but should not be used around beds containing food crops because their arsenic based toxins may leach into the soil. Old railroad ties are also suitable, but newer ties may leach creosote, which is harmful to plants.
No matter what method you choose to build them, or the shape or materials you use to frame them, raised bed gardening offers you space and crop versatility in a minimal amount of space.
About The Author: Ellen Brown is an environmental writer and photographer and the owner of Sustainable Media, an environmental media company that specializes in helping businesses and organizations promote eco-friendly products and services.
Add your voice! Click below to comment. ThriftyFun is powered by your wisdom!
I've wanted to do this for years. This article is the boost I needed to start. Since you wrote directions I can do step 1, step 2..... Thanks a lot!!
All my garden beds are raised beds. I hurt my back quite badly 2 years ago and after 7 weeks off work I had to make some gardening changes. I now have a pair of kneelers so do all my low work while kneeling. I also don't dig except for holes for fruit trees. I start by mowing short, using cardboard or thick newspaper and build layers using lucerne hay, lawn clippings and either sheep or horse manure. It takes a while but is great for potatoes (first year) or with some compost and a bit of soil to put in things like zucchinis, capsicums, brassicas, tomatoes. all do really well. When the soil is starting to build I put in things like broad beans and peas to use as green manure and either mulch or just toss on top, around young plants. I do find that slugs like the mulch. Now I just have enough plants that i leave some to the pests. I always find that some are attacked more than others, so I just use the good ones and leave the others there to be pest targets.
I've spent a back breaking week installing 5 large and 2 small raised beds in my yard.
Since the native soil was useless, I used a combination of top soil (two parts), humus (one part) and manure (two parts) to fill the beds. But the soil is not draining well at all! I've begun planing a few things and the water sits on the soil for far too long to be healthy. How can I improve the drainage of this soil?
Help!
Editor's Note: Hi Kay,
I put in a few bags of sandbox sand. It's clean and should help with the drainage.
I also have raised beds and love them! I have gophers who seem to enjoy the garden before I do, so have placed rabit wire on the bottom of the raised bed before adding soil. So far (3 years) - no gophers!
Add your voice! Click below to comment. ThriftyFun is powered by your wisdom!