ThriftyFun Logo
Home   Find   Ask   Share   Answer   Join   Index   Login  
 
 User Login:  Username:    Password:      Forgot It?  | Join ThriftyFun!

 - Beauty
 - Budget and Finance
 - Cleaning
 - Consumer Advice
 - Craft Projects
 - Craft Tips
 - Food Tips
 - Garage Sales
 - Gardening
 - Gifts
 - Green Living
 - Home Improvement
 - Organizing
 - Parenting
 - Parties
 - Pest Control
 - Pets
 - Product Reviews
 - Recipes
 - Repair
 - Weddings for Less

RSS Feed
About Us
Media
Advertising
Contact Us
Privacy Statement
Disclaimer

Lighted Floral Arrangement in a Miniature Wooden Wagon

1x1
Date: 04/11/2007 Topics: Craft Projects > Floral | Photos > Crafts  
1x1
Post Feedback | Get Responses | Bookmark | Link | Print | Print (With Feedback) | Rate: Thumbs Up Thumbs Down | Bookmark and Share
Lighted Floral Wagon

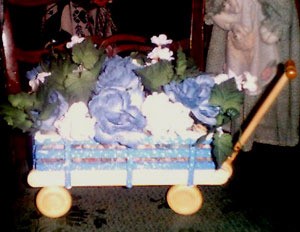
I found these cute little wagons and I just had to have them to make for two friends and co-workers for Christmas. I bought one in blue and one in pink. The wagons cost me about $12.00. I had spanish moss already and I used 2 strings of 50 clear light mini Christmas lights which I already had also. I bought the flowers at the Dollar Store which cost me about $6. The total cost was about $20.00 by the time I got everything for both gifts.

Approximate Time to Complete: was about 30 minutes for each wagon.

List of Materials:

  • Bag of spanish moss
  • 2-50 light strings of clear Christmas mini lights
  • 2-miniature wagons
  • 4 or 6-bouquets of flowers of your choice

Instructions:

Line bottom of wagon with a layer of the spanish moss. Add the christmas lights over the spanish moss making sure the plug in for the lights is on the back corner of the wagon so it will be hidden. Then lay another light layer of spanish moss over the lights to kind of hide them. With the flowers you start by cutting them all off the bouquet stem at the bottom of the stems (I used the pliers with the wire cutter). Once you have all the flowers cut, then you start inserting them into the wagon (this can be alittle frustrating at first until you get a number of them inserted, then tend to fall over at first) . I arranged the flowers as I went, changing them around till I found the right look that I wanted.

It is an easy but dramatic looking craft project that makes great gifts. And you feel really great when you give the gifts and the recipients can not believe you made it yourself and they absolutely love your gifts.

By Connie from Towanda, PA

(1x1 graphic )
Previous: Daily Thrifty Tips - April 11, 2007 ThriftyFun Next: How to Make a Tiny Bow
(1x1 graphic )
1x1
1x1
 Feedback
1x1
1x1
1x1

No Feedback Yet

Be the first to post feedback! Click here to post feedback.

1x1
1x1
 Post Feedback:
1x1
1x1
1x1

Login using the form on the top of the page to post feedback (if you are a registered user). If you have not yet registered, click here to do so. It's FREE!.

1x1
(1x1 graphic )

© 1997-2009 ThriftyFun.com - Design by Cumuli Design
Disclaimer: ThriftyFun.com cannot accept any responsibility for any injury or damage that you may cause to yourself, others, or property when following any advice given on this site. Read the full disclaimer. If you find any information on ThriftyFun.com or in our newsletters that is either erroneous and/or potentially harmful to others, please Contact Us, immediately.