Home |  Index |  Submit Request |  Share Photos |  Share Tips |  Active Topics |  New Feedback  |  Contact Us  |  Search
 User Login:  Username:    Password:      Forgot It?  | Join ThriftyFun!

 Popular Topics
 - Beauty
 - Budget and Finance
 - Christmas *
 - Cleaning
 - Consumer Advice
 - Craft Projects
 - Craft Tips
 - Food Tips
 - Garage Sales
 - Gardening
 - Gifts
 - Green Living
 - Home Improvement
 - Organizing
 - Parenting
 - Parties
 - Pest Control
 - Pets
 - Product Reviews
 - Recipes
 - Repair
 - Thanksgiving
 - Weddings for Less

More Topics

Google Search:

Web thriftyfun.com

About:
RSS Feed
About Us
Media
Advertising
Contact Us
Privacy Statement
Disclaimer

Three Tier Garden Container

1x1
Date: 06/12/2008 Topics: Gardening > Container | Photos > Garden  
1x1
1x1
Post Feedback! | Email Friend | Print | Get Responses | Bookmark | del.icio.us | Link | Rate: Thumbs Up Thumbs Down
Three Tier Garden Container
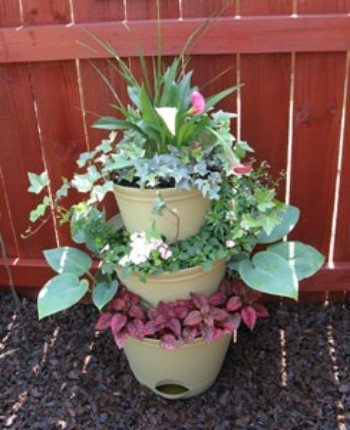
An impressive and fun garden project is a three or four tier container suited to a particular spot in your garden.

I have a slightly shady area, so I chose Calla Lilies surrounded by English Ivy and some tall grasses (behind the Lilies) for the topmost (and smallest) pot.

The second larger pot, I filled with Impatiens. (Because my project was to sit in front of a section of fencing, it was not necessary to plant anything in the back section of the pot.)

In the bottom (largest) pot, I used Hosta on the sides and a bright red and green Coleus in the middle area.

The results are amazing, and although planted only a month ago, it is full and lush and all I have to do is pinch off wilted Impatiens here and there.

Another great thing about this project is that the pots I bought were very inexpensive plastic ones from WalMart. This is a big savings when you have a whole garden to work on!

Just remember to water as needed. It is very hot where I live, so I water every day.

By Linda from Kernersville NC
Jump to Feedback | Post feedback
Related Links:
Previous: Why Are My Green Beans Yellow? ThriftyFun Next: How to Get a Start From a Flowering Almond Bush
1x1
 Feedback
1x1
1x1
1x1
1x1
 Sponsors
1x1
1x1

Post by 1bigmama (16) | (06/15/2008)
Profile |Contact
This is absolutely beautiful. However, I do have questions, are these annuals only?, can you do this with perninnals? what kind of potting soil did you use? can you do this with fragrant blooms? If I wanted to use this technique for my side and front porches, would I have to plant all the way around the pots? Again this is a wonderful idea, I would like to try this, especially being that I prefer container planting over ground planting. I don't like the whole weeding process, and I find that it is easier to water them in pots than in the ground garden.

Report Spam or Abuse


Post by Allison5 (13) | (06/14/2008)
Contact
Great ideas -- and I like the focus on the shade plants. I just found a helpful article on creating a compost pile -- great way to recycle, reuse and enhance your garden.

http://www.oldhouseweb.com/stories/Detailed/15053.shtml

Report Spam or Abuse


Post By Elaine (Guest Post) (06/14/2008)
Is it put together with threaded rod? I have seen ones that way but the pots do not line up as yours does. Could you explain how you got them to line up?

Report Spam or Abuse


Post By Artlady (Guest Post) (06/14/2008)
I've made these before. To keep them together, put drainage holes in the bottom, if there aren't any. You can then put a metal rod or a dowel down through the top two pots into the bottom pot. In the bottom pot, turn a small clay pot upside down and insert the dowel or rod into it. You can put a rubber grommett at each pot to keep it from sliding in and out. But, I didn't find this necessary. However, my cat did manage to turn the entire thing over!

Report Spam or Abuse


Post By Debbie (Guest Post) (06/14/2008)
Looks great. Another ideas its to use rebar or other "pole. Stick it in the ground and continue to add pots and tip them. To see this lovely effect just google tipsy pots. Really cute and different. I planted some myself this year.

Report Spam or Abuse


Post by mscolletti (1) | (06/14/2008)
Blog! |Contact
How did you get the pots to sit on each other? It's a beautiful arrangement of the plants. :)) Great idea. :)

Report Spam or Abuse


Post by melody_yesterday (406) | (06/13/2008)
Profile |Blog! |Contact
great space saving idea + it LOOKS GOOD !
In addition to that - the draining water would benifit the next level down !
WAY TO GO !

Report Spam or Abuse


Post by izzylea (1) | (06/13/2008)
Profile |Contact
Thank you for this great space-saving planter idea! It should work well on my apartment patio too! And, the low cost is a winning feature, to say the least!
:) Shayla (izzylea), Anaheim, CA

Report Spam or Abuse


Post by Persnickety Paula (381) | (06/12/2008)
Profile |Contact
I love it! What a wonderful idea for people that only have a small yard, or a patio, to decorate with. Thank you for sharing your cute idea.

Report Spam or Abuse


Post by rascal_50 (11) | (06/12/2008)
Contact
You are right, it does look amazing. What a clever idea. If you live where it freezes in winter, I wonder if the hostas will survive though.

Report Spam or Abuse


1x1

Post Feedback:
Login using the form on the top of the page to post feedback if you have registered with ThriftyFun. If you have not yet registered, click here. It's FREE!. If you are not registered you can post feedback as a guest below. Please don't use your email address for your name because spam robots can dredge it from our site. Please do not post your feedback more than ONCE. We need to approve all guest feedback and it may take from minutes to hours for that to happen.
(1x1 graphic )
Your Name

Subject

Feedback

text tool text tool text tool text tool

Image Upload: Add an image to your post! Click the "Browse" button below and select an image from your hard drive. Please only select gifs or jpegs. If you have any problems, just email the image to images@thriftyfun.com


If you want to post your email address for responses from readers, obscure it in some way like put spaces between the name and @ sign and service address with (remove spaces) behind it or name (at) server (dot) com . This is for your protection from those creepy Robots.

(1x1 graphic )

© 1997-2008 ThriftyFun.com - Design by Cumuli Design
Disclaimer: ThriftyFun.com cannot accept any responsibility for any injury or damage that you may cause to yourself, others, or property when following any advice given on this site. Read the full disclaimer. If you find any information on ThriftyFun.com or in our newsletters that is either erroneous and/or potentially harmful to others, please Contact Us, immediately.