It's March. Time to start your garden seedlings!
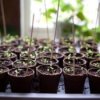
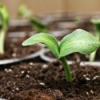
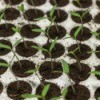
You know the clear egg cartons and the clear croissant or cookie containers with clear lids that you get at the grocery store? Don't throw them away! Buy seed starter discs and soak them in these containers. Drain off the water and add the seeds. Close the containers! Sit under a plant light. When your plants are tall enough, transplant outside
An economical way to start seedlings and completely reusable!
Source: My husband thought of it! :)
By Gooby from Straughn, IN
Add your voice! Click below to comment. ThriftyFun is powered by your wisdom!