Home |  Index |  Submit Request |  Share Photos |  Share Tips |  Active Topics |  New Feedback  |  Contact Us  |  Search
 User Login:  Username:    Password:      Forgot It?  | Register

 Popular Topics
 - Beauty
 - Budget and Finance
 - Christmas *
 - Cleaning
 - Consumer Advice
 - Craft Projects
 - Craft Tips
 - Food Tips
 - Garage Sales
 - Gardening
 - Gifts
 - Green Living
 - Home Improvement
 - Organizing
 - Parenting
 - Parties
 - Pest Control
 - Pets
 - Product Reviews
 - Recipes
 - Repair
 - Thanksgiving
 - Weddings for Less

More Topics

Google Search:

Web thriftyfun.com

About:
RSS Feed
About Us
Media
Advertising
Contact Us
Privacy Statement
Disclaimer

Craft Project: Origami LED Light Embellishments

By Stella Rivet
1x1
Date: 06/16/2008 Topics: Craft Projects > Garden & Yard | Gardening > Decoration  
1x1
1x1
Post Feedback! | Email Friend | Print | Get Responses | Bookmark | del.icio.us | Link | Rate: Thumbs Up Thumbs Down
Origami Light Embellishments/Covers
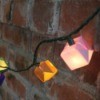
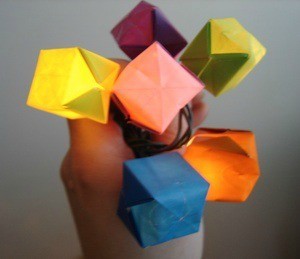
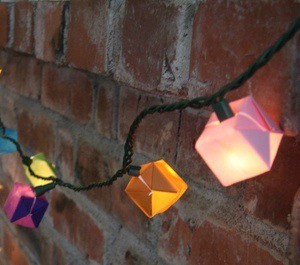
This is a great way to embellish your lights at anytime of the year. These do take some time but if you get the whole family working on them, they can make nice decorations for your summer parties. Because they are paper, keep them out of the rain.

Supplies:

  • 3" square Origami paper, or wrapping or other paper cut into 3" squares
  • White LED Christmas type lights (regular small lights could be used but the LEDs burn very cool and use very little electricity. If you use regular small Christmas lights, check to make sure they don't get too hot.)

Instructions:

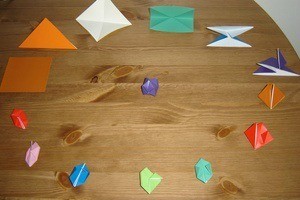
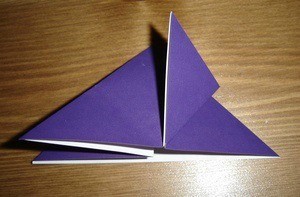
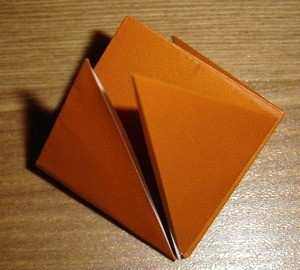
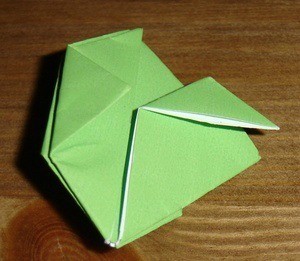
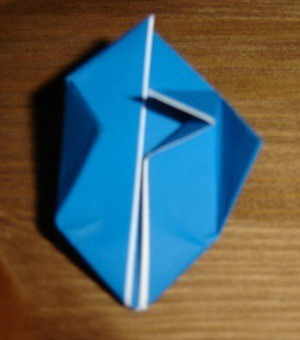
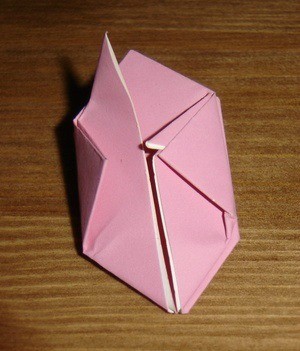
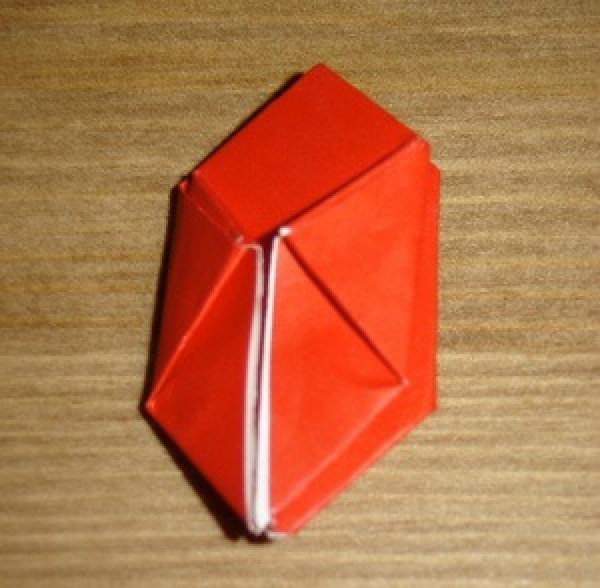
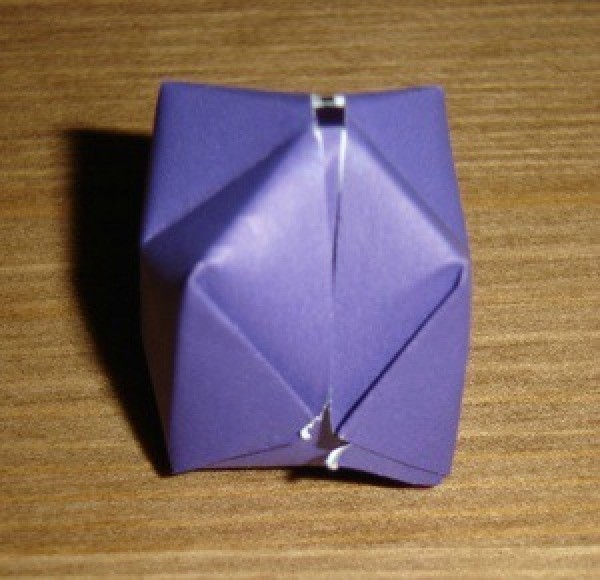
See the pictures for each step in folding your little box light cover.

Origami Light Covers

Step 1. Fold the square paper diagonally into a triangle with the color side of the paper on the outside.

Step 2. Unfold and fold diagonally the other direction with the color side of the paper on the outside again.

Step 3. Unfold and fold in half into a rectangle with the color side of the paper on the inside.

Step 4. Unfold and tuck the two ends inward inward toward each other along the folds you have already made.

Origami Light Covers

The remaining steps are hard to explain but the pictures will show you what you are supposed to do.

Step 5. Fold each flap up on an angle. Do both flaps on the front then flip the paper over and do both flaps on the back. The end result is a diamond.

Origami Light Cover Instructions

Step 6. This is the end result of step 5.

Origami Light Cover Instructions

Step 7. Align the diamond so the slit goes vertically up the front. Fold the two sides of the diamond in to the center slit. Flip the paper over and do the same to the back. The end result is a kind of hexagon.

Origami Light Cover Instructions

Step 8. Steps 8, 9, and 10 are best performed together. Do all three steps with one flap of the paper, then repeat with the other three flaps. First, unfold the flap which was folded in step 7 and instead fold the flap down as shown below.

Origami Light Cover Instructions

Step 9. Next, fold the end of this little flap back toward the center.

Origami Light Cover Instructions

Step 10. 
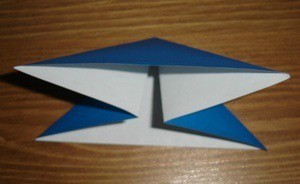
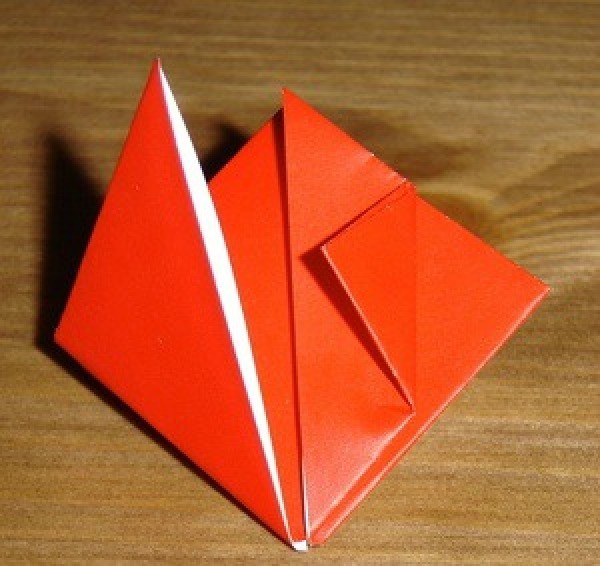
Finally, tuck the little flap you have made into the pocket formed by the flap created in Step 7. You can see how it looks with one flap tucked in below.

Origami Light Cover Instructions

Step 11. Repeat steps 8 through 10 on each of the three other parts of the paper.

Origami Light Cover Instructions

Step 12. You will see a little hole at one end of the paper. This is where you blow to inflate the box. Blow into the end of your box, inflating it and making it box-like. It sometimes helps to shape the box with your fingers a little to square up the corners.

Origami Light Cover Instructions

Step 13. Once you have your boxes, stick the end that you blew in over the light and make some more. Get the whole family involved to make a nice party string for your summer parties.

Origami Light Cover Instructions

Jump to Feedback | Post feedback
Related Links:
Previous: Pixie (Dachshund Mix?) ThriftyFun Next: Removing Black Mold From Grout
1x1
 Feedback
1x1
1x1
1x1
1x1
 Sponsors
1x1
1x1

Post by Karyn01 (54) | (06/22/2008)
Profile |Contact
This is a great idea. When I was a kid, we use to make water bombs this way. Once opened fill with water. Oh what fun we had.

Karyn

Report Spam or Abuse


Post by CalaLily (10) | (06/20/2008)
Contact
I have never done Origami in my life, but with these thorough and easy to follow instructions (w/pictures helped) I made my first box on the FIRST try! Thanks for this great decorative idea. Forth of July will have an added feature on our deck! Red, White and Blue lights. Thanks so much.

Report Spam or Abuse


Post by zballoongirl (35) | (06/16/2008)
Contact
Stella, these instructions and photos are just marvelouos! I learned how to make these cute little origami boxes way back in college, and you have made the entire process easy for anyone to understand. I never thought of using them in this way -- thanks for a very creative and useful idea!

Patty

Report Spam or Abuse


1x1

Post Feedback:
Login using the form on the top of the page to post feedback if you have registered with ThriftyFun. If you have not yet registered, click here. It's FREE!. If you are not registered you can post feedback as a guest below. Please don't use your email address for your name because spam robots can dredge it from our site. Please do not post your feedback more than ONCE. We need to approve all guest feedback and it may take from minutes to hours for that to happen.
(1x1 graphic )
Your Name

Subject

Feedback

text tool text tool text tool text tool

Image Upload: Add an image to your post! Click the "Browse" button below and select an image from your hard drive. Please only select gifs or jpegs. If you have any problems, just email the image to images@thriftyfun.com


If you want to post your email address for responses from readers, obscure it in some way like put spaces between the name and @ sign and service address with (remove spaces) behind it or name (at) server (dot) com . This is for your protection from those creepy Robots.

(1x1 graphic )

© 1997-2008ThriftyFun.com - Design by Cumuli Design
Disclaimer: ThriftyFun.com cannot accept any responsibility for any injury or damage that you may cause to yourself, others, or property when following any advice given on this site. Read the full disclaimer. If you find any information on ThriftyFun.com or in our newsletters that is either erroneous and/or potentially harmful to others, please Contact Us, immediately.