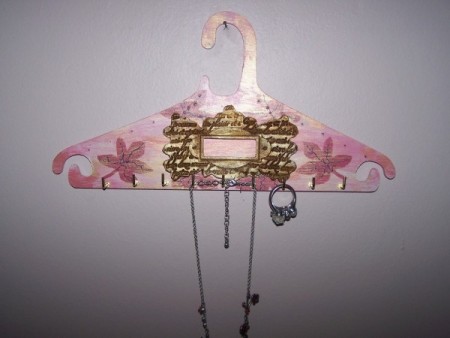
Use stenciling techniques and a resin embellishment to turn a wooden hanger into a jewelry hanger. It can also be a nice gift for a special family member.
Approximate Time: 1 hour
Supplies:
- a wooden hanger, cut from 1/8 inch plywood, available from a craft shop.
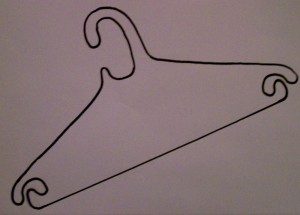
* I have included the outline of the hanger I used ~ if you are unable to find something similar, use the given outline to cut one from a piece of plywood and drill holes in the appropriate places.
- a resin embellishment ~ see http://www.charmedcardsandcrafts.co.uk/ for suitable embellishments for this project.
- acrylic paint in the following four colors: white, plum, old gold, and Sweet Memories (pink)
- a small craft sponge
- one old sheet of X-ray film
- utility knife (Stanley knife)
- Artline 210 Fineliner pen
- quick-drying spray varnish
- a 10/32 inch paint brush
- a fan-shaped paint brush
- fine sanding paper
- a dry cloth to dust the hanger with
- nine screw hooks
- small pink seed beads
- quick-drying glue
- old sheets of newspaper
Instructions:
- Sandpaper the hanger, back and front, thoroughly and dust well with a dry cloth.
- Using the 10/32 inch brush, start off by giving the whole hanger a base coat with the white paint. Work on a sheet of old newspaper to protect the working area. First paint the back of the hanger and let it dry thoroughly, before painting the front.
- Allow the paint to dry thoroughly.
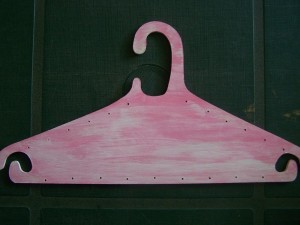
- Next, using the same paint brush, add a thin layer of Sweet Memories-colored acrylic paint over the white acrylic paint. Allow to dry thoroughly again.
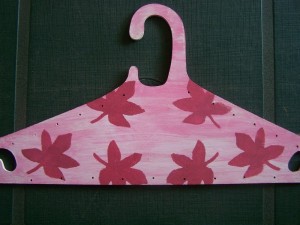
- Draw a picture of a leaf on the X-ray film, and use the utility knife to cut out the stencil.
- Place the stencil on the appropriate place. Hold the leaf stencil down with one hand while painting, so that it will not move while applying the paint.
- Use the sponge to "paint" the stencil with the plum paint. Dab the sponge into the paint, and remove the excess paint by dabbing it onto a sheet of newspaper first, before applying it to the stencil, so that the excess paint will not seep underneath the X-ray film.
- Carefully lift the stencil and move it to the next appropriate place. Continue until the front of the hanger has been covered with the stencilled leaf design.
- Allow the paint to dry thoroughly.
- Using the fan-shaped paint brush, give the back and front of the hanger a wash with the old gold-colored acrylic paint. Remember not to use too much paint when using a fan-shaped brush, as this will lose the fan-shaped effect. Remove excess paint by dabbing it onto a sheet of newspaper before starting to paint.

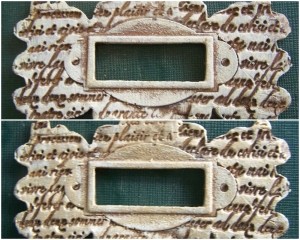
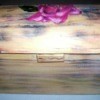
- Use the old gold paint to highlight some details on the resin embellishment and allow to dry thoroughly.
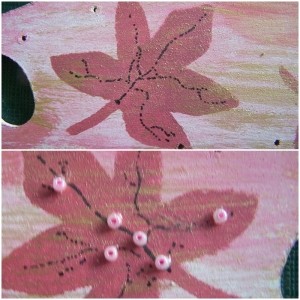
- With the Artliner 210 Fineliner pen, add some veins to the leaves. Add the finishing touches by gluing a few seed beads onto the leaves. Use tweezers to handle the seed beads more easily.
- Glue the resin embellishment in place on the front of the hanger.
- Allow the glue to dry thoroughly.
- To protect the paint from wear and tear, apply one coat of the quick-drying spray varnish. Remember not to hold the can too close to the hanger when spraying, and do not spray too much varnish, as this will cause the varnish to run.
- Allow to dry thoroughly.
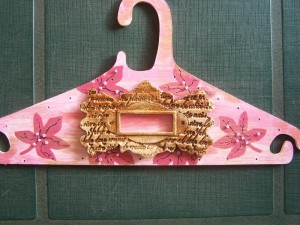
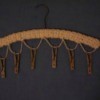
- Add the finishing touches by screwing in the nine hooks.
Photos included:
Photo 1: The outline of the hanger used for this project.
Photo 2: Add a thin layer of Sweet Memories-colored acrylic paint over the white acrylic paint.
Photo 3: Cover the front of the hanger with the stencilled leaf design.
Photo 4: Give the back and front of the hanger a wash with the old gold-colored acrylic paint.
Photo 5: Use the old gold paint to highlight some details on the resin embellishment and allow to dry thoroughly.
Photo 6: Add some veins and a few seed beads to the leaves.
Photo 7: Glue the resin embellishment in place on the front of the hanger.
Photo 8: Add the finishing touches by screwing in the nine hooks.
Photo 9: The completed hanger.
By Benetta from Pretoria, Gauteng