social

Inexpensive Stepping Stones


Gold Post Medal for All Time! 858 Posts

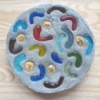
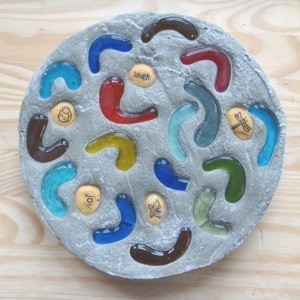
Stepping stones are an easy way to add functional creativity to your garden. Here's a simple and inexpensive way to make your own in just 10 easy steps.

Advertisement

Supplies:

  • Mold. This can be made out of anything that will hold cement: pizza boxes, disposable pie tins, cake pans, vinyl pot saucers, plastic take-out containers, etc.)

  • Non-stick agent. This will "grease" your mold so the finished stone releases easily from the mold. You can use Vaseline, cooking spray, or plastic wrap.

  • Quickrete (or other fast-setting concrete). If you want to add embellishments, choose a product with a sandy texture for a smoother finish.

  • A bucket, stir stick, and large spoon. A one gallon ice cream pail is large enough to hold cement for one mold the size of a pie tin.

  • Chicken wire or hardcloth. This will give the finished stone extra strength. Cut a piece to fit your mold before you mix up the concrete.

  • Embellishments. Use your imagination here!

Directions:

  1. Gather supplies.

  2. Protect your work surface. It's helpful to use a piece of plywood or another movable surface for your work surface so you can move them to another location for curing. Then cover it with an old tarp, vinyl table cloth, or lawn-sized trash bags.
    Advertisement

  3. "Grease" your mold. Cover your mold with a heavy coating of cooking spray, Vaseline, or line the bottom of the mold with plastic wrap. This will help your stone release easily from the mold. Pizza boxes, plastic saucers, and pie tins generally don't need to be sprayed. Simply peel the sides of the mold away from the stone after it sets.

  4. Mix up the concrete. Follow the directions according to the product's package. If necessary, add in more mix or water until the mix reaches the consistency of thick brownie batter. Take care to protect yourself with eyewear, gloves, and a face mask. Concrete dust can be hazardous when inhaled, and once mixed, cement can cause severe burns upon contact with your skin.

  5. Scoop half of concrete mixture into the mold. Level out the surface by gently tapping it on your work surface.

  6. Add chicken wire. Press the edges down so that no sharp ends are sticking up.
    Advertisement

  7. Scoop remaining concrete into mold.

  8. Tap the mold gently (several times) on a hard, flat surface. This will level the surface and help release any air bubbles that might be trapped.

  9. Add embellishments. Press them gently into the surface. Use stones, tiles, stained glass, leaves, pine cones, pot shards, scrapbooking embellishments, or whatever captures your imagination. Letters and numbers made specifically for stamping imprints into stepping stones can be found at most large craft stores. Cookie cutters are also great for stamping and making imprints.

  10. Let it cure. Leave your stone to dry for 2-3 days before attempting to remove it from the mold. Plan to let it cure for at least another week before taking it outdoors and walking on it. As the stone continues to harden, mist it with water once or twice a day and keep it covered with plastic wrap. This will prevent it from drying too quickly and give it added strength.
Advertisement

Additional Hints:

  • Mix up only enough concrete to make one mold at a time.

  • Grease your mold, cut your chicken wire to size, and lay out your embellishments BEFORE mixing up the cement. Depending on what cement product you use, once it's mixed it usually sets up within a matter minutes.

  • DON'T wash cement products down the sink! To save your bucket to reuse, wipe it out with moist paper towels and throw them in the garbage.

  • Change the final color of the stone by adding acrylic or latex paint or cement dye to the mix. Stones decorated with paint after they cure should be sealed before being placed outdoors.

  • Place stepping stones in the ground so that no more than 1/2 to 3/4 inch of the stone breaks the surface of the ground. This will protect the stone from cracking while being walked on and help people avoid tripping.

A homemade stepping stone with glass pieces and rocks placed in the cement.
 
Advertisement

About The Author: Ellen Brown is an environmental writer and photographer and the owner of Sustainable Media, an environmental media company that specializes in helping businesses and organizations promote eco-friendly products and services.

Add your voice! Click below to comment. ThriftyFun is powered by your wisdom!


Bronze Feedback Medal for All Time! 231 Feedbacks
February 16, 20110 found this helpful

Great ideas...and much better than the kits you buy which have some questionable ingredients that might not be too healthy for kids to work with.

 
February 23, 20110 found this helpful

I like this so much that I am going to share with a friend of mine who has a ten year old and is always searching for party ideas. This is great! I loved the "in ten easy steps"!


Bronze Post Medal for All Time! 169 Posts
February 24, 20110 found this helpful

This might be a good project for some of my old buttons which I know in my heart I'll never use.

 
February 25, 20110 found this helpful

You can also use colored bottle caps as the design of the flower center and at the Dollar Store get the colored stones that are the "petals".

 
February 27, 20110 found this helpful

I am getting the spring bug here in Missouri, there's still snow out there! I actually have been thinking about doing this for the flower/fish pond area, I just wasn't sure how to.

Advertisement

Thank you so much for this article, it is very helpful. I guess I had the right idea, there was just some details I never thought about.

 
February 27, 20110 found this helpful

Great creative, affordable, and potentially beautiful environmentally-friendly yard enhancement craft idea. Cannot wait to try this to add beauty to my yard and lawn. Thanks!

 
September 23, 20142 found this helpful

There is a much easier way to do that. Get a bag of ordinary ready-mix concrete and some chicken mesh.
Peel the lawn where you want a step, round, heart shaped, like a Sasquatch imprint, whatever, and hammer it nice and hard. Pour some ready mix into the hole. Use a planter trowel or mini shovel to mix it with some water, poke the chickenmesh down below the surface, agitate the mess a bit and smooth it.

If you want, you can add marble or brick planter topping, and pat it in.
After an hour or two use a brush or broom and a bit of water to clean the topping, or to add a bit of texture to the concrete. Shield it from the sun with cardboard or scrap wood for a day or two.
That's all there is to it.
Have FUN!
DearWebby

 
September 29, 20141 found this helpful

Thank you for this idea. I'm going to be doing stepping stones soon and I wasn't thrilled with having to buy the silicone molds. Now I know I can use pizza boxes! We eat pizza all the time and I'll be saving these boxes from now on. Thank you, thank you, thank you!

 
February 17, 20190 found this helpful

Your idea is great. It actually gave me an idea to "repair" my brick walkway. It would cost a fortune to re-do it by brick work so I will use your idea and put in the odd cement brick which I will make myself. I'll use your ideas about inserting special things to add to the uniqueness of the project. Thanks for helping me solve a very expensive problem. Much appreciated!

 
February 17, 20190 found this helpful

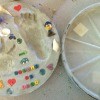
Can you use your puppy's paw print in this cement mixture? Assuming you can as long as you wash off his paw thoroughly. As he ages, I want to continue to make them as his paw gets bigger. I think it would make a great stepping stone display. Whatcha think? Anybody......

 
April 21, 20200 found this helpful

I have a mold that has some grooves in it, my thought was putting some small colorful rocks(ones they use in fishtanks) then pouring the concrete over it. Everything I see is putting the decorations on the top. Any thoughts?


Silver Post Medal for All Time! 267 Posts
April 21, 20200 found this helpful

I think that should be fine, as long as you are planning on flipping over the stone when you display it. Do let us know how it turns out.


Add your voice! Click below to comment. ThriftyFun is powered by your wisdom!

 
In This Page
Categories
Crafts Garden & Yard DecorationsFebruary 23, 2011
Pages
More
🍀
St. Patrick's Ideas!
🎂
Birthday Ideas!
💘
Valentine's Ideas!
Facebook
Pinterest
YouTube
Instagram
Categories
Better LivingBudget & FinanceBusiness and LegalComputersConsumer AdviceCoronavirusCraftsEducationEntertainmentFood and RecipesHealth & BeautyHolidays and PartiesHome and GardenMake Your OwnOrganizingParentingPetsPhotosTravel and RecreationWeddings
Published by ThriftyFun.
Desktop Page | View Mobile
Disclaimer | Privacy Policy | Contact Us
Generated 2024-02-05 14:56:15 in 3 secs. ⛅️️
© 1997-2024 by Cumuli, Inc. All Rights Reserved.
https://www.thriftyfun.com/Inexpensive-Stepping-Stones-1.html