 Making your own vermicomposting tub is fun and easy. It reduces waste that would otherwise go to the landfills. It is also very educational for both children and adults alike. You can make a worm compost bin out of a plastic moving tub, so why not start one today!
Supplies:
- plastic storage tub
- peat moss
- shredded paper and cardboard
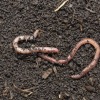
- red wiggler worms
Steps:
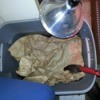
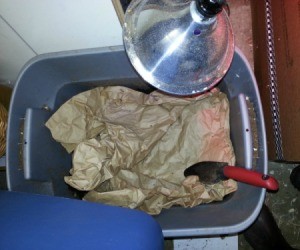
- In a bucket combine shredded paper and cardboard with just enough water that when you squeeze a handful, a few drops of water come out (not a stream of water). Mix well.
- Fill the tub with about one foot of peat moss and the moistened paper/cardboard mixture. You can also use most plastic storage bins. If you are using red wigglers (which are the best for composting) you want the container at least a foot deep. The red wigglers don't go very deep into the soil.
- After you have your composter at the right moisture level, add your worms. You will want a piece of burlap, newspaper, or cardboard to place right on the surface of the dirt. This helps keep it dark for your worms.
- Add food scraps in around the sides or on one side only. This helps prevent hurting the worms if the soil becomes too acidic. Add food scraps then cover them with some dirt. This keeps down on smell and on hatching any other insects, like fruit flies. Add your first batch of scraps and then wait a week or two to see how fast the worms are breaking it down. If it's well on its way to being dirt or eaten up then add more!
- It's best to keep the bin in a place where the worms are not too hot or cold. It's also good to have a light on over the bin to make sure the worms settle in without trying to get out.
- Once you notice the material in your bin is mostly black and full of rich looking black soil it's time to move the worms. This is a bit of a process depending on the size of the compost bin. Most people dump the compost onto a tarp then pick the worms out and place them back into the tub, once it has been refilled with new peat moss and paper. You can move worm eggs, however that would be pretty tedious. With this method you may lose some worms and worm eggs, but when your worms are happy they breed like crazy!
- Put the worm compost into an open bucket or bin for storage. The worm castings are concentrated stuff and should be thought of as fertilizer, less is more! It can be made into compost tea. Worm castings can be added sparingly to your plants trees and garden.
- Acceptable food for composting:
- veggies
- fruits, including pits (avoid citrus, too acidic)
- paper
- cardboard
- junk mail (avoid high gloss papers and remove plastic windows from envelopes)
- newspaper
- toilet paper and paper towel tubes
- most cardboard packaging
Add your voice! Click below to comment. ThriftyFun is powered by your wisdom!

likekinds
Gold Post Medal for All Time! 523 Posts April 10, 20140 found this helpful
Great article. I'm sold. I'm going to give this a try, this summer.
Add your voice! Click below to comment. ThriftyFun is powered by your wisdom!