lalala...
Gold Post Medal for All Time! 899 Posts 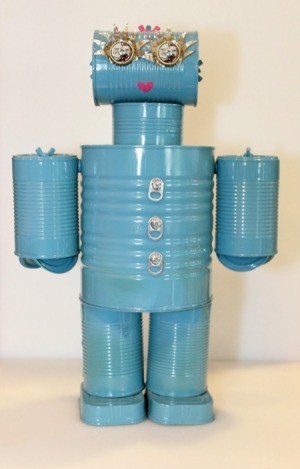 A great way to reuse tin cans is to make a tin can robot! This particular robot took a few hours to put together. I will give step by step instructions for how I put this together, but no robot needs to be alike! Hopefully this project will give you a starting point to make your own, unique tin can robot.
Total Time: 2 to 3 hours
Yield: 1
Supplies:
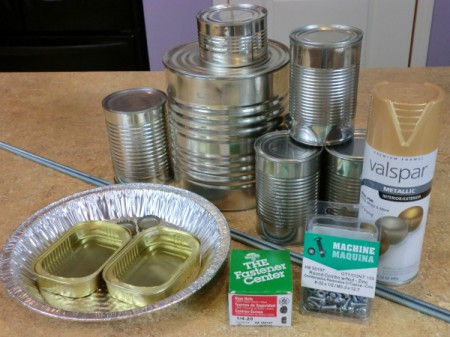
- 1 large tin can (the body)
- 4 small tin cans (arms and legs)
- 2 sardine cans (the feet)
- 1 medium sized can (the head)
- 1 squat tin can (the neck)
- 1 aluminum pie tin
- 7 wing nuts
- lock nuts or nuts and split lock washers
- 6 ft threaded rods
Imported: Make sure that as you are collecting your cans that you are using "smooth edge" can opener. It allows you to use all the lids that you collect as well as the cans!
Steps:
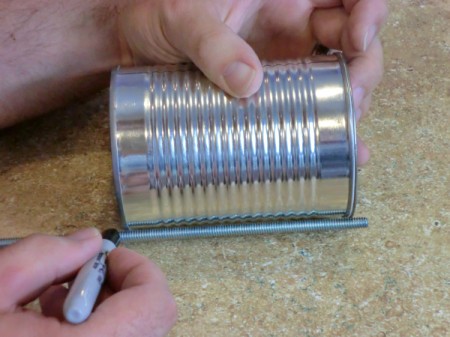
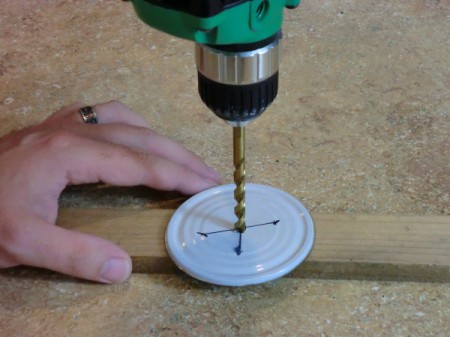
- I started by assembling the head. I drilled holes in the center of the detached can lid and the bottom of the can.
- I then measured a length of threaded rod that would allow me to put nuts on either side. This holds the head together.

- I used a hacksaw to cut the threaded rod. Unfortunately, the side that I cut would often get marred to the point that I couldn't attach a nut and I can to spin the nut from the uncut side. This makes it preferable to buy smaller threaded rods, so that you don't have a lot of waste. You can also put a tin can robot together with heavy gauge wire!
- Assemble the head with lock nuts or nuts and split lock washers.
- Assemble the body by drilling a hole in the top of the can for the head and sides to attach the arms. You will want to set the arm holes a little towards the front of your robot. This will ensure that your threaded rod for the body and head doesn't interfere with the threaded rod for the body. Also, having the arms set forward a bit works fine with the balance of the robot, since the feet extend forward a bit. Be careful drilling holes in the side of the can. It's easy to bend the can and the bit slips easily. Use a nail to pre-punch the hole to keep your bit from slipping.
- Now you figure out the placement of your legs. Leave enough room between the legs so you can fit the nut to hold the body together.
- I used Sharpie to mark up my materials because I eventually will be painting the robot.
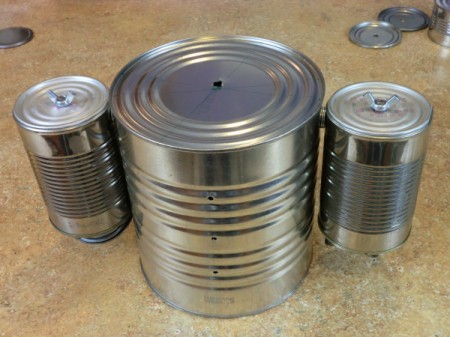
- Drill holes in the center of the top and bottom of 4 cans to form the legs and arms. Then take two of those cans and drill holes through the side, near the top of the can. These holes will be used to attach the arms. Also, measure and drill a hole in each sardine can, which will become the feet. If you want the body parts to be different colors, paint them before you assemble the robot.
- Measure a rod wide enough to go through the body and both arms to attach the arms. Put a couple washers between the body and the arms so they can move freely. Then bend two lids to become the hands. When attaching nuts to the inside of cans I used a lock nuts, on the outside I used wing nuts, which look cool.
- The body is done!
- The lid of the large can will be used to attach the legs. Measure two rods long enough to attach both the legs and feet.
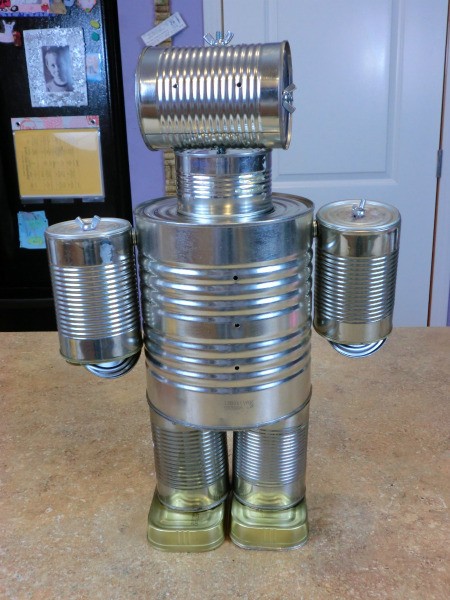
- I then used a long rod that extended all the way from the head to the bottom of the large can (the body) using two wing nuts. It holds everything together.
- Here are the legs ready for assembly!
- Now, thread the legs through the rod.
- Using a pie pan, cut two bottoms out for you feet. Then attach the feet using a wing nut. Then you can glue the bottom on the feet.
- It's alive! This is the point where my wife saw how cool it looked and decided she was going to paint it.
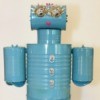
- She ended up painting it a solid color. If you want two different body parts to be different colors, paint the cans before assembly. We used bottle caps for eyes and foil for eyelashes. My once manly robot has become a girl.
- But, she's cute! We added some pop tabs to the front, the possibilities are endless.
Add your voice! Click below to comment. ThriftyFun is powered by your wisdom!
Ginnee
Bronze Feedback Medal for All Time! 135 Feedbacks June 11, 20141 found this helpful
What a cutie, she looks like Rosie, the Jetson's maid. You do great work!
July 28, 20141 found this helpful
I love this one. Had made something not so elegant which was a pattern for the Wizard of Oz "Tin Man" which I gave to my son in Florida. It was a real fun project, but yours it absolutely fantastic.
January 28, 20151 found this helpful
Could I get to directions to make a taller say 5-6 foot tin man?
Anonymous
April 13, 20200 found this helpful
I'am making the Dallas Cowboy having alots of fun .
August 14, 20200 found this helpful
can you please take a picture so you can share it to see how it looks.
Jess
Silver Post Medal for All Time! 267 Posts August 14, 20200 found this helpful
Unfortunately, this person did not become a member and posted anonymously. They won't see your message.
May 23, 20200 found this helpful
I thank you for the great ldea,and instruction..
Add your voice! Click below to comment. ThriftyFun is powered by your wisdom!