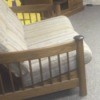
Directions for HAND Stripping.
Work with plenty of ventilation, safety goggles or glases, and skin protection. Stay out of the direct sun and stay protected from wind or strong drafts if working outside.
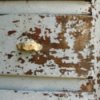
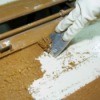
Work in small areas starting at the top and working to the bottom of the piece. Apply a generous coat of gel remover. Brush on in one direction. Do not brush back and forth.
Use soft wood scrapers and/or Steel Wool to remove crinkled finish and spent stripper.Repeat the above process until all layers of old finish are gone. On fine work, when the piece has all the finish gone and looks ready to refinish, go over it again with one last coat of stripper carefully working from top to bottom and removing stripper with Liberon #00 steel wool to ensure all traces of finish are lifted from the pores of the wood. Neutralize the wood surface by washing the piece down with Naphtha followed by Lacquer Thinner, if the piece is newer and in very good condition, a washdown with Lacquer Thinner may suffice.
Let the stripped piece dry thoroughly for at least 24 hours to 48 hours for softer woods or pieces that required long soaking to clean off all the finish. Refinish promptly to seal and protect from humidity changes and environmental contamination.
HINTS & TIPS:
Test to see if a through cleaning with Liberon's Wood Cleaner & Wax remover might eliminate the need to totally strip and refinish the piece.
Use the right stripper for the finish being removed. (Determine finish type with solvents.)
Use solvent washable strippers or paint removers.
Avoid water washable removers to minimize grain raising, staining problems, and softening of glues or adhesives and the subsequent lifting of veneers and loosening of joinery.
Avoid Metal Scrapers of any kind, wood fibers softened from the remover are easily compressed by hard metal edges. These sometimes apparently invisible `indents' can later show up after staining or even under clear coat finishes.
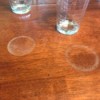
DO NOT Sand a stripped surface. Sanding removes oxidized fibres, the natural distressing wear and ageing collectors refer to as patina. Upon refinishing uneven and splotchy effects result from the `windows' sanded into the surface. Often sanded areas of stripped wood will not take stain or finish the same as the unsanded part of the same piece. Therefore, for instance, sanding of a table leaf usually means sanding the entire top and remaining leaves. The surface was carefully prepared for the previous finish. Successful refinishing will be much easier if we disturb the wood the very least possible, in the finish removal process. If an area is badly damaged as to require sanding; proceed with care and be aware of the increased finish work that can be created by sanding.
Lightly raised grain can in some cases be stained, sealed with sanding sealer, and then sanded instead of sanding on the bare wood.
Partially strip (on Lacquers): On some pieces a top for instance might be all that really needs to be stripped and totally refinished. Proper cleaning and touch-up of dings, dents, and blemishes on sides or underpinnings with an overfinish of the existing finish might give a very professional result. In the right instance this can be a more profitable for the finisher and offer an affordable option for the customer.
Use wax paper laid over the remover to slow evaporation and prolong working time. On difficult finishes and in drafty work areas each application of remover can then do more work.
To lift paint or finish retained in the grain of open pored timber, despite repeated applications of remover, try the following. Let the surface dry for a day, apply a liberal coat of 1 pound cut shellac & and allow to dry throughly then try a coat of remover to lift the shellac and the adhered finish out of the pores. The wax paper trick above helps here also. On hard cases repeat the shellac and remover steps above if positive results come from the first application.
Refinishing
Stripped surfaces are always a little more problematic than finishing on new wood. Generally Pigment Wiping Stains are the best choice for coloring on the stripped surface. Lacquer shading stains and lacquer colorants blended into sanding sealer and build coats are a good bet for color correcting. Use amber lacquer on medium to darker woods or stains to give a richer and homogeneous continuity to the piece. On very light timber and on light colors use water -white lacquer or for the very clearest non-yellowing finish use CAB-Acrylic lacquer.
IMPORTANT:
PROTECT EYES and SKIN.
Always test products in an inconspicuous place to check compatibility and end results.
Companion Materials & Supplies:
Safety Glasses or face shield for eye protection.
Heavy duty rubber stripping gloves.
Apron; preferably rubber or rubber coated.
WOODEN scrapers (NOT putty knives or metal scrapers)
Stripping BRUSH: stripper resistant plastic for getting into carvings and mouldig.
STEEL WOOL:
#0 or #1 for light clear finishes, #1 or #2 for paints, &
#3 or #4 for very heavy built up layers of finish.
Rags.
PRECAUTION:
Do not leave impregnated rags wadded or stacked in bundles as these can burst into spontaneous fire.
Dispose of rags and waste in accordance with local regulations; or lay rags out flat preferably outside, to dry so as to avoid any fire hazard.