
About The Author: Stella recently graduated from college and enjoys contributing craft ideas to ThriftyFun.com. If you have any craft ideas that you would like to share with Stella and ThriftyFun community, please submit them here.
Add your voice! Click below to comment. ThriftyFun is powered by your wisdom!
WOW that was a great idea ,cant wait to try this....thank you so much
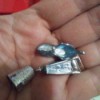
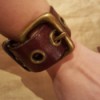
I love the Monopoly Money Belt, it is so cute and it is a way to recycle a thriftstore belt and old Monopoly Money. I LOVE IT.
Zig

WOW! Where do these ideas come from? I am just
glad you shared with us. This is a great gift idea
and for myself too.
Thank You.
I just had to check it out as my sons always loved to play momopoly they have good momories of when they were younger and we played an had popcorn served in a big plastic purple bowl which finally went to plastic heaven kids are funny the way they remember things of when they were young any way sorry about that your belt is fantastic great job.
This is just too cool !
Reminds me of the juice pouch purses that have been popping up all over my town.
I wish I had the imagination to think of something like this to sell, and make money at flea markets with.
can someone tell me how you get your sewing machine to sew this vinlye to work on your machine
Yeah...thats REALLY cool...thats totally something im gonna have to try!!!
that belt is really cute can't wait and try it but it will be a while cause i am a beginer
sweet
Nice idea, truly I would have never thought of using Monopoly Money in the design of a belt.
Why do you have to use a belt? Why can't you just buy a belt buckle that is big enough? they sell those at craft stores.
Editor's Note: You could do either.
Where do you go to get medium weight vinyl??
You can buy vinyl at fabric stores (10 oz.or lighter) or use an old clear vinyl table cloth. If the sewing machine sticks to the vinyl while you are sewing try to LIGHTLY oil the vinyl.
Add your voice! Click below to comment. ThriftyFun is powered by your wisdom!