ThriftyFun Logo
Home   Find   Ask   Share   Answer   Join   Index   Login  
 
 User Login:  Username:    Password:      Forgot It?  | Join ThriftyFun!

 - Beauty
 - Budget and Finance
 - Cleaning
 - Consumer Advice
 - Craft Projects
 - Craft Tips
 - Food Tips
 - Garage Sales
 - Gardening
 - Gifts
 - Green Living
 - Home Improvement
 - Organizing
 - Parenting
 - Parties
 - Pest Control
 - Pets
 - Product Reviews
 - Recipes
 - Repair
 - Weddings for Less

RSS Feed
About Us
Media
Advertising
Contact Us
Privacy Statement
Disclaimer

How to Make a Tiny Bow

1x1
Date: 04/11/2007 Topics: Craft Tips > Advice | Photos > Crafts  
1x1
Post Feedback | Get Responses | Bookmark | Link | Print | Print (With Feedback) | Rate: Thumbs Up Thumbs Down | Bookmark and Share
How to Make a Tiny Bow
Sometimes the little things are the hardest. Years ago, when I needed a tiny ribbon bow to decorate a package or an article of clothing, I struggled for hours trying to get it right. I must have wasted entire bolts of ribbon! Then I learned to do it the easy way.

Approximate time needed: Five minutes.

Materials:

  • Nine inches of double-face satin ribbon or narrow lace

Equipment:

  • Scissors

Instructions:

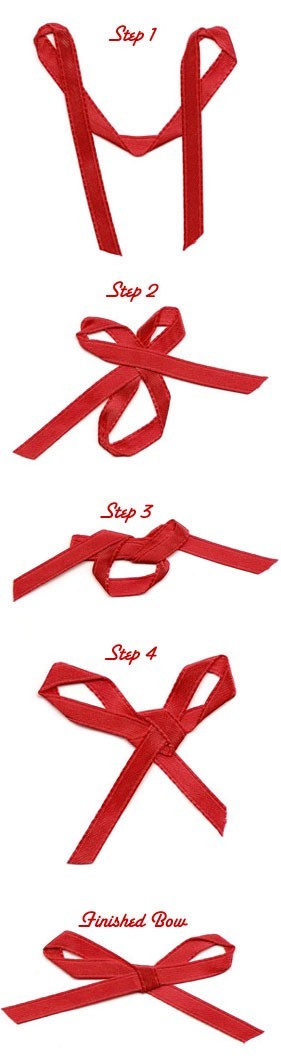
This little wee bow is delightful to adorn the front of a simple cami or little girl's T-shirt. Glue it onto a place card for your next holiday meal, or on the front of a handmade greeting card. You can even sew it onto a teddy bear's sweater or a doll's hat. Once you master the technique, you'll find yourself using it in lots of new ways.

The only material needed to make this simple bow is nine inches of double-face satin ribbon. To discourage fraying, cut the ends at an angle with a sharp pair of scissors.

To make the bow, start by thinking. That's right, thinking. Remember when you learned to tie your shoes? The first step was to cross the two laces, and then pass one underneath the other. This is called a half knot, and it's also the basis for the tiny bow. You can even practice by holding each end of the ribbon between your thumb and forefinger, crossing both ends, and passing one under the other. Just don't pull the ends too tight.

Now untie it, and we'll try the "real thing."

In this version of the half knot, you will cross two loops instead of two ends of ribbon. Instead of holding the two ends of the ribbon, gently fold back about three inches at each end, and hold one of these loops of ribbon in each hand. The middle of the ribbon will be hanging loose between your hands.

Now cross the two loops and pass one loop under the other. Carefully pull it tight, making sure the two ends don't come through. Once you pull it tight, you will have a tiny bow.

Trim the ends even, at an angle, and it's done. If you're sewing the bow on, be sure to catch all the layers of ribbon with the thread, so it doesn't come untied when it's washed.

You can make the bow with quarter-inch or eighth-inch ribbon, or with narrow lace. Try using different materials for different looks. While you're at it, you might try tying some heartstrings. What a great project that would be!

By Patty Zion from Pennsylvania

(1x1 graphic )
Previous: Lighted Floral Arrangement in a Miniature Wooden Wagon ThriftyFun Next: Menu Foods Adds to Recall List
(1x1 graphic )
1x1
1x1
 Feedback
1x1
1x1
1x1

By Jenn (Guest Post)
Nice job with this bow! I just love making bows because they are so much fun and so easy to do! I learned how to make my bows at http://www.LearnHowToMakeBows.com

Posted on 02/26/2009 | Report Spam or Abuse

By brittany (Guest Post)
Thank you! I needed a simple technique for bow ties, I'm going to use them in multiple decor projects in my 100% DIY wedding :-) These are just perfect!

Posted on 10/07/2008 | Report Spam or Abuse

By janette (Guest Post)
Thank you for the good instructions for making the simplest bow. It was easy to follow. Thank you.

Posted on 05/31/2008 | Report Spam or Abuse

By Harmonie (Guest Post)
I learned how to make bows from www.sweetbabybowtique.com They show how to make SO MANY different kinds....really fun!

Posted on 01/12/2008 | Report Spam or Abuse

By Holly (Guest Post)
I have been doing this for years with my kindergarten class.

Posted on 04/15/2007 | Report Spam or Abuse

By Dianne (Guest Post)
Thank you for these instructions. I never would have thought of this method but it works perfectly.

Posted on 04/11/2007 | Report Spam or Abuse

1x1
1x1
 Post Feedback:
1x1
1x1
1x1

Login using the form on the top of the page to post feedback (if you are a registered user). If you have not yet registered, click here to do so. It's FREE!.

1x1
(1x1 graphic )

© 1997-2009 ThriftyFun.com - Design by Cumuli Design
Disclaimer: ThriftyFun.com cannot accept any responsibility for any injury or damage that you may cause to yourself, others, or property when following any advice given on this site. Read the full disclaimer. If you find any information on ThriftyFun.com or in our newsletters that is either erroneous and/or potentially harmful to others, please Contact Us, immediately.