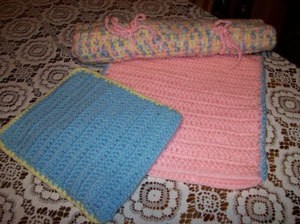
Traveling with a baby means an extra bag to tote. If that bag is not organized, changing baby can be quite a challenge. I have designed three original pieces to go into your diaper bag. They are lightweight and can come in quite handy.
First, I designed a pad to lay your baby on for changing his/her diaper. A double layer of double crochet crocheted together to make a comfy and clean spot to do the change and rolls up to fit in your diaper bag. Made bigger, this would make a great pad to lay on the ground for baby to take a nap on in a park or anywhere you would like to use it. It could be tied to the outside of your diaper bag.
Second, I crocheted two sizes of bags to carry wet wipes and clean clothes or wet clothes, whichever the case may be. They are waterproof because the bags are lined with Ziploc bags. You could make several of these to carry anything that might leak in your diaper bag also.
I made these very basic and purposely did not decorate them because I really could not decide which design I wanted to use and wanted to get these directions out to you all as soon as possible. But here are some ideas I am toying with: crocheted hearts that would be put on before the bag was sewn together or butterflies or stars or just big circles. These are machine washable, but I would not put the bags in the dryer as, if you have a hot dryer, the bags could melt. These also would make a wonderful and unique baby shower gifts.
With Main Color: Ch 52 in third chain from hook DC in each stitch across. Turn. 50 DC. Ch 2 and DC in each stitch across. Continue in pattern for another 26 rows, making 27 rows total. Fasten off and work in ends.
With Contrasting Color: Ch 52 in third chain from hook Dc in each stitch across. Turn. 50 DC. Ch 2 and Dc in each stitch across. Continue in pattern for another 26 rows, making 27 rows total. Fasten off and work in ends.
With Contrasting Color and holding both pieces together, slip stitch both pieces together. Fasten off and work in ends.
With contrasting color: Make 2 Chain 52. Fasten off and work in ends. Holding piece in front of you with inside facing; pull tie through the slip knot edge 4 and a half inches from each end until you have the tie half way through. Now tie and knot ties in place. You want to tie this so that you have two ties per like a sleeping bag. Roll up and tie.
Make two. With Main color: Chain 44 and DC in third chain from hook. 42 DC. Chain 2 turn. DC in each stitch across. Continue in pattern for 22 rows, 23 rows total. Fasten off and work in ends.
With contrasting color: slip stitch pieces together. Fasten off and work in ends.
Slide quart size Ziploc bag inside of crocheted sleeve. With white thread and sharp needle, tack the bottom to corners. Once you have them secure, tack again on each side right under the Ziploc track and in the center of the front and back. You will do the front and back with the bag open so you don't sew it shut.
Make two. With Main color: Chain 29. In third chain from hook DC and in each stitch across. Chain 2 turn. DC in each stitch across Ch 2 turn. Continue in pattern for 15 rows for a total of 17 rows. Fasten off and work in ends.
With contrasting color: slip stitch pieces together. Fasten off and work in ends.
Slide quart size Ziploc bag inside of crocheted sleeve. With white thread and sharp needle, tack the bottom to corners. Once you have them secure, tack again on each side right under the Ziploc track and in the center of the front and back. You will do the front and back with the bag open so you don't sew it shut.
About The Author: Debra Frick is a mother of 5 and a grandmother to 7 grandsons. She is a published author and poetress. Born in California, she now lives in Colorado Springs with her husband and many pets. Her hobbies include crocheting, reading, arts and crafts and bargain hunting.
Add your voice! Click below to comment. ThriftyFun is powered by your wisdom!
Another wonderful and useful crocheting project. Thanks for sharing this!
Love the idea of lining the items with plastic ziplock bags. Heavy Duty Freezer Bags may last a bit longer. I also like the idea that they are sewn in with a bit of tacking.
Add your voice! Click below to comment. ThriftyFun is powered by your wisdom!