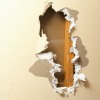
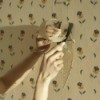
After removing wood paneling that had been glued on over an unfinished drywall, I noticed that the drywall paper had been torn away in several spots. The exposed gypsum is smooth and intact. Can I tape over these areas or should the drywall be replaced?
By Chris Marvin from Felton, CA
Add your voice! Click below to answer. ThriftyFun is powered by your wisdom!
Here's an answer from my carpenter of 20 years husband: "If you are going to paint it, you could tape over it, but if it's no big deal, I'd replace it, because you'll get a smoother finish."
You can spatula on a thin layer of drywall mud and then once completely dry lightly sand with fine sand paper wrapped around a wood block to even out. There will be mud dust doing this but all you have to do is cover up furniture, etc. and be sure to have the doors closed to other rooms. I've done this a couple of times in doing such minor drywall repairs and it works well. If you use drywall tape you're going to have to mud anyway (and actually have to use more mud) so why not save a step? ;-) Also, it's quite alot more expensive and time consuming to replace the drywall, tape all the seams, mud and then sand twice because you have to use more mud (sometimes dry, sand, apply a second coat, dry again and sand again) on taped seams.
P.S. Always wear a doctor's type mask when sanding so the dust doesn't get in your lungs.
Add your voice! Click below to answer. ThriftyFun is powered by your wisdom!
I live in a double wide mobile home. The walls are sheetrock that was made with vinyl wallpaper already on it. The dog tore up a small portion, the vinyl come off and left just the drywall paper. Can I mud that portion of the wall, sand, smooth, and then paint the whole thing? Will the mud adhere to the paper of the sheetrock OK?
By Sheryl from OK
I wouldn't count on anything sticking to vinyl. You might try using your hair dryer near the area where the dog tore off the vinyl and see if it softens the glue holding the vinyl. Then you could remove the vinyl and then patch any areas as you were suggesting, with sanding, etc. and then paint. (03/22/2010)
By PENNY K
You have the right idea, mud will stick to sheet rock. Good luck. (03/22/2010)
If nothing else works, you can just buy another panel; who cares if it doesn't match, since you plan on painting them anyway. Yes, they are paintable. They shouldn't be too difficult to replace. They are the same size, simply remove the old one, nail the new panel up, and replace the trim to hide the nail holes, then paint. (03/23/2010)
By susan
When you tear the paper on the sheet rock you have to fill in that hole left from the missing paper. First remove all loose paper. You will want to sand the edges of the paper off before filling the hole with sheet rock mud, sand until smooth so you cannot feel any edges of the paper. Prime and paint your wall.
I have my doubts that the mud will stick to the vinyl; it needs an absorbent surface. If you want to mud over the vinyl you are going to have to rough it up to remove the plastic coating. Rather than mud over vinyl I would suggest you cut out the damaged panel and replace it instead of trying to repair it if you can, since it has the vinyl covering. Just my opinion without seeing it in person. Good luck. (03/23/2010)
By Ann Winberg
You need to seal the vinyl wall covering before any thing will stick to it. Use a product like Kilz white shellac. After the wall has dried patch any damage that may exist.
Do not try to sand the vinyl. That will not work. The sealer is a satisfactory base for painting. After any needed repairs are finished, use Kilz to seal any repaired areas. Now you are ready to paint. If you do not seal the vinyl the paint will not stick. (11/27/2010)
By Scotty
I recently removed some very old and very adhered wallpaper in my kitchen. Despite my best efforts, there are large and small areas where the top layer of the sheetrock came off with the paper. How do I prepare these areas for painting? I am afraid if I just sand and prime these spots the primer and paint will just be sucked up by the gray paper-like substance that was exposed. Can someone advise? Thanks.
Tripleb from Greenville, AL
Have you checked at the paint store/home supply store? Usually, there are employees who are pretty knowledgeable about painting projects and this sounds like a common situation they've probably dealt with before. (05/10/2006)
Sounds like your absorbent areas need "sizing" or sealing. This usually involves painting the area with papering paste or PVA glue if the the top paper is very heavy. (05/11/2006)
By Alan
If you don't want to call the plasterers and the areas involved are relatively small, you can use drywall joint compound to smooth over the rough spots. Use a plastic putty knife to apply the compound and to even out the edges and blend them flush with the rest of the wall. It might take practicing a couple of times to do it right, but if you make a mistake, just use a damp cloth to remove the mistake areas. Allow the joint compound to dry before painting. If you do use drywall joint compound, you can sand the plastered spots when they are dry to smooth them out and make them even.(05/11/2006)
By P.