ThriftyFun Logo
Home   Find   Ask   Share   Answer   Join   Index   Login  
 
 User Login:  Username:    Password:      Forgot It?  | Join ThriftyFun!

 - Beauty
 - Budget and Finance
 - Cleaning
 - Consumer Advice
 - Craft Projects
 - Craft Tips
 - Food Tips
 - Garage Sales
 - Gardening
 - Gifts
 - Green Living
 - Home Improvement
 - Organizing
 - Parenting
 - Parties
 - Pest Control
 - Pets
 - Product Reviews
 - Recipes
 - Repair
 - Weddings for Less

RSS Feed
About Us
Media
Advertising
Contact Us
Privacy Statement
Disclaimer

Raised Stenciling with Spackle

1x1
Date: 11/07/2007 Topics: Craft Projects > Home Decor > Walls | Photos > Crafts  
1x1
Post Feedback | Get Responses | Bookmark | Link | Print | Print (With Feedback) | Rate: Thumbs Up Thumbs Down | Bookmark and Share
Raised Stenciling with Spackle
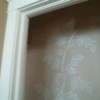
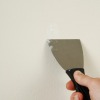
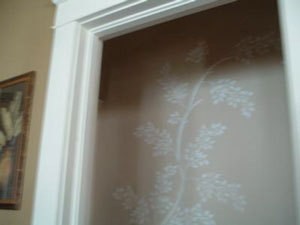
Decorating a wall with joint compound and a stencil.

Approximate Time 4 hours

Supplies:

  • Joint compound or spackle
  • Putty knife
  • Blue tape for taping stencil
  • Colorant (optional)
  • Paint (optional)
  • Stencil (I got mine from VictoriaLarsen.com)

Instructions:

First, make sure wall is clean or painted the color you wish. Position the stencil to your taste. Decide if you want to use colorant to your joint compound or spackle or if you want to paint it after it is done. If you wish to use the colorant, add it before you start.

Using joint compound or spackle and a putty knife, paste the compound through the holes of the stencil. Remove immediately, lifting straight up so not to damage the compound and then let dry completely. If you use paint, after it has dried completely, paint over the leaves. If you wish you may also glaze them.

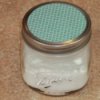
Note: The stencil from VictoriaLarsen.com is a little thicker than the ones you buy in the craft store so that makes the design more raised. However, any stencil will work, it just won't have as much depth. In the picture you see, I used spackle with white paint.

By Elaine from Belle Plaine, Iowa

(1x1 graphic )
Previous: Black and Decker Jar Opener ThriftyFun Next: Let's Share Our Pretty Party Platter Ideas
(1x1 graphic )
1x1
1x1
 Feedback
1x1
1x1
1x1

By frugalelf (63) Profile Contact
Really beautiful....love it!!

Could you possible take another picture so I can get a better look at the stenciling, it's a bit dark and hard to see. Thanks!

Posted on 08/27/2008 | Report Spam or Abuse

By (Guest Post)
First of all, sorry this is so late with a reply. Somehow this address got blocked in my email.

I would not use it where it could get wet. Even if you use some kind of waterproofing on it, it could come off as joint compound is water soluble. It would be painstaking to varnish over it. I have heard where people have used it on furniture by mixing glue with it. I urge you to go to the website I suggested because there are all kinds of applications that are shown.

Posted on 11/29/2007 | Report Spam or Abuse

By Freebyrdz (Guest Post)
Great tip!! I think I will try it on a board and then frame it as art. Thanks!

Posted on 11/16/2007 | Report Spam or Abuse

By (Guest Post)
WoW ! Thats attractive ! I L O V E it !

Posted on 11/08/2007 | Report Spam or Abuse

By Wendy from Oz (Guest Post)
I love the idea ... However, to get more texture on the stencil, it might be worth trying to use a brush & 'stipple' the spackle onto the surface after you have put in on using the trowel, then remove the stencil.

I also wonder if there's some type of paint that you can mix with the spackle that would give you a 'pearlised' effect. You have such a huge variety of everything in the US that I'm sure there'd be something on the market for 'pearlising' paint, in either the hardware store, paint store, chaft or artists supply store. We have only just reached the 21million population here!

As for waterproofing it, I am sure that it would be ok if you used something like tile grouting, as it has to work in showers!

The worst that can happen, is that you just scrape it off, then use a damp cloth to remove all traces of it, then replace your stencil & try it again the 'traditional' way.
Cheers
Wendy

Posted on 11/08/2007 | Report Spam or Abuse

By meme23 (Guest Post)
Looks wonderful!
Would this be ok for an inside window, over a sink? It might get a little wet, and I am wondering if it would work there.
thanks!

Posted on 11/08/2007 | Report Spam or Abuse

By \Shirley. (Guest Post)
Will this wash off? Can I do it on a window or will moisture, if it gets on there somehow, make it come off.
Really neat idea, going to try it!

Posted on 11/08/2007 | Report Spam or Abuse

By chretienne (74) Profile Contact
That's beautiful. Thank you for a terrific idea!

Posted on 11/08/2007 | Report Spam or Abuse

1x1
1x1
 Post Feedback:
1x1
1x1
1x1

Login using the form on the top of the page to post feedback (if you are a registered user). If you have not yet registered, click here to do so. It's FREE!.

1x1
(1x1 graphic )

© 1997-2009 ThriftyFun.com - Design by Cumuli Design
Disclaimer: ThriftyFun.com cannot accept any responsibility for any injury or damage that you may cause to yourself, others, or property when following any advice given on this site. Read the full disclaimer. If you find any information on ThriftyFun.com or in our newsletters that is either erroneous and/or potentially harmful to others, please Contact Us, immediately.