ThriftyFun Logo
Home   Find   Ask   Share   Answer   Join   Index   Login  
 
 User Login:  Username:    Password:      Forgot It?  | Join ThriftyFun!

 - Beauty
 - Budget and Finance
 - Cleaning
 - Consumer Advice
 - Craft Projects
 - Craft Tips
 - Food Tips
 - Garage Sales
 - Gardening
 - Gifts
 - Green Living
 - Home Improvement
 - Organizing
 - Parenting
 - Parties
 - Pest Control
 - Pets
 - Product Reviews
 - Recipes
 - Repair
 - Weddings for Less

RSS Feed
About Us
Media
Advertising
Contact Us
Privacy Statement
Disclaimer

Mosaic Picture Frame

By Christine Weber
1x1
Date: 05/14/2006 Topic: Craft Projects > Framing > Decorative  
1x1
Post Feedback | Get Responses | Bookmark | Link | Print | Print (With Feedback) | Rate: Thumbs Up Thumbs Down | Bookmark and Share
Mosaic Picture Frame
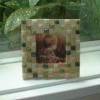
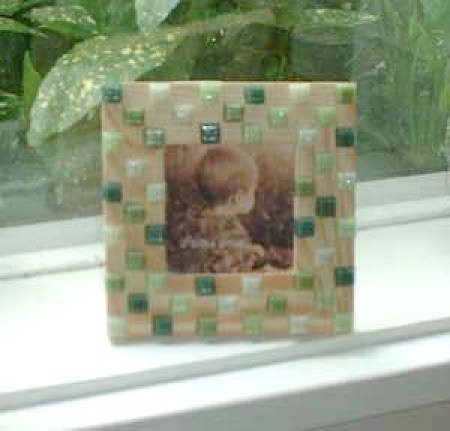
Colorful pieces of tile elevate a standard picture frame to something extraordinary.

Materials and Equipment:

  • an inexpensive unfinished wooden picture frame, any size
  • mosaic tiles, available at any craft store, enough to cover the perimeter of your frame (to make the frame in the photo, use Venetian glass tiles)
  • glue or silicone (be sure to check that it works for wood and tile)
  • a glue spreader or Q-tip
  • a plastic container lid, such as for yogurt
  • a piece of paper larger than the frame
  • a pencil
  • grout and spreader (optional)

Instructions:

1. Before you start, clear the table and cover it with newspaper or a large garbage bag to avoid getting glue on the table.

2. Place all your supplies on the table in front of you. The goal of this project is to cover one side of the picture frame with tiles in a mosaic pattern. To do this, you will probably want to create a practice pattern first. Use the pencil to trace an outline of the frame onto the paper. Arrange your tiles on the border of this outline until you are happy with the pattern.

3. Transfer the tiles from the paper test pattern to the picture frame. To do this, pour some glue into the plastic container lid and spread it on the back of a tile. Press the tile onto the frame and hold until it sets. Repeat with the other tiles until done. Set aside until completely dry.

4. If you are making a larger frame, you may want to spread grout over the tiles (follow instructions on grout package). Allow to dry and wipe the tiles clean of grout afterwards with a wet paper towel.

5. Place a picture in your masterpiece or give it to a craft-loving friend!

(1x1 graphic )
Previous: Baby Concentration (Baby Shower Game) ThriftyFun Next: Installing New Sinks
(1x1 graphic )
1x1
1x1
 Feedback
1x1
1x1
1x1

By Lynda (Guest Post)
And if short on cash, try weaving ribbons over photo matting cardboard, then gluing onto another mat for the backing, inserting thick clear "glass"/plastic from many recyclable products, and leaving one end unglued from the back mat. Add a secure support leg to the back after the whole frame is dry. The visual effect is similar, soft, and best for a little girl. I like the tiles for a teen, adult or a male if you are near a craft store or walmart. God bless you. : )

Posted on 12/13/2007 | Report Spam or Abuse

By Jennifer,CA (Guest Post)
Love the idea. Great info! Lovely gift for any occasion.
Jennifer Ca

Posted on 05/16/2006 | Report Spam or Abuse

By meoowmom (1743) Profile Contact
Thank you for the great details!

Posted on 05/15/2006 | Report Spam or Abuse

1x1
1x1
 Post Feedback:
1x1
1x1
1x1

Login using the form on the top of the page to post feedback (if you are a registered user). If you have not yet registered, click here to do so. It's FREE!.

1x1
(1x1 graphic )

© 1997-2009 ThriftyFun.com - Design by Cumuli Design
Disclaimer: ThriftyFun.com cannot accept any responsibility for any injury or damage that you may cause to yourself, others, or property when following any advice given on this site. Read the full disclaimer. If you find any information on ThriftyFun.com or in our newsletters that is either erroneous and/or potentially harmful to others, please Contact Us, immediately.