These potholders are thick and safe, so long as you crochet tight stitches. If you use a larger hook, you may get air spaces where the hot pan can burn your fingers. If a size H hook is too loose, get an F or G hook. We all crochet at different tensions. I have made many for gifts as well as for our home, and they always see lots of use.
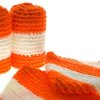
Using one strand of 4-ply knitting worsted such as Red Heart, and a size H crochet hook, chain 35. SC in second stitch from hook working tightly and SC in each stitch (33 stitches). Turn work and SC along the other side of the chain. Continue working around the piece SC in each stitch. You are working in rounds. Do not increase! At first it looks as if you are making a pocket.
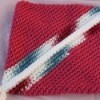
After a few rounds, you will have a canoe-shaped piece. Make a total of 24-25 rounds. Press the ends toward the center, and you will see a diagonal pattern develop. The two sides should meet in the middle. If they do, and the result makes a square shape, cut the yarn leaving a 24-inch tail.
Make the hanging loop: At the other end, anchor the stitching again by taking an extra stitch in the right side of the corner, and pull the yarn through. Tie the tail end of the yarn back onto the rest of the yarn. Push your hook through the hot pad at the corner and pull a stitch through. Chain 10 stitches. Push hook through the hot pad at the left of the same corner and SC. Move over one stitch to the left and SC again. Now SC over the CH10 loop to cover, using 18 SC. Cover the ends of the knot. Make another SC in the potholder next to the first one and end off. Work in the loose end using a darning needle or feed sack needle.
Source: I copied one from an example a friend made, then made it bigger.
By Coreen Hart from Rupert, ID
Add your voice! Click below to comment. ThriftyFun is powered by your wisdom!
I've made the same potholders using "Sugar and Cream" cotton yarn, and the knock-off "Peaches and Cream" from Wal Mart. Because they are doubled, they shield from the heat well.
And you can do them in seed stitch (sc, dc, then on the next row sc in the dc, dc in the sc) and they have some texture. Here is a pattern on the web for those who need more "visual" instructions (this is where I got the idea): myboringblog.wordpress.com/
I have made and given away very similar potholders however I place blue jean in between the layers.That makes them very thick and very durable as well. To keep from bunching in the wash just do a stitch all the way around in a similar color of thread.
Hi, I sent pictures and "how to" for this craft last year. It really is a fun craft!
Thank you for the post and the feedbacks. I wil be making some of these. Just bought a few skeins of cotton yarn today too, so I am good to go! Pat in Roseville, MI
Make sure you only use cotton yarn. The acrylic yarns will melt or catch fire.
I hate to throw away any yarn no matter the length. My mother taught me this pattern 60 years ago and since you can tie any pieces together and not worry about the knot, I have made probably 200 of these and given them away.
Add your voice! Click below to comment. ThriftyFun is powered by your wisdom!