I like the towel toppers that have a concealed crochet chain so you can hang a towel over the chain without having to cut the towel in half and deal with the cut edge. I also like that type of topper because when the towel gets dirty, but the topper isn't, you can change the towel, and the topper lasts longer because it is washed less often.
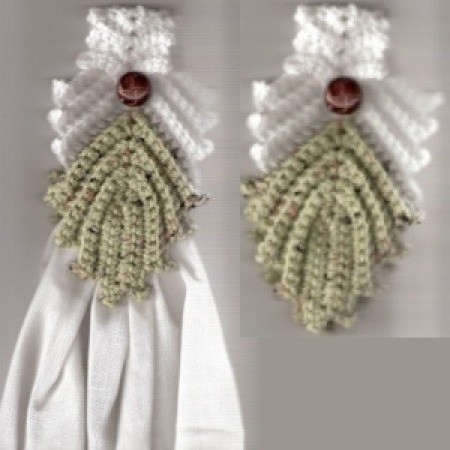
I made my leaves with Red Heart 'Frosty Green Fleck', but the topper can be made all in one color or in fall colors like red and green for Christmas or orange and brown for Thanksgiving.
With green, ch 12
(1) (This is the right side of the leaf) Sc in 2nd ch from hook; sc in next 9 ch, in last ch make sc, ch 3 and sc; working along opposite side of staring chain, sc in next 8 ch. Ch 3, turn.
(2) Sc in next 9 sc, in next sp make sc, ch 3 and sc; sc in next 8 sc. Ch 3, turn.
(3) Working in BACK loops of each sc, sc in next 9 sc, in next sp make sc, ch 3 and sc; sc in next 8 sc. Ch 3, turn.
Source: My own design.
By Fortunately
Add your voice! Click below to comment. ThriftyFun is powered by your wisdom!

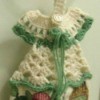
Here is one made with verigated colored yarn.

This Is Beautiful,And I Will Make Wonderful Gifts With It I Think Black And Acru Would Be Very Elegant!
Do you have patterns for any others? I like it!
Grandma Jan
I love the design. Can't wait to crochet it.
Thank you for the pattern.
Javajano, I don't have patterns for any others, but do have the knit version of this pattern if anyone is interested.
Could you please send me the knit version? Thank you
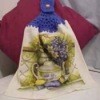
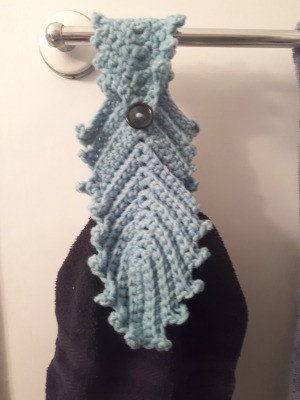
I received an email from lindylou31 requesting the instructions for the knitted version of the towel topper, so here it is. The knitted version is pictured below.
Knit Venetian Leaf Towel Topper
4 Size 8 double-pointed knitting needles
2 stitch holders
2 markers
Worsted weight yarn - green
Worsted weight yarn - white
Button, approximately 3/4" diameter
Scissors
Darning needle
Sewing needle and thread
[NOTE: You will be placing a marker on one of the needles in order to mark it as 'needle 1'. Because you will be binding off and adding stitches to that needle, reposition the marker as needed, to keep it on the needle. The needle with the marker on it is needle 1. The center needle is needle 2, the last needle with stitches on it is needle 3.]
MS = "move stitches" To move stitches, transfer 1 stitch from the center needle to needle 1 (as if to purl), then transfer 1 stitch from the center needle to needle 3 (as if to purl). The stitch to be moved is always the stitch that is closest to the needle to which it will be moved.
With green yarn, cast on 5 stitches, place a marker. Cast on 5 more stitches.
On a second needle, cast on 2 stitches.
With needle 2 to your right and working along the bottom of the cast-on stitches of needle 1, beginning at the end nearest needle 2, insert a third needle between the first 2 loops of needle 1 and pull up a loop. Working between the loops of needle one, pull up 8 more loops.
(Row 1) Needle 3: BO 1 st in K, K accross. Needle 2: K in the front and back of both stitches. Needle 3: K across, BO the last st in knit.
(Row 2) Purl across on each needle. MS
(Row 3) Needle 3: BO 1 st in P, P across. Needle 2: P in the front and back of both stitches. Needle 1: P across, BO the last st in purl.
(Row 4) Knit across on each needle. MS
(Row 5 through 16) (Repeat rows 1 through 4) 3 times.
FO. (You will be transferring the stitches onto stitch holders. Be sure to also transfer the marker.) Beginning with needle 1, as if to purl, place needle 1 stitches on a stitch holder. Place needle 2 stitches on the same holder. Working in the same direction, place needle 3 stitches on the second stitch holder.
Make a second leaf. Fasten off, but do not place on a stitch holder.
Hold the second leaf so that the marker is on the right hand side, then place the other leaf behind, having the stitch holder that has the marker, on the left hand side. Using the spare needle, pick up one stitch from the needle, then one stitch from the stitch holder that has no marker on it. Continue alternating between the needle and stitch holder until no stitches remain on the needle or stitch holder, be sure to include the marker. [There will be an odd number of stitches, so at the end, just transfer the extra stitch (or stitches) to the needle. Do the same when transferring stitches onto the last needle.]
Place the first stitch from the center needle onto the new spare needle, then place the first stitch from the other stitch holder onto the same needle. Repeat. You will have 4 stitches on the center needle. Using the new spare needle, transfer the remaining stitches of the needle and stitch holder in the same way. When you reach the marker, remove it.
(Row 17) Having needle 1 to your right, attach white yarn just under the first stitch. On needle 1, (K 2 sts together) across, until 1 stitch remains, knit the last stitch. On needle 2, (K 2 sts. together) twice. On needle 3, (K 2 sts together) across until 1 stitch remains, knit the last stitch. Next time you reach the marker, remove it.
(Row 18) P in each stitch of all 3 needles. MS
(Row 19) BO the first stitch in purl, P across. Center needle: (P in front and back of next stitch) twice. On last needle, P across, BO the last stitch in purl.
(Row 20) K in each stitch of all 3 needles. MS
(Row 21) BO the first stitch in knit, K across. Center needle: (K in front and back of next stitch) twice. On last needle, K across, BO the last stitch in knit.
(Rows 22 through 32) Repeat rows 18 through 21, ending with row 20.
(Row 33) BO 6 sts in knit, K across. Center needle: (K in front and back of next stitch) twice. Last needle: K across, BO last stitch in knit.
(Row 34) BO 6 sts in purl, purl in remaining stitches on all 3 needles. MS
(Row 35) BO 1 st in purl, P across. Center needle: (P in front and back on next stitch) twice. Last needle: P across, BO last stitch in purl.
(Row 36) K in each stitch of all 3 needles. MS
(Row 37) BO 1 st in knit, K across. Center needle: (K in front and back of next stitch) twice. Last needle: K across, BO last stitch in knit.
(Row 38) P in each stitch of all 3 needles. MS
(Row 39 through 42) Repeat rows 35 through 38.
(Row 43) BO 1 st in purl, P across. Center needle: P first st, CO 4 (for buttonhole), P last stitch. Last needle: P across, BO last stitch in purl.
(Row 44) BO all stitches in knit. FO.
To make a chain (towel-hanging loop), with green, CO 14, BO all stitches in knit, FO. Sew one end of the chain between the 2 leaves, (where the leaves are joined). Sew the other end of the chain to the opposite side of the leaves.
Use the darning needle to weave the yarn ends into the back of your work. Sew the button just above the leaf.

I guess I'm not sure what you mean by a towel topper. Is it something you just hang a towel up with? Why not use towel bars? I don't understand why you need them. Please explain to me their purpose and how they work.
Handy for kitchens. Can be attached to oven handle.
From someone who uses them because they are also cute .
Some people don't have a towel bar in their kitchen. With a topper, the towel stays where you put it and people won't grab the hand towel to wipe up spills.
This pattern is great! I'm making up Christmas towels and am using Christmas Green and Red and they look like holly leaves! Thanks for sharing this pattern!
I love this look but I don't understand how it attaches. It's not attached to the towel?
I just started this and mine is already not looking like the picture. Do you have a tutorial video of this so I can follow along? I'm not sure if I'm not doing something correctly or what's going on. I just frogged mine or I would post a picture.
Yes this was just great. I want to thank you so much for shareing this pattern. GOD BLESS YOU.
Thank you so much! I love this and it is a great towel holder .
Thank you so much! This is a beautiful and useful pattern!
I am finding it Very hard to understand, will you please do a tutorial video? Thank you.
This was posted in 2009 so I don't think that this member is still active on the site.
What a cool idea. Nice work.
I love this topper. Simple and beautiful. Thank you so much
Love this pattern, thank you. I made it in a heavier weight so I can hang a hand towel in my bathroom.
Thanks so much for sharing your version. It turned out beautifully!
Add your voice! Click below to comment. ThriftyFun is powered by your wisdom!