ThriftyFun Logo
Home   Find   Ask   Share   Answer   Join   Index   Login  
 
 User Login:  Username:    Password:      Forgot It?  | Join ThriftyFun!

 - Beauty
 - Budget and Finance
 - Cleaning
 - Consumer Advice
 - Craft Projects
 - Craft Tips
 - Food Tips
 - Garage Sales
 - Gardening
 - Gifts
 - Green Living
 - Home Improvement
 - Organizing
 - Parenting
 - Parties
 - Pest Control
 - Pets
 - Product Reviews
 - Recipes
 - Repair
 - Weddings for Less

RSS Feed
About Us
Media
Advertising
Contact Us
Privacy Statement
Disclaimer

Craft Project: Elegant Country Ribbon and Roses Basket

1x1
Date: 04/21/2009 Topics: Craft Projects > Home Decor | Photos > Crafts  
1x1
Post Feedback | Get Responses | Bookmark | Link | Print | Print (With Feedback) | Rate: Thumbs Up Thumbs Down | Bookmark and Share
Craft Project: Elegant Country Ribbon and Roses Basket
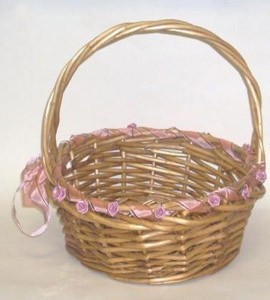
This lovely basket is wrapped with sheer ribbon and decorated with mini fabric roses. It's perfect for placing in the bathroom to hold soaps or towels, in the living room to hold mail, and makes a wonderful gift basket. Simply put, it's an elegantly decorated basket that has a million different uses.

Approximate Time: 20 minutes

Supplies:

  • 1 large, open weave, round basket with handle
  • Dusty Pink Sheer Ribbon (1/2 inch thick)
  • Dusty Pink Fabric Roses with Wire Stem (1/2 inch big, about 2 dozen)

Instructions:

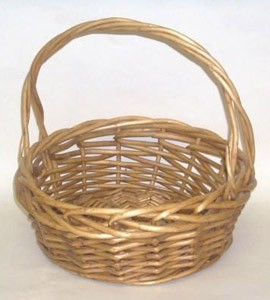
  1. First you need to measure the size of your basket. Your basket should look something like the basket in picture 1. Take a tape measure and wrap it all the way around the basket rim. You want to cut the sheer pink ribbon about twice as long as your basket measurement.

  2. Starting at one handle, begin looping the ribbon through the top rim of the basket. Keep at least 10 inches of ribbon loose at the starting end to use for the bow. Wrap the ribbon evenly around every, or every other, twist in the basket rim. Keep the ribbon tight as you wrap it all the way around the basket rim, as shown in picture 2. Tie the two ends of the ribbon together in a loose and floppy, medium size bow.

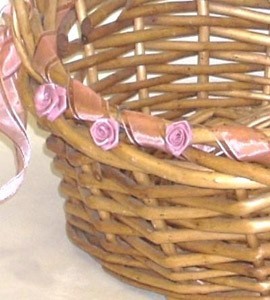
  3. Take a rose and place it in-between the ribbon wraps, where the basket is still bare. Wrap the rose wire stem around the basket and twist it around the rose base. Add a little glue to the back of the rose to keep it in place. Repeat placing roses until basket rim is covered, as shown in picture 3.

  4. Picture 4, provides a up-close view of how the basket rim should look.

By Aysha from Boise, Id

(1x1 graphic )
Previous: ThriftyFun Recipes - April 22, 2009 ThriftyFun Next: Heat Mark on Leather Sofa
(1x1 graphic )
1x1
1x1
 Feedback
1x1
1x1
1x1

No Feedback Yet

Be the first to post feedback! Click here to post feedback.

1x1
1x1
 Post Feedback:
1x1
1x1
1x1

Login using the form on the top of the page to post feedback (if you are a registered user). If you have not yet registered, click here to do so. It's FREE!.

1x1
(1x1 graphic )

© 1997-2009 ThriftyFun.com - Design by Cumuli Design
Disclaimer: ThriftyFun.com cannot accept any responsibility for any injury or damage that you may cause to yourself, others, or property when following any advice given on this site. Read the full disclaimer. If you find any information on ThriftyFun.com or in our newsletters that is either erroneous and/or potentially harmful to others, please Contact Us, immediately.