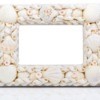
This old picture frame was going to be trash until I thought of painting it and adding some extra "Happy New Years" confetti to it. I slapped on some glossy varnish and now it looks fantastic.

Approximate Time: 10 minutes without drying time
Supplies:
- old picture frame
- black craft spray paint
- handful of metallic confetti
- white glue
- clear, glossy craft varnish
- paintbrush
- tweezers
Instructions:
- Start by cleaning and lightly sanding the frame if it's wood or metal. Plastic should just be cleaned. I used an old "I Love Mommy" frame that looks pretty, but was scratched and discolored, as shown here."

- Make sure the picture frame is dry. Spray an even coat of black paint on the frame and let dry. Repeat if needed.
- Find any kind of stiff, plastic confetti. I used "Happy New Year" metallic confetti. Brush a tiny bit of glue to the back of the confetti and use a pair of tweezers to help place it on the frame.
- Push the confetti flat and let dry. Repeat process for each piece of confetti you want to use. This will make the confetti stick, but it won't stay there long. That's why the next step is varnish.
- Apply a light, even layer of clear varnish over the frame. Pay close attention to the confetti and make sure to get on, around and in the nooks of each piece. Let the varnish dry.
- Add second coat and let dry. This glues the confetti on from the top as well as the bottom. Now it'll stay put.
- Put a picture in your new frame and enjoy!
By Aysha from Boise, ID
Add your voice! Click below to comment. ThriftyFun is powered by your wisdom!

(Guest)
Gold Post Medal for All Time! 846 Posts December 31, 20080 found this helpful
Cute idea !!! Thanks !!!

Janet
Silver Feedback Medal for All Time! 399 Feedbacks December 31, 20080 found this helpful
Very nice.
Add your voice! Click below to comment. ThriftyFun is powered by your wisdom!