Home |  Index |  Submit Request |  Share Photos |  Share Tips |  Active Topics |  New Feedback  |  Contact Us  |  Search
 User Login:  Username:    Password:      Forgot It?  | Join ThriftyFun!

 Popular Topics
 - Beauty
 - Budget and Finance
 - Christmas *
 - Cleaning
 - Consumer Advice
 - Craft Projects
 - Craft Tips
 - Food Tips
 - Garage Sales
 - Gardening
 - Gifts
 - Green Living
 - Home Improvement
 - Organizing
 - Parenting
 - Parties
 - Pest Control
 - Pets
 - Product Reviews
 - Recipes
 - Repair
 - Thanksgiving
 - Weddings for Less

More Topics

Google Search:

Web thriftyfun.com

About:
RSS Feed
About Us
Media
Advertising
Contact Us
Privacy Statement
Disclaimer

Decoupaged Bleach Bottle Piggies

1x1
Date: 10/24/2007 Topics: Craft Projects > Crafts for Kids | Photos > Crafts  
1x1
1x1
Post Feedback! | Email Friend | Print | Get Responses | Bookmark | del.icio.us | Link | Rate: Thumbs Up Thumbs Down
Decoupaged Bleach Bottle Piggies
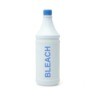
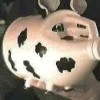
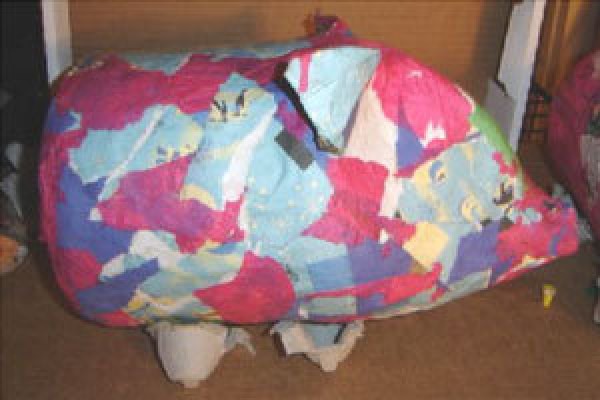
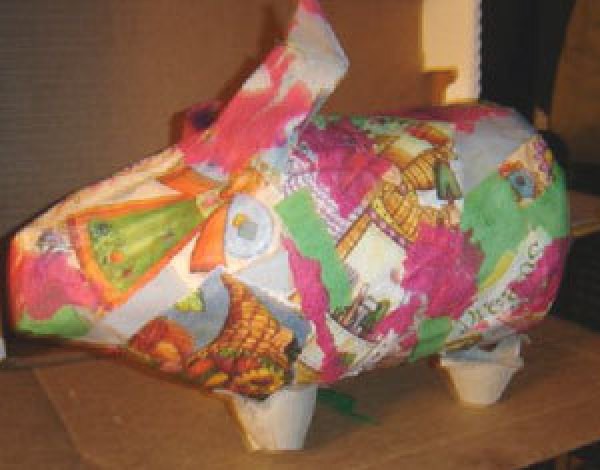
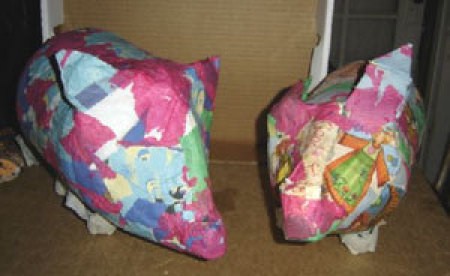
This is my second year of homeschooling and I wanted to show the girls how to decoupage. After several hours of thinking of what they could do that would be fun as well as useful, I went into my laundry room. And there atop of my washer sat an empty bleach bottle. The bottle was laying on its side and from the front it looked to me like a piggy. And hence, this is where I got the idea.

First wash the bleach bottle out good. You can also use those gallon vinegar bottles. Then get some newspaper and rip them into strips. meanwhile make your decoupage glue. I used the basic recipe of 1 cup of flour to 2 cups of hot water.

Cook over low heat until no clumps and thick. You may need to add more water. If its too watery add a bit more flour. JUST BE SURE TO LET IT COOL BEFORE USING!

Dip your newspapers in the glue mixture and begin layering on your bottle. We did the top part and let it dry then the bottom.

After several layers and being completely dry (we do a part each week for art class) then you can decorate. We used scrapbooking paper and tissue paper. We kept with a theme but you can use anything you would like: newspaper funnies, music pages, etc.

Let dry!

For the legs we used the holder from an egg carton and the ears we formed out of the paper. After the entire thing is dry you can cut a hole in the top to put your coins in and then varnish. I use a clear coat in a spray paint can.

That is it! Now you have a cute little piggy bank that isn't just cute, it is also very useful.

In the photos, we haven't added the tail or the eyes. The eyes will be buttons and the tail will be a curled pipe cleaner.

By Melissa from Pine City NY

pigs2-300x184.jpg pigs3-300x200.jpg

Jump to Feedback | Post feedback
Related Links:
Previous: Limit Your Shopping For A Frugal Wedding ThriftyFun Next: Chunked Baked Potatoes
1x1
 Feedback
1x1
1x1
1x1
1x1
 Sponsors
1x1
1x1

Post By glinda (Guest Post) (10/26/2007)
What a great project for the kids to do! I love the personal artist touch of each person, they can really put their own personal touch to their art project, and it's so colorful. Then it is a useful project they can keep for a long time. So many projects are just done, and discarded. You've got a great ideal, I hope other home schoolers pick up on this. I have older kids now, but, my 3 kids would have loved this project when they were younger.


1x1

Post Feedback:
Login using the form on the top of the page to post feedback if you have registered with ThriftyFun. If you have not yet registered, click here. It's FREE!. If you are not registered you can post feedback as a guest below. Please don't use your email address for your name because spam robots can dredge it from our site. Please do not post your feedback more than ONCE. We need to approve all guest feedback and it may take from minutes to hours for that to happen.
(1x1 graphic )
Your Name

Subject

Feedback

text tool text tool text tool text tool

Image Upload: Add an image to your post! Click the "Browse" button below and select an image from your hard drive. Please only select gifs or jpegs. If you have any problems, just email the image to images@thriftyfun.com


If you want to post your email address for responses from readers, obscure it in some way like put spaces between the name and @ sign and service address with (remove spaces) behind it or name (at) server (dot) com . This is for your protection from those creepy Robots.

(1x1 graphic )

© 1997-2008 ThriftyFun.com - Design by Cumuli Design
Disclaimer: ThriftyFun.com cannot accept any responsibility for any injury or damage that you may cause to yourself, others, or property when following any advice given on this site. Read the full disclaimer. If you find any information on ThriftyFun.com or in our newsletters that is either erroneous and/or potentially harmful to others, please Contact Us, immediately.