Question:
Does anyone have any soda bottle terrarium directions for me? I am not sure if I am in zone 5 or 6.
Hardiness Zone: 5b
Dawn from Elmira, NY
Answer:
Dawn,
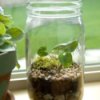
Here are some simple directions for a soda bottle terrarium.
Supplies
- One 2 or 3 liter clear plastic soda bottle (needs to have a colored base).
- Scissors, craft knife and a teaspoon
- Charcoal
- Coffee filter
- Potting Soil
- Suitable small plants
- Assorted rocks or figures
- Moss
Directions
- Remove the label and the colored base from the plastic bottle by soaking the bottle in hot, soapy water.
- The clear portion of the bottom is made of a thicker plastic than the top. Use the tip of a craft knife to punch 5-6 holes around the bottom to create some ventilation. You're going to flip this over so it becomes the top.
- Now, using a craft knife or scissors, cut off the top of the plastic bottle at the point where it starts to slope toward the top. Flip this over. This end is now the bottom and should now slide easily into the colored base.
- If the colored end has holes in it, place a coffee filter in the bottom to prevent soil from leaking out the holes.
- Place a 1/4 or 1/2 inch layer of horticultural charcoal in the colored base, followed by 1 to 2 inches of high quality potting soil so that it comes to 1/2 inch below the bottom's rim.
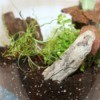
- Add 2-3 small plants or cuttings. The plants should have similar growing requirements. Some good plants include Aluminum Plant, Ivy or Baby Tears.
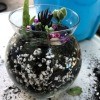
- Add decorative figures and rocks as desired.
- Water the terrarium lightly. The soil should be barely moist, but not wet. Cover the soil with moss.
- Slip the clear plastic top back onto the base until it's firmly seated in place.
- Keep an eye on the terrarium for a few days. Water droplets should form. If they don't, add a bit more water. If too many form, open the top of the terrarium temporarily to let it dry out a bit.
Ellen
About The Author: Ellen Brown is our Green Living and Gardening Expert. Click here to ask Ellen a question! Ellen Brown is an environmental writer and photographer and the owner of Sustainable Media, an environmental media company that specializes in helping businesses and organizations promote eco-friendly products and services. Contact her on the web at http://www.sustainable-media.com
Add your voice! Click below to answer. ThriftyFun is powered by your wisdom!

July 24, 20061 found this helpful
Just type in kidsdomain terrarium on yahoo search.and you will find instructions.
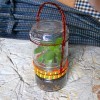
Oh ,by the way i made a hanging plant bottle just buy cutting holes on the one side so the plant can hang out and down almost to the floor if you wish.
I just poked a hole in the cap tied a plastic bead to the inside end and screwed in a plastic plant hanger in the ceiling joist. it still hangs in my bedroom by the window (10 years now)
The old plant died from my neglect a few years ago. Your message has encouraged me to start a new one
Thank You
Mr Thrifty
By dawn (Guest Post)
September 28, 20060 found this helpful
Thank You. I will try it.
November 12, 20061 found this helpful
I remember making terrariums like that which Ellen described above when I was a kid! They're a lot of fun. The only problem might be that I think they stopped making two-liter bottles with those colored plastic bases a long time ago - all the soda bottles I've seen for years now have been all one piece.
Add your voice! Click below to answer. ThriftyFun is powered by your wisdom!