social

Giving Clay Pots an Aged Look

November 15, 2007

mossy clay potHow do you "age" clay pots with the crusty white and green patina? Tips from the ThriftyFun community.

Aging Clay Pots

Depending on what kind of yard you have, sometimes it's nice to make a perfectly new clay pot look old. Making your pots mossy really gives them an antique look, and gives a new dimension to your yard.Here is what you do:
    Advertisement

  1. Collect mosses either from around your yard or a friends or neighbors.
  2. Finely chop the moss up.
  3. Allow the moss bits to dry up for a couple of days.

Then mix together in a large bucket or bowl:

Once the above is mixed together, put the bucket in full sun for three days.

When the mixture is good and smelly, brush it generously on the outsides of your clay pots. Then wrap the pots in plastic wrap and put them in the full sun.

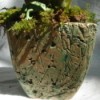
In two weeks the pots will start to grow mold, and by eight weeks the pots will be nice and furry with moss, and looking very antique and old.

By Sherry

Copper Sulphate

I read a few years back where a landscape hobbyist was painting his pots and stepping stones with copper sulphate for the dark blue-green aging that is so attractive. I'd love to do this to pots and rocks I have collected. The white comes by setting something in water and salt, I understand, but I'd be careful to rinse the inside out before planting in a pot done this way. Good luck and God bless you.
Advertisement

By Lynda

Step By Step Yogurt Tip

Several years ago someone in a newsletter suggested plain yogurt. Outside, over newspaper, paint on the plain yogurt with a sponge brush, be liberal. Let 'set' for several days away from any living area. The ants will be very attracted to this, but after a while you will have a great greenish patina and your pot will look aged. I've done it and it is simple, just watch out for the ants at first.

By Memre

Patina, Paint Or Moss

There are basically 3 ways to "age" pots: patina, paint, or moss. There are many patinas you can paint over your pots.

Rust: If you want a rust look, you can paint the post with a paint that has real metal shavings in it or "magnetic" board paint. Then you make them rust by spraying or wiping them with vinegar, daily for about a week, then leaving them outside to rust.

Advertisement

Copper: To patina them with a copper look, you paint them with a copper solution and painting on the acid type solution and waiting until it partially turns turquoise. The copper/patina solutions are usually sold in a pack together.

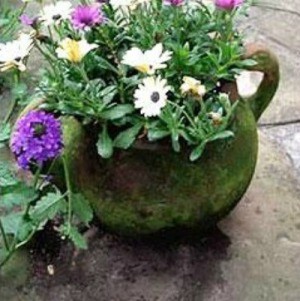
Moss: To grow real moss on any pot, rock, or rock garden, cement container or directly on the soil in your garden on a shady place in your yard. You'll need to take plain yogurt or buttermilk and place one of these in a blender with the green type of moss they sell at craft stores (do NOT use Spanish moss). You can add a bit of water to make them blend easier. After blending the solution, pour this where you want the moss to grow. In a shady area and spray it with a mister to keep it moist every day. After about a month or so, if the conditions are right (not too hot and not too dry) you'll have real moss growing permanently on your pots!

Advertisement

Yogurt, Moss and Glue (this is what you want): You slather on the plain yogurt, then glue on the moss with hot glue. Not as good as above, but it's instant, and no waiting for the moss to "grow". The yogurt will "age" in several weeks and look old. If you mix this method with the one above, you'll get a very cool look!

Painted Fake Patinas

Moss Look: You can make a pot look like it's rusted, mossy, or copper with metallic paint or paint and metal "leaf". To do a moss look, take your terra-cotta pot and some mossy colors of greens. Take a sponge, we it first the dip it in several shades of moss green. Lightly dab the mossy green paints around the top lip of the terra cotta pot, them spray or paint with a UV sealer like clear paint medium or a water based varathane. Use exterior sealer if the pot is going outside. Any high quality acrylic paint can be used indoor or outdoors.
Advertisement

Rust Look: If painting a real terra cotta pot, first seal the pot with a clear water based sealer, if plastic, use a paint for plastics. Take the colors of rust and follow the above instructions.

Copper Look:

  1. Paint entire pot with a metallic copper color of craft paint, then daub with a sponge the colors of teal and turquoise and a greenish turquoise around the lip of the pot and in a few places around the pot. Let one color dry, then daub the next until you are satisfied. After you are done, go back and daub a little bit of copper or bronze over the top of the turquoise colors.
  2. Use the same technique as above, only switch the colors. First, paint the pot with sponge paint the pot with differing shades of turquoise, then sponge over that with the metallic copper. You can also splatter (using a toothbrush) a bit of watered down black paint lightly over the pot in a few places.
Advertisement

Faux-Iron Finish:

Faux-RustMany Faux Painting Techniques:

By Cyinda

Paint and Other Ideas

The quickest and easiest way is with paint, which is what I've always done. I just use thinned acrylic paints, brushed on and lightly sanded or wiped off. Of course there are other aging processes too, using milk paint, lime powder, buttermilk, or yogurt. All work in varying degrees. Just do a web search for aging terra cotta pots and you'll find lots of info.

Here's one idea using paint:

And another idea using lime powder:

By Carole

Feel free to post your ideas below!

Read More Comments

Questions

Here are the questions asked by community members. Read on to see the answers provided by the ThriftyFun community.

February 12, 2015

I loved all of your suggestions on how to age my terra cotta pots for my new herb garden! I did the one using lime and had great results, then tried the yogurt/moss technique and followed the instructions exactly. It's been four days now, and instead of moss, all that seems to be growing is black fuzzy mold. What went wrong? Has anyone else had this happen?

By Becki A.

Answers


Gold Post Medal for All Time! 677 Posts
June 8, 20180 found this helpful

According to the Martha Stewart website, the process takes at least 1 month. www.marthastewart.com/.../making-history-aging-pots

 
Answer this Question
Categories
Home and Garden Gardening Creative PlantersJune 24, 2014
Pages
More
💘
Valentine's Ideas!
🎂
Birthday Ideas!
🍀
St. Patrick's Ideas!
Facebook
Pinterest
YouTube
Instagram
Categories
Better LivingBudget & FinanceBusiness and LegalComputersConsumer AdviceCoronavirusCraftsEducationEntertainmentFood and RecipesHealth & BeautyHolidays and PartiesHome and GardenMake Your OwnOrganizingParentingPetsPhotosTravel and RecreationWeddings
Published by ThriftyFun.
Desktop Page | View Mobile
Disclaimer | Privacy Policy | Contact Us
Generated 2024-02-02 18:22:25 in 7 secs. ⛅️️
© 1997-2024 by Cumuli, Inc. All Rights Reserved.
https://www.thriftyfun.com/Giving-Clay-Pots-an-Aged-Look-1.html