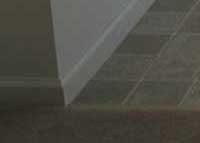
Base moldings are installed to cover the gap between the floor and the wall. Laminate and wood flooring for example, is installed about half an inch away from the wall, so there is always a measurable gap to cover. Newly tiled or carpeted floors can be trimmed out by adding a simple quarter round molding to existing baseboards. If you plan to repaint and have grown tired of your old baseboards and trim around windows and doors, removing the old trim eliminates many feet of cutting in with a brush, making painting much faster and neater.
Advertisement
Remove old moldings by prying them from walls, taking care not to gouge or bruise the finished drywall. Look for a part of the baseboard that gives the least resistance and begin pulling from there. Sometimes, where paint build-up occurs, it will first be necessary to run a sharp utility knife along the molding where it meets the wall.
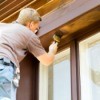
If you plan to change the doorway moldings, do them first. This is because baseboards are cut to butt up against the outside edge of door moldings. The other part of this two part series addresses window and door molding installation. If you have lots of trim work to do, renting a pneumatic nail gun is highly recommended. With hammer and nails, trim bounces around during nailing and makes precision work much more difficult. I also recommend the use of carpenter's glue on all joints. This helps reduce the potential for gaps at joints due to wood shrinkage and movement.
Advertisement
The finish cuts you will be making to the baseboards are inside miters, outside miters and splices. These can be made as 45 degree cross cuts with a table saw, radial arm saw or tilting compound miter saw and as 45 degree downward cuts with a simple miter saw. Making accurate measurement of molding pieces will be difficult at first. Inside mitered moldings measure their longest on the backside while outside mitered pieces are longest at the front. Some pieces you install will have an outside miter at one end and inside at the other, but you will be surprised just how quickly you adapt to measuring for correct length and fit. Cut all your moldings a little longer than your measurements, because wood is much easier to cut again than it is to stretch.
Start in a hidden corner such as inside a closet, and move on to more visible sections as you gain experience. Measure for length from wall to wall at inside corners using a tape measure. First, cut the baseboard square and flush at the measured length, then cut the inside miters so that the backside of the miter finishes exactly on the length. In other words, your angle cuts will not reduce the molding's length. Double cutting in this fashion helps the novice carpenter simplify fit and get the angle correct.
Advertisement
Apply downward pressure to get a good fit to the floor as you nail the baseboard in place. Lower nails will find wood to hold to along the base of the wall, while nails placed higher on the molding should be set at an angle so they can grab the drywall.
Outside miters are made by transferring the wall measurement to the back side of the molding with enough molding left over to allow for the miter angle. You can also mark the cut without the use of a tape by holding a baseboard piece to the subject wall and marking the backside length by "eyeballing" the cut line. Remember what I said earlier about cutting long.
Some runs on long walls will require more than one length of molding. To make your splices look good, do not butt join pieces of molding. Professionals lay an outside mitered piece over an inside mitered piece and sand the join smooth.
Advertisement
If a gap is still visible after putting baseboards to your walls, quarter round molding nailed to the baseboard is the common solution. In cases where the space is slight, a shoe mold makes a more attractive addition to the baseboard. Both add on moldings are measured, cut and nailed in the same way as your baseboards were done.
Fill nail holes and imperfections with latex wood filler and your trim job is complete.
 Base moldings are installed to cover the gap between the floor and the wall. Laminate and wood flooring for example, is installed about half an inch away from the wall, so there is always a measurable gap to cover. Newly tiled or carpeted floors can be trimmed out by adding a simple quarter round molding to existing baseboards. If you plan to repaint and have grown tired of your old baseboards and trim around windows and doors, removing the old trim eliminates many feet of cutting in with a brush, making painting much faster and neater.