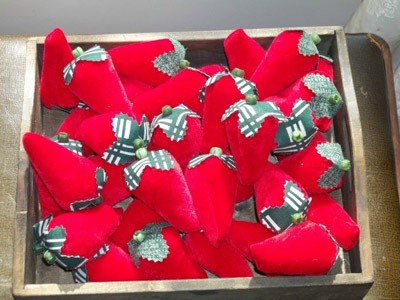
A big bowl of red, juicy strawberries are a favorite treat of mine. I enjoy eating them, but the decorator in me also enjoys the pop of luscious color they provide when accessorizing a room.
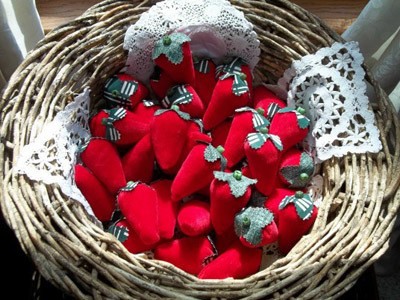
Since strawberries are mainly a summer delicacy (depending on your locale), and they don't last forever, I came up with a simple bowl filler design that allows them to be displayed and enjoyed all year long.
Using scraps of red velvet, velour, or felt, these fruit fakes look just as yummy as the real deal.
Approximate Time: less than an hour
Supplies:
- lightweight cardboard
- ruler
- scissors
- red velvet, velour, or felt
- permanent marker
- straight pins
- sewing machine
- stuffing
- hand-sewing needle and red thread
- green cotton fabric
- heavy-duty fusible web
- pinking shears
- green pony bead
- embroidery needle and green floss
- craft glue
Instructions:
-
Trace and cut out a 6 inch square on lightweight cardboard. Cut the square in half diagonally. This will leave you with two triangles. Discard one triangle.
- Lay the triangle with the cut diagonal edge at the top and running horizontal. This is the top edge of the strawberry. Measure 3/4 inch straight up from the bottom point. Draw a horizontal line across the point at this measurement. Cut the point off along the line.
- Measure 1 3/4 inches down from the top edge on each side edge of the triangle and mark the edges. Find the center of the top edge and mark. Draw an arch from one side mark to the center mark and on to the other side mark. The arch will look similar to the outer edge of a piece of pie. Cut along the line. This is the strawberry pattern.
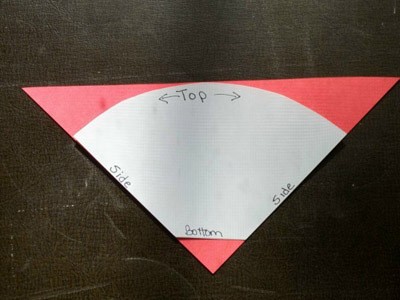
- Lay the pattern on the back of your red fabric. Draw around the shape using a permanent marker. Cut out the fabric shape.
- Fold the fabric in half with the right sides facing and matching the side edges. Pin the side edges and the bottom edge. Sew the pinned edges using a 1/4 inch seam allowance.
- Turn the strawberry cone right side out. Stuff the strawberry to the top edge.
- Hand-sew a running stitch around the open top edge. Pull the thread to gather the opening closed. Knot and cut the thread.
- Cut a 2 inch square from lightweight cardboard. Draw an "x" across the square from corner to corner. Round out each of the four legs into ovals. The ovals will overlap closer to the center. Cut out the shape, but do not cut into the overlapping marks at the center. This is the leaf pattern for the strawberry. It will resemble a chubby "x".
- Cut one 2 inch square from heavy-duty fusible web and two 2 inch squares from green fabric.
- Lay one green square on your ironing surface with the wrong side facing up. Place the fusible web square on the fabric with the paper side facing up. Iron the fusible web to adhere it to the fabric. Allow the web to cool. Peel the paper from the fusible web.
- Place the remaining fabric square on the fusible web with the right side facing up. Iron the fabric to adhere the whole sandwich together.
- Center the leaf pattern on the fused fabric square. Trace around the pattern. Cut out the shape, inside the traced lines, using pinking shears.
- Center a green pony bead on one side of the leaf. This side will be the right side. Sew the bead to the leaf using green embroidery floss and what ever stitch you are comfortable with, or you can glue the bead in place.
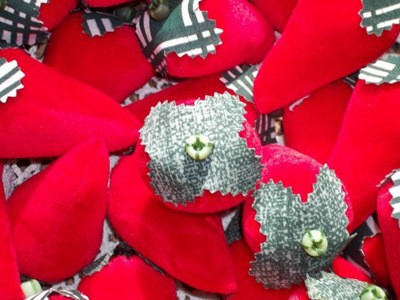
- Apply craft glue to the wrong side of the leaf. Center the leaf on top of the strawberry. Pin each of the leaf ends to the strawberry. Allow the glue to dry and remove the pins.
By Cyndee from Winfield, KS