I need help with a step by step procedure for how to thread a Handy sewing machine. I have tried all the steps in every article, even the videos. It is still not working.
Add your voice! Click below to answer. ThriftyFun is powered by your wisdom!
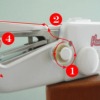
Step 1
Thread the Handy Stitch by passing the thread from the bobbin or spool up through the two thread guides on the needle arm, through the tension control and down to the needle.
Step 2
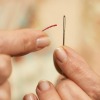
Pass the thread from back to front through the needle, using the threader if necessary by inserting the threader through the needle, placing the end of the thread in the loop of the threader behind the needle and pulling through.
Step 3
Pull a couple of inches of thread out through the needle before beginning to sew.
Source: ourpastimes.com/
Step 1
Put the thread from the bobbin through the first thread guide on the needle arm, through the two plates in the tension control, then through the second thread guide at the end of the needle arm.
Step 2
Use the provided needle threader to feed the thread into the eye of the needle.
Step 3
Turn the rotary once so the thread goes under the fastening plate. Lift up the fastening plate and pull the thread out from underneath.
This is a diagram of the Handy Stitch Sewing machine to help you understand it better. Instructions are great, but if you don't see a diagram also it is hard to follow them.
There are many users of this little machine that have threw their hands in the air - and then thrown the machine away but maybe you will be able to understand some of the instructions presented here.
I bought one for a simple sewing project one time and it broke before I could get through a few seams. I'm afraid it isn't a very good product. If possible, I would just return it and get a small sewing machine from a decent brand. Lots of sewing stores sell refurbished sewing machines.
Good luck!
Step 1
Turn the rotary wheel to raise the needle arm.
Step 2
Lift fastening plate, pull the thread out and cut with your seam ripper.
Step 3
Turn rotary wheel again so the needle goes up and down one more time.
Step 4
It will create a loop on backside of your fabric.
If you still need more information go here www.ebay.com/
Add your voice! Click below to answer. ThriftyFun is powered by your wisdom!