social

Dripping Paint Glass Jar

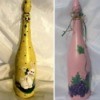
This cute craft uses watered-down paint to create a dripping pattern. Depending on the colors you choose, the results can look like marble, tie-dye, dripping paint and much more. Great as a gift itself, or filled with bath salts/oils or other non-food items.

Advertisement

Approximate Time: 20 minutes without drying time

Supplies:

  • glass jar
  • assorted acrylic paints
  • clear craft varnish/sealer
  • paintbrush
  • water

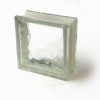
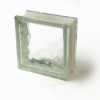
Notes On Jar: Try to use a "bumpy" glass for this project. The more super-slick the glass, the less the paint will stick and the straighter the drips will remain. You want a slightly rough glass to help the paint stick and give lots of interesting paths for the drips.

Notes On Paint

How you want to mix the paint is entirely up to you. I usually mix a tiny bit less than 2/3 paint with a tiny bit more than 1/3 water. You want the paint to be watery enough to drip, but not so watery that it loses color or drips right off the jar. Some paint will drip off, and you definitely need to do this project on a layer of newspapers and garbage bags. But your aim is to make most of the dots drip down, but not completely off, the jar.

Advertisement

Instructions:

  1. Start by washing and drying your glass jar very, very well.
  2. Begin making dripping dots on the jar by dipping your paintbrush into the watery paint and making big dots on the jar.
  3. Let dry between colors. This can take a few days, a few minutes here and there. It may take two minutes to paint the yellow dots, but if you want them to stay yellow, you need to let them dry before adding other colors.
  4. You can mix colors to get a neat effect, just make dots all around the jar with two different colors. Let the colors drip together, don't try to force them by placing one right below the other. Each time you apply a new layer of paint, make the dots smaller. Start the dots big and keep going until they shrink down and blend into the background. It's OK if every dot doesn't drip, just try to make sure most do.
  5. Advertisement

  6. Once you reach the desired effect, let the jar dry for at least a day to make sure everything is set.
  7. Cover the jar in a light, even coat of clear varnish and let dry. The jar will last for awhile, but not forever. You can clean it with a damp rag, but never put it in the dishwasher, oven, soapy sink and so on.

To make the same exact jar I made, you will have to apply the colors as follows:

  • blue and yellow, let them drip together and then dry
  • red, let drip, then dry
  • green and peach, let them drip together, and then dry
  • blue, let drip, then dry
  • red, let drip, then dry
  • yellow, let drip, then dry

By Aysha from Boise, ID

Dripping paint jar.
 
Advertisement

Add your voice! Click below to comment. ThriftyFun is powered by your wisdom!

 
By cat lover 1 (Guest Post)
January 19, 20090 found this helpful

That looks so cool. I love the colors in it. The shape of the vase is cool, too.

 
By Racer (Guest Post)
January 20, 20090 found this helpful

I do a similar project with candles from around the house. I drip the wax on them and it rolls down.
It dries fast and then I usually use them to hold pencils and such.


Add your voice! Click below to comment. ThriftyFun is powered by your wisdom!

 
In This Page
Categories
Crafts Home Decor DecorationsJanuary 18, 2009
Pages
More
🐰
Easter Ideas!
🍀
St. Patrick's Ideas!
🌻
Gardening
Facebook
Pinterest
YouTube
Instagram
Categories
Better LivingBudget & FinanceBusiness and LegalComputersConsumer AdviceCoronavirusCraftsEducationEntertainmentFood and RecipesHealth & BeautyHolidays and PartiesHome and GardenMake Your OwnOrganizingParentingPetsPhotosTravel and RecreationWeddings
Published by ThriftyFun.
Desktop Page | View Mobile
Disclaimer | Privacy Policy | Contact Us
Generated 2024-03-08 19:17:06 in 2 secs. ⛅️️
© 1997-2024 by Cumuli, Inc. All Rights Reserved.
https://www.thriftyfun.com/tf31553513.tip.html