Home |  Index |  Submit Request |  Share Photos |  Share Tips |  Active Topics |  New Feedback  |  Contact Us  |  Search
 User Login:  Username:    Password:      Forgot It?  | Join ThriftyFun!

 Popular Topics
 - Beauty
 - Budget and Finance
 - Christmas *
 - Cleaning
 - Consumer Advice
 - Craft Projects
 - Craft Tips
 - Food Tips
 - Garage Sales
 - Gardening
 - Gifts
 - Green Living
 - Home Improvement
 - Organizing
 - Parenting
 - Parties
 - Pest Control
 - Pets
 - Product Reviews
 - Recipes
 - Repair
 - Thanksgiving
 - Weddings for Less

More Topics

Google Search:

Web thriftyfun.com

About:
RSS Feed
About Us
Media
Advertising
Contact Us
Privacy Statement
Disclaimer

Handmade Journal

By Christine Weber
1x1
Date: 12/21/2005 Topics: Christmas > Gifts > Crafts | Craft Projects > Paper | Photos > Crafts  
1x1
1x1
Post Feedback! | Email Friend | Print | Get Responses | Bookmark | del.icio.us | Link | Rate: Thumbs Up Thumbs Down
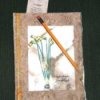
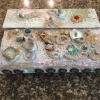
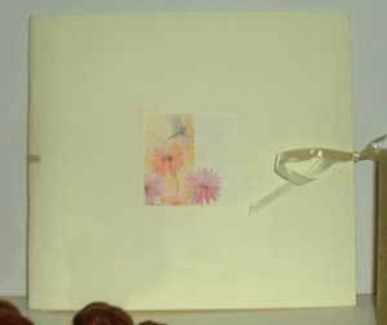
A handmade journal for memories, lists, and recipes. Made of fine paper and a beautiful photo, you may want to make one for yourself as well!

handmade journal

Materials and Equipment:

  • a large plastic bag or several sheets of newspaper
  • a thick piece of cardboard or plywood to cut on
  • a pretty greeting card or photo
  • a velum envelope (optional)
  • an exactoknife
  • a single-hole punch
  • a piece of ribbon, 1/4- 1/2 inches wide and several inches long
  • craft glue or tape
  • photo corner stickers (optional)
  • a 30 inch long ruler with a hard edge
  • a pencil
  • an eraser
  • one sheet of thick, cardstock quality paper, 7 x 17 inches or larger
  • ten or more sheets of good quality paper of an identical pattern, 7 x 17 inches or larger
  • a long reach, heavy-duty stapler (like those used in schools) OR a thin, plain paper journal (available at craft or stationery stores)

Instructions:

1. Before starting, clear the table and cover it with newspaper or a large garbage bag to avoid getting glue on the table. Place a hard cutting surface such as thick cardboard or plywood on top of the table to protect it from cuts made with the exactoknife.

2. Place the piece of cardstock quality paper in front of you. This is going to be the cover of your journal. Using the pencil and ruler, measure off and lightly outline an area that is 7 x 17 inches. You will be folding this paper in half to create a 7 x 8 1/2 inch journal. If you would like a different size, you need to adjust the measurements accordingly.

3. Using the exactoknife and the hard edge of your ruler, cut along the lines you have drawn.

4. Place the pieces of good quality paper in front of you. These are going to be the pages of your journal. Repeat steps two and three for this paper (you can usually cut three or more at a time), but this time cut the paper to slightly smaller measurements (about 1/4 inch smaller) so the paper will fit neatly within the cover.

5. Fold the cover and each of the pages in half. Slip the pages inside the cover. They should just fit neatly inside. Open the book and staple length-wise along the crease. Three evenly divided staples should do it. If you can't find a heavy-duty stapler or are pressed for time, you can 'cheat' on this craft and use a pre-made paper journal. If you do so, follow the next steps to personalize your journal.

6. Place your pretty greeting card or photo in front of you. This card or photo will be placed in a 'window' on the cover of your journal. Decide how large you want the picture to be and outline these measurements on the back of the picture lightly in pencil. Using the exactoknife and the hard edge of your ruler, cut along the lines you have drawn.

7. Open the front cover of your journal and lay it flat on your cutting surface so the back of the front cover is flush against the table. Outline measurements that are about 1/4- 1/2 inches smaller than the measurements of the picture you just cut. Cut a 'window' out of the front cover of your journal using the exactoknife and ruler. Glue or tape your picture onto the back of the front cover, covering this opening. The picture will now fill the window when you flip the book over. Check the book for any stray pencil lines and erase these with the eraser.

8. (optional) If you want to include recipes and clippings in your journal, tape or glue a velum envelope on the inside of the back cover. Use this envelope to store the above. You can also insert photos in your journal by pasting in photo corners and slipping a photo into place. Because they aren't glued in, photos can then be changed whenever you want.

9. Using a single-hole punch, punch a hole halfway down the right side of the front and back covers. Thread a ribbon through these holes and tie closed in a bow.

10. Add a pretty pen and give the journal to the writer on your Christmas list!

Jump to Feedback | Post feedback
Related Links:
Previous: Jingle Bell Ornaments ThriftyFun Next: Covered Matchbox
1x1
 Feedback
1x1
1x1
1x1
1x1
 Sponsors
1x1
1x1

Post By Tanja Cilia (Guest Post) (12/21/2005)
I have been making cheapo versions of this for ages... just fold (even used) 8 A4 papers in two,and cover each 'page' with a full picture from magazines or textbooks (buy cheaply from bazaars or jumble sales or car boot sales). Then add messages from those daily inspirational / gospel / quotations books. Cut letters from magazines to spell message or name of recepient for cover. Stick down middle with UHU or similar transparent-setting glue.
Alternatively, add recipes or poems.


1x1

Post Feedback:
Login using the form on the top of the page to post feedback if you have registered with ThriftyFun. If you have not yet registered, click here. It's FREE!. If you are not registered you can post feedback as a guest below. Please don't use your email address for your name because spam robots can dredge it from our site. Please do not post your feedback more than ONCE. We need to approve all guest feedback and it may take from minutes to hours for that to happen.
(1x1 graphic )
Your Name

Subject

Feedback

text tool text tool text tool text tool

Image Upload: Add an image to your post! Click the "Browse" button below and select an image from your hard drive. Please only select gifs or jpegs. If you have any problems, just email the image to images@thriftyfun.com


If you want to post your email address for responses from readers, obscure it in some way like put spaces between the name and @ sign and service address with (remove spaces) behind it or name (at) server (dot) com . This is for your protection from those creepy Robots.

(1x1 graphic )

© 1997-2008 ThriftyFun.com - Design by Cumuli Design
Disclaimer: ThriftyFun.com cannot accept any responsibility for any injury or damage that you may cause to yourself, others, or property when following any advice given on this site. Read the full disclaimer. If you find any information on ThriftyFun.com or in our newsletters that is either erroneous and/or potentially harmful to others, please Contact Us, immediately.