ThriftyFun Logo
Home   Find   Ask   Share   Answer   Join   Index   Login  
 
 User Login:  Username:    Password:      Forgot It?  | Join ThriftyFun!

 - Beauty
 - Budget and Finance
 - Cleaning
 - Consumer Advice
 - Craft Projects
 - Craft Tips
 - Food Tips
 - Garage Sales
 - Gardening
 - Gifts
 - Green Living
 - Home Improvement
 - Organizing
 - Parenting
 - Parties
 - Pest Control
 - Pets
 - Product Reviews
 - Recipes
 - Repair
 - Weddings for Less

RSS Feed
About Us
Media
Advertising
Contact Us
Privacy Statement
Disclaimer

Soda Can Plant Labels

By Ellen Brown
1x1
Date: 09/17/2009 Topics: Craft Projects > Garden & Yard > Plant Markers | Gardening > Helpful Hints | Photos > Crafts  
1x1
Post Feedback | Get Responses | Bookmark | Link | Print | Print (With Feedback) | Rate: Thumbs Up Thumbs Down | Bookmark and Share
Soda Can Plant Labels
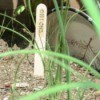
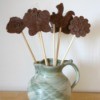
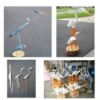
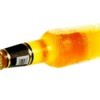
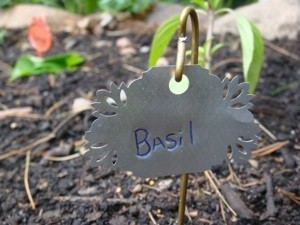
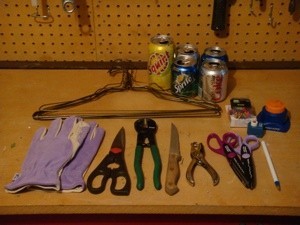
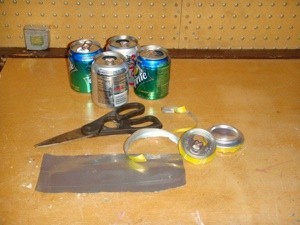
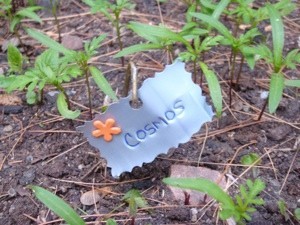
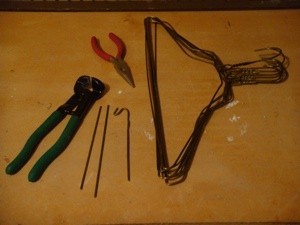
One of my favorite garden crafts is making homemade plant labels from aluminum cans and wire clothes hangers. Not only are they inexpensive and durable, but these labels are actually attractive and fun to make. They are designed to dangle freely on their supports, so when the wind blows their movement makes a gentle clinking noise, turning your tiny reflective plant labels into a collective army of rabbit repellents.

Materials:

  • Assorted aluminum soda/beer cans
  • Wire clothes hangers
  • Gloves (to protect hands when cutting cans)
  • Old steak knife
  • Scissors
  • Needle-nose pliers
  • Paper punch
  • Ball-point pen
  • Embellishment tools used (from Michaels craft store):
  • Scrapbooking scissors (Fiskars)
  • 3 in 1 corner punch (Fiskars)
  • Flower-shaped decorative brads (Provo Craft)

Directions:

Put on your gloves. Use the tip of your scissors to punch a small hole on the side of each end of the can. If your scissors isn't sharp enough, use a steak knife or screwdriver to get the hole started.

Using your scissors, cut off the top and bottom of the can and discard the ends in your recycling bin. If you need to, trim off any excess sharp edges from the remaining piece of aluminum and finesse it a bit until it lays pretty flat.

Cut individual labels from the remaining piece of aluminum according to the desired size. The shape and style of your labels is highly personal. Cut them into circles, triangles, rectangles, even flowers. To add some decorative flair, use fancy corner punches or try trimming the edges with scrapbooking scissors.

I add color-coded brads to my labels (I found some in the shape of flowers). This helps me organize my plantings and remember what color flower is coming up where. You're only limited by your imagination so have fun with it! Just don't forget to leave room to punch a hole for hanging and space to write down the name of the plant.

To write names of plants on your labels, lay them on top of a notebook or thick stack of newspaper and press down hard with a ball point pen. Make sure to press hard enough so that when the ink wears off, the name stays imprinted in the metal. Create a hole for hanging using a paper punch (or a hammer and nail).

Finally, use a wire cutter or tin snips to cut 7-8 inch long support pieces from wire coat hangers. Make an "S" hook at one end using a needle-nose pliers, hang the label on the hook, and pinch the "S" shut to keep it from falling off. Voila! You've got durable, inexpensive plant labels!

About The Author: Ellen Brown is an environmental writer and photographer and the owner of Sustainable Media, an environmental media company that specializes in helping businesses and organizations promote eco-friendly products and services. Contact her on the web at http://www.sustainable-media.com

(1x1 graphic )
Previous: Cooking Instructions for Smoked Ham ThriftyFun Next: Stretching Chicken Salad
(1x1 graphic )
1x1
1x1
 Feedback
1x1
1x1
1x1

By Deb H. (10) Profile Contact
What a great idea! It'll never rust, the name will stay pressed into the label, and I love your colored brads, to remind you of the color of the flower. Thanks for sharing your creative craft! Deb H.

Posted on 09/19/2009 | Report Spam or Abuse

By peggyseitz (11) Profile Contact
This is one of the best ideas I've seen in a long time. We too have rabbit and squirrel problems. I hope this helps. Cute, cute, cute.

Posted on 09/18/2009 | Report Spam or Abuse

By lori104 (3) Contact
What a great idea. Thanks for sharing, I'm going to attempt to make these.

Posted on 09/17/2009 | Report Spam or Abuse

1x1
1x1
 Post Feedback:
1x1
1x1
1x1

Login using the form on the top of the page to post feedback (if you are a registered user). If you have not yet registered, click here to do so. It's FREE!.

1x1
(1x1 graphic )

© 1997-2010 ThriftyFun.com - Design by Cumuli Design
Disclaimer: ThriftyFun.com cannot accept any responsibility for any injury or damage that you may cause to yourself, others, or property when following any advice given on this site. Read the full disclaimer. If you find any information on ThriftyFun.com or in our newsletters that is either erroneous and/or potentially harmful to others, please Contact Us, immediately.