I am a clothing designer living in a TINY studio apartment looking for a cheap table (preferably a high one that is big enough to work on), and shelving that I'm assuming would fit under the table. I'm okay at building things, but maybe you know a cheap way to make shelving and a table? Please give me advice!
Add your voice! Click below to answer. ThriftyFun is powered by your wisdom!
I'm not sure if my idea would be appropriate for you, but I'll tell you the solution that immediately came to my mind when I read your request.
I would buy a sheet of plywood with the largest dimensions your space allowed, the largest being 4X8 ft or 4X4 ft or 2X4 ft. Usually these sizes are precut and available at stores like Lowes, Home Depot, lumber-yards and large hardware stores.
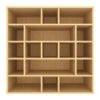
The next step would be to buy 2,3 or 4 of the "assemble it yourself" bookcase/shelf kits. They are available in various heights. I have one that is about 36 inches high and 30 inches wide. I can buy one that size for $20.00 which is less than I would pay for wood and hardware to build it. After the bookcases are assembled just place the sheet of plywood on top of the bookcases. Just face the shelves outward, one bookcase per side. I'd buy a roll of that waffle texture, rubber, no-slip, shelf liner stuff ($1 at dollar stores) and put a strip on top of each bookcase to keep the plywood from sliding around.
Another item you could use for the table top (instead of plywood) would be a flat surface, hollowcore, interior door. (There are no holes, hinges, doorknobs, etc. on these when you buy them!) I think the door dimensions are approximately 30 inches X 84 inches or 36 inches X 84 inches. This could also rest on top of the bookcases. The doors are lightweight and relatively inexpensive.
This solution would probably only require a screwdriver, used to assemble the bookcases! Another advantage of this solution is that it can be easily and quickly dismantled and moved. I'm sure, in my area, that I could construct this with new material for $75-$100. If you have a "Habitat ReStore" store in your area you could possibly located these items "used" and assemble it for much less. Good Luck to you!
IKEA sells inexpensive table tops. You can use anything to prop them up -- crates, cubes, etc.
Or...you can score a wooden door off your local Freecycle and do the same thing. :)
You want totally cheap? Today from the food bank I got fifteen matching cardboard boxes, and with a roll of clear shipping tape I'm building a wall of shelf boxes! I lay them all on their sides stacked, and tape everything everywhere. So for three dollars, hey, right?
A piece of plywood or an old door works and 2 saw horses fashioned into a table should do the trick for you. For the book shelves, why not use bricks or cement blocks with pieces of wood?
Another tip... walk around Hell's Kitchen or the Village to see what people throw out. My friend collected some great furniture from those neighborhoods when he lived in NYC, refurbished them, and still has that furniture today.
You could get a door, plywood or a wooden pallet from one of those home stores like lowes. If you get a wooden pallet, just deconstruct it so that you have individual planks of wood. then take them into a place like lowes and have them cut so they're all even, except for 2 pieces, which need to be the width of the table.. like this:
---------------i---------------i-------------
---------------i---------------i-------------
---------------i---------------i-------------
---------------i---------------i-------------
---------------i---------------i-------------
---------------i---------------i-------------
those 2 pieces running across the others...
then just nail or screw the wood to the cross sections & buy some sand paper to get rid of the rough edges and paint or stain the table. stack it on cement blocks, buy some legs for it, or build some legs for it out of the remaining lumber.
You can also take a door, or a piece of plywood & sand them down so there's no rough edges, or wrap them up very tightly in cardboard. You can get cardboard for free from grocery stores because they throw tons of it away! Then just wrap the plywood or door up very tightly in the cardboard, using a staple gun. Just make sure to staple the cardboard so it's flat on top. Then you can cover it up with a table cloth or some inexpensive fabric.
As for the milk crates, just get some floral wire (the thicker kind) then call some gas stations, grocery stores and/or convenience stores & ask if you can have some of their milk crates. Those are about 1 foot by 1 foot, cubbie holes and you can stack them on top of eachother, then all you have to do is use the floral wire to fasten them together. then spray paint them whatever color you want. you can also upholster them inexpensively with some fabric, cardboard and hot glue, or if you like how they look, just put in some Plexiglas, on the bottoms..
All you'd need to upholster them is some spare fabric, a hot glue gun and some cardboard cut out to be slightly less than 12 x 12 (for the bottom part, so you can set things on top of the milk crates like you would shelves). Just put a dab of hot glue on the 4 corners of the cardboard, set the cardboard on the bottom, like this:
i-------------i
i i
i i
i i
i___________i
i-------------i
(the solid line being the cardboard)
Then just glue the fabric inside & outside of the crate.
Add your voice! Click below to answer. ThriftyFun is powered by your wisdom!