ThriftyFun Logo
Home Find Ask Share Contests Answer Join Index Login
 
 User Login:  Username:    Password:      Forgot It?  | Join ThriftyFun!

 - Beauty
 - Budget and Finance
 - Cleaning
 - Consumer Advice
 - Craft Projects
 - Craft Tips
 - Food Tips
 - Garage Sales
 - Gardening
 - Gifts
 - Green Living
 - Home Improvement
 - Organizing
 - Parenting
 - Parties
 - Pest Control
 - Pets
 - Product Reviews
 - Recipes
 - Repair
 - Weddings for Less

RSS Feed
About Us
Media
Advertising
Contact Us
Privacy Statement
Disclaimer

Craft Project: Paper Rose

1x1
Date: 01/07/2010 Topics: Craft Projects > Paper | Photos > Crafts  
1x1
Post Feedback | Get Responses | Bookmark | Link | Print | Print (With Feedback) | Rate: Thumbs Up Thumbs Down | Bookmark and Share
Craft Project: Paper Rose
How to make realistic paper roses from various papers and materials.

Approximate Time: 30 minutes

Supplies:

  • Scissors
  • Paper
  • Glue
  • Marker(s) or pens
  • Floral wire
  • Forceps

Instructions:

    Cut out pieces of rose as follows. One rose is made from recycled grocery bag (kraft paper).
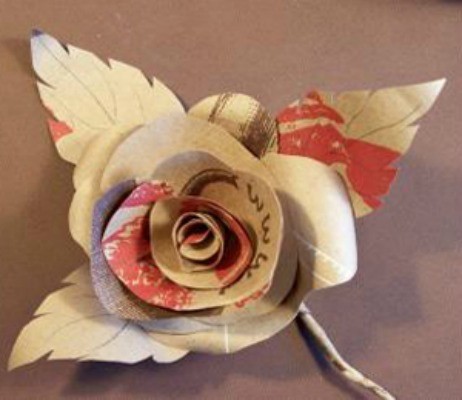
    1. You want 3 outer petals, 4 inner petals and 2 or 3 leaves.

    2. Pieces are manipulated to resemble rose petals/leaves.

    3. Following photos, the outer petals are cut out, a small cut is made in the bottom of the petal. The resulting two pieces are glued by drawing one edge over the other.

    4. The top edges of the petal is curled with scissors and your thumb.

    5. The inner pedals: cut 3 or 4 circles as shown. The center is cut out so that you have a round piece as shown.

    6. Using forceps, wind petal around itself, so that a cone shape is made.

    7. Glue in one spot at the end of the circle. Hold until dry. (7-10sec.)

    8. Glue the three outer petals together at the bases.

    9. Add three strips to inner cones that have been glued together. These will allow the fastening of the cones to the outer petals.

    10. Add two or three leaves by cutting patterns, serrating the edges with scissors, and gluing to the bottom of the petal structure.

    Rose(s) can be used for corsages, display, or in floral arrangements.

    By Creativeman from Chatsworth, CA

(1x1 graphic )
Previous: Keep Butter from Burning ThriftyFun Next: Ants in the Bathroom
(1x1 graphic )
1x1
1x1
 Feedback
1x1
1x1
1x1

By keeper60 (259) Profile Contact
redhaterb, gree. I'd also like to see how the "leaves and petals" look cut before the finished product. Tweezers would work just fine. I have locking forceps I found at a yard sale.

Posted on 01/13/2010 | Report Spam or Abuse

By Stellaluna (25) Profile Blog! Contact
These are really beautiful! I am guessing that both pliers or even tweezers would work as alternatives to the forceps.

Posted on 01/12/2010 | Report Spam or Abuse

By redhatterb (321) Profile Contact
I agree it looks complicated and where does the average person get forceps? They would be kind of expensive to buy for just one craft item. It might be easier to picture if there was step by step pictures along with the directions and the already assembled flowers.

Posted on 01/10/2010 | Report Spam or Abuse

By keeper60 (259) Profile Contact
Looks a little complicated...

Posted on 01/08/2010 | Report Spam or Abuse

1x1
1x1
 Post Feedback:
1x1
1x1
1x1

Login using the form on the top of the page to post feedback (if you are a registered user). If you have not yet registered, click here to do so. It's FREE!.

1x1
(1x1 graphic )

© 1997-2010 ThriftyFun.com - Design by Cumuli Design
Disclaimer: ThriftyFun.com cannot accept any responsibility for any injury or damage that you may cause to yourself, others, or property when following any advice given on this site. Read the full disclaimer. If you find any information on ThriftyFun.com or in our newsletters that is either erroneous and/or potentially harmful to others, please Contact Us, immediately.