Home |  Index |  Submit Request |  Share Photos |  Share Tips |  Active Topics |  New Feedback  |  Contact Us  |  Search
 User Login:  Username:    Password:      Forgot It?  | Register

 Popular Topics
 - Beauty
 - Budget and Finance
 - Christmas *
 - Cleaning
 - Consumer Advice
 - Craft Projects
 - Craft Tips
 - Food Tips
 - Garage Sales
 - Gardening
 - Gifts
 - Green Living
 - Home Improvement
 - Organizing
 - Parenting
 - Parties
 - Pest Control
 - Pets
 - Product Reviews
 - Recipes
 - Repair
 - Thanksgiving
 - Weddings for Less

More Topics

Google Search:

Web thriftyfun.com

About:
RSS Feed
About Us
Media
Advertising
Contact Us
Privacy Statement
Disclaimer

Dried Leaf/Flower Wreath Cards

By Christine Weber
1x1
Date: 12/05/2005 Topics: Christmas > Cards | Craft Projects > Christmas | Photos > Crafts  
1x1
1x1
Post Feedback! | Email Friend | Print | Get Responses | Bookmark | del.icio.us | Link | Rate: Thumbs Up Thumbs Down
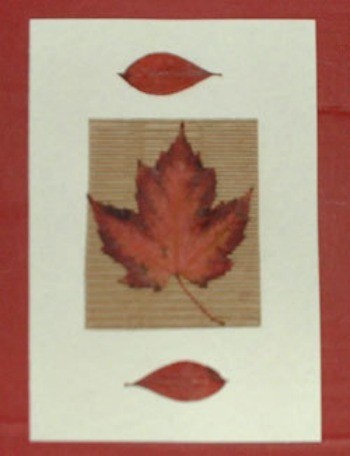
These cards make frugal use of all those leaves carted home and pressed in books in late October. They are reborn again in a pretty set of stationery cards for correspondence with loved ones or as a gift for a friend who loves to write. If leaves aren't available, dried flowers work well too and look particularly festive formed into a wreath for Christmas.

Leaf Cards

Materials and Equipment:

  • a large plastic bag or several sheets of newspaper
  • several plain stationery cards, with envelopes
  • craft glue
  • a lid from a used plastic container (such as a yogurt container)
  • a glue spreader or Q-tip
  • a gold or silver ink pen (optional)
  • thin ribbon (color of your choice) (optional)
  • corrugated cardboard or coloured paper (optional)
  • tissues
  • pressed dried leaves (one or more per card)
OR
  • pressed dried flowers (a dozen or so per card)

Instructions:

1. Before you start, clear the table and cover it with newspaper or a large garbage bag to avoid getting glue on the table.

2. To begin, make a "practice card" by arranging your dried leaves or flowers on the front of a card until you are satisfied with the arrangement (this will take longer if you are making the flower wreath).

3. Place this card carefully aside and take out a fresh card.

4. Pour some glue onto the plastic lid.

5. Using the glue spreader or Q-tip to spread glue across the back of each dried leaf or flower, transfer each leaf or flower from the "practice card" to the fresh card, gluing each item in place as you go. This method allows you to recreate your original design accurately. You may choose to place a piece of corrugated cardboard or colored paper behind the leaves/flowers as a background (see photo). Clean off any glue peaking out from the edges of the design with a tissue or fingernail.

6. Allow the card to dry and repeat steps 2-5 for each card you want to make.

7. Once all the cards are completely dried, embellish them in any way you would like. For the leaf cards, I sometimes like to write the botanical name of each leaf in gold ink at the bottom of each card. For the dried flower cards, try tying a ribbon into a bow and gluing it to the bottom of the wreath to give it a festive feel, or simply write a greeting across the bottom of the card. The cards are also lovely unadorned.

8. Place cards in a pretty box or tie with a ribbon if you are giving them as a gift.

Jump to Feedback | Post feedback
Related Links:
Previous: Holiday Greens Planter ThriftyFun Next: Sassy (Cavalier King Charles Spaniel)
1x1
 Feedback
1x1
1x1
1x1
1x1
 Sponsors
1x1
1x1

No Feedback Yet

Be the first to post feedback! Click here to post feedback.

1x1

Post Feedback:
Login using the form on the top of the page to post feedback if you have registered with ThriftyFun. If you have not yet registered, click here. It's FREE!. If you are not registered you can post feedback as a guest below. Please don't use your email address for your name because spam robots can dredge it from our site. Please do not post your feedback more than ONCE. We need to approve all guest feedback and it may take from minutes to hours for that to happen.
(1x1 graphic )
Your Name

Subject

Feedback

text tool text tool text tool text tool

Image Upload: Add an image to your post! Click the "Browse" button below and select an image from your hard drive. Please only select gifs or jpegs. If you have any problems, just email the image to images@thriftyfun.com


If you want to post your email address for responses from readers, obscure it in some way like put spaces between the name and @ sign and service address with (remove spaces) behind it or name (at) server (dot) com . This is for your protection from those creepy Robots.

(1x1 graphic )

© 1997-2008ThriftyFun.com - Design by Cumuli Design
Disclaimer: ThriftyFun.com cannot accept any responsibility for any injury or damage that you may cause to yourself, others, or property when following any advice given on this site. Read the full disclaimer. If you find any information on ThriftyFun.com or in our newsletters that is either erroneous and/or potentially harmful to others, please Contact Us, immediately.