Home |  Index |  Submit Request |  Share Photos |  Share Tips |  Active Topics |  New Feedback  |  Contact Us  |  Search
 User Login:  Username:    Password:      Forgot It?  | Join ThriftyFun!

 Popular Topics
 - Beauty
 - Budget and Finance
 - Christmas *
 - Cleaning
 - Consumer Advice
 - Craft Projects
 - Craft Tips
 - Food Tips
 - Garage Sales
 - Gardening
 - Gifts
 - Green Living
 - Home Improvement
 - Organizing
 - Parenting
 - Parties
 - Pest Control
 - Pets
 - Product Reviews
 - Recipes
 - Repair
 - Thanksgiving
 - Weddings for Less

More Topics

Google Search:

Web thriftyfun.com

About:
RSS Feed
About Us
Media
Advertising
Contact Us
Privacy Statement
Disclaimer

Craft Project: Homemade Fall Place Mats

1x1
Date: 10/06/2008 Topics: Craft Projects > Crafts for Kids | Photos > Holiday > Thanksgiving | Thanksgiving > Crafts  
1x1
1x1
Post Feedback! | Email a Friend | Get Responses | Bookmark | Link | Rate: Thumbs Up Thumbs Down | Print | Print (With Feedback)
Homemade Fall Place Mats
The leaves are changing colors on the trees! What a perfect time to make a personalized Fall place mat for your little ones! We made these last year and the leaf colors aren't as vibrant as they had been when we first made them. We may have to sneak out and grab some new leaves and make another set this year.

Approximate Time: 20 minutes or less

Supplies:

  • Leaves
  • Clear Contact Paper
  • Large Construction Paper
  • Glue Stick
  • Scissors
  • Photo of Child

Instructions:

Collect leaves with your child. You may want to press the leaves in between the pages of a heavy book over night if they are curled on the edges.

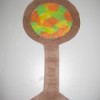
Glue a photo of your child to the construction paper. I glued ours to a piece of solid white paper first, so that it was matted and stood out a bit.

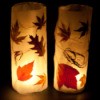
Let your child arrange the leaves on the construction paper in any manner they wish to do.

When they are arranged to their liking, use a dab of glue to hold each in place.

Carefully cover the entire sheet of construction paper with a piece of clear contact paper, pressing out any air bubbles.

Cover the backside with contact paper as well.

Trim the edges of the place mat with a scissors and then enjoy using it daily!

By Michele from East Bethel, MN

Related Links:
Previous: Looking For 15 in. Foam Pumpkins ThriftyFun Next: Craft: Quick Halloween Wreath
1x1
 Feedback
1x1
1x1
1x1
1x1
 Sponsors
1x1
1x1

Post By mary (Guest Post) (11/13/2008)
Thank you for this great idea! I did this project last week-end with my three granddaughters. They enjoyed doing this and the place mats turned out really nice.

Report Spam or Abuse


Post by Deeli (320) | (10/10/2008)
Contact
What a lovely idea! This brings back memories of when I was a wee one in the late '50's/ early 60's of collecting leaves, sandwiching them between two pieces of wax paper, placing a towel over them on the ironing board and pressing them together with a hot iron :-) We would then use pinking shears to cut the edges and use as place mats :-) Thanks for bringing back this long forgotten memory :-)

Report Spam or Abuse


Post by Savings Assistant (136) | (10/06/2008)
Profile |Blog! |Contact
My nieces did this for all the kids one year and it was such a nice touch to the holiday table.
http://savingspotpourri.blogspot.com/

Report Spam or Abuse


1x1

Post Feedback:
Login using the form on the top of the page to post feedback if you have registered with ThriftyFun. If you have not yet registered, click here. It's FREE!. If you are not registered you can post feedback as a guest below. Please don't use your email address for your name because spam robots can dredge it from our site. Please do not post your feedback more than ONCE. We need to approve all guest feedback and it may take from minutes to hours for that to happen.
(1x1 graphic )
Your Name

Subject

Feedback

text tool text tool text tool text tool

Image Upload: Add an image to your post! Click the "Browse" button below and select an image from your hard drive. Please only select gifs or jpegs. If you have any problems, just email the image to images@thriftyfun.com


If you want to post your email address for responses from readers, obscure it in some way like put spaces between the name and @ sign and service address with (remove spaces) behind it or name (at) server (dot) com . This is for your protection from those creepy Robots.

(1x1 graphic )

© 1997-2008 ThriftyFun.com - Design by Cumuli Design
Disclaimer: ThriftyFun.com cannot accept any responsibility for any injury or damage that you may cause to yourself, others, or property when following any advice given on this site. Read the full disclaimer. If you find any information on ThriftyFun.com or in our newsletters that is either erroneous and/or potentially harmful to others, please Contact Us, immediately.