Home |  Index |  Submit Request |  Share Photos |  Share Tips |  Active Topics |  New Feedback  |  Contact Us  |  Search
 User Login:  Username:    Password:      Forgot It?  | Join ThriftyFun!

 Popular Topics
 - Beauty
 - Budget and Finance
 - Christmas *
 - Cleaning
 - Consumer Advice
 - Craft Projects
 - Craft Tips
 - Food Tips
 - Garage Sales
 - Gardening
 - Gifts
 - Green Living
 - Home Improvement
 - Organizing
 - Parenting
 - Parties
 - Pest Control
 - Pets
 - Product Reviews
 - Recipes
 - Repair
 - Thanksgiving
 - Weddings for Less

More Topics

Google Search:

Web thriftyfun.com

About:
RSS Feed
About Us
Media
Advertising
Contact Us
Privacy Statement
Disclaimer

Chandelier Light Covers

1x1
Date: 07/18/2007 Topics: Craft Projects > Home Decor > Decorations | Photos > Crafts  
1x1
1x1
Post Feedback! | Email Friend | Print | Get Responses | Bookmark | del.icio.us | Link | Rate: Thumbs Up Thumbs Down
Chandelier Light Covers
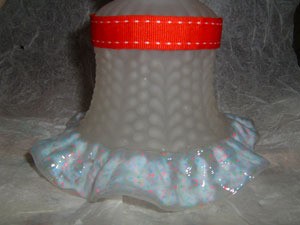
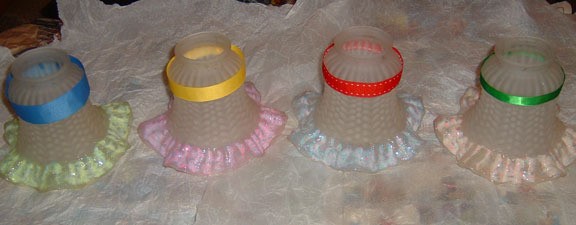
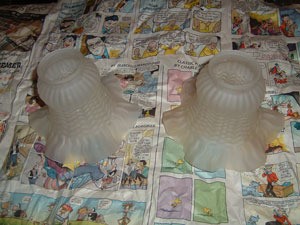
Do you have old Chandelier light covers that give you a headache when you look at them? With a little paint and ribbon, you can have brand new covers!

Total project time: 4 hours

Actual work time: 2 hours

Materials

  • Four chandelier covers, cleaned and dried
  • Four colors of craft paint; I used blue, green, pink, and yellow
  • Four colors of ribbon, long enough to circle the top of the covers; I used blue, green, red, and yellow
  • Hot glue
  • Newspaper
  • Paintbrush and paper plate, optional

barechandelier300x225.jpg

Instructions

Wash the covers thoroughly. After the covers are completely dry, lay them on your spread out newspaper. Choose a color of paint and either 1) squirt some on the paper and use your brush, or 2) squirt some paint directly on the bottom of the cover; I used the second method. Using the tip of the paint bottle (or your paintbrush), spread the paint onto the cover thick enough so you cannot see the cover. Use a different color on each cover. Let dry. Measure the length of ribbons to fit snugly around the top of the covers, overlapping an inch, and cut.

chandelier2300x225.jpg

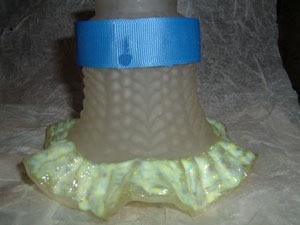
Put the red ribbon on the blue cover, the green ribbon on the yellow cover, the blue ribbon on the green cover, and the yellow ribbon on the pink cover. place a drop of hot glue on the cover and put one end of the ribbon down. Wrap the ribbon around the cover, gluing occasionally to help it stay in place. Glue the end securely to the beginning of the ribbon.

By Jessica from Marion, NC

chandelierAll576x225.jpg

Jump to Feedback | Post feedback
Related Links:
Previous: Keeping Oxygen Tubes On At Night ThriftyFun Next: Homemade Candle Scents
1x1
 Feedback
1x1
1x1
1x1
1x1
 Sponsors
1x1
1x1

Post By (Guest Post) (07/20/2007)
Very pretty! I especially like the bottom trim!


Post By Susie (Guest Post) (07/19/2007)
Nicely done! This would be wonderful in a little girls room!


Post by pamphyila (271) | (07/18/2007)
Blog! |Contact
Not my taste, especially the ribbon at the top - but you could take this idea and decorate your glass fixtures with paint. I have done that myself...


1x1

Post Feedback:
Login using the form on the top of the page to post feedback if you have registered with ThriftyFun. If you have not yet registered, click here. It's FREE!. If you are not registered you can post feedback as a guest below. Please don't use your email address for your name because spam robots can dredge it from our site. Please do not post your feedback more than ONCE. We need to approve all guest feedback and it may take from minutes to hours for that to happen.
(1x1 graphic )
Your Name

Subject

Feedback

text tool text tool text tool text tool

Image Upload: Add an image to your post! Click the "Browse" button below and select an image from your hard drive. Please only select gifs or jpegs. If you have any problems, just email the image to images@thriftyfun.com


If you want to post your email address for responses from readers, obscure it in some way like put spaces between the name and @ sign and service address with (remove spaces) behind it or name (at) server (dot) com . This is for your protection from those creepy Robots.

(1x1 graphic )

© 1997-2008ThriftyFun.com - Design by Cumuli Design
Disclaimer: ThriftyFun.com cannot accept any responsibility for any injury or damage that you may cause to yourself, others, or property when following any advice given on this site. Read the full disclaimer. If you find any information on ThriftyFun.com or in our newsletters that is either erroneous and/or potentially harmful to others, please Contact Us, immediately.