Home |  Index |  Submit Request |  Share Photos |  Share Tips |  Active Topics |  New Feedback  |  Contact Us  |  Search
 User Login:  Username:    Password:      Forgot It?  | Register

 Popular Topics
 - Beauty
 - Budget and Finance
 - Christmas *
 - Cleaning
 - Consumer Advice
 - Craft Projects
 - Craft Tips
 - Food Tips
 - Garage Sales
 - Gardening
 - Gifts
 - Green Living
 - Home Improvement
 - Organizing
 - Parenting
 - Parties
 - Pest Control
 - Pets
 - Product Reviews
 - Recipes
 - Repair
 - Thanksgiving
 - Weddings for Less

More Topics

Google Search:

Web thriftyfun.com

About:
RSS Feed
About Us
Media
Advertising
Contact Us
Privacy Statement
Disclaimer

Craft Project: Easy Plastic Chocolate Easter Eggs

By Debra Frick
1x1
Date: 03/19/2008 Topics: Craft Projects > Easter > Decorations | Easter > Crafts | Photos > Holiday > Easter  
1x1
1x1
Post Feedback! | Email Friend | Print | Get Responses | Bookmark | del.icio.us | Link | Rate: Thumbs Up Thumbs Down
Plastic Chocolate Easter Eggs
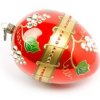
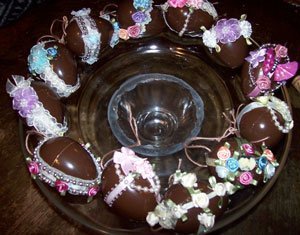
This article is in honor of my mom Patricia Churchman who, when she was alive, never let an Easter pass without going to our local chocolate shop and buying us the most beautiful chocolate eggs. They were so beautiful that we even did not want to eat them. I tried once spraying one of them with clear plastic spray to try and preserve them but it did not work and became an awful mess. So for all the wonderful moms of the world that buy their kids beautiful works of art chocolate eggs, this one is for you!

The other day when I was doing my shopping at Walmart, I happened to see that they now sell a chocolate brown paint for plastic. It is called Krylon Fusion's paint. So I painted a dozen of my empty plastic eggs. It was wonderful they came out looking just like they were made of chocolate. The eggs my mom bought had beautiful sculptured flowers and non-pareils and birds and butterflies made out of frosting so I tried to make mine look like they just came out of the chocolate shop using ribbons and string beads and ribbons flowers.

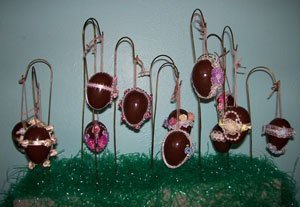
My husband made me a dozen little Shepherd's hooks to hang them from out of old wire hangers that my sister gave me. I will also give the instructions for making these. I made a base of Styrofoam and Easter grass to put the Sheppard's hooks into. I made mine long and skinny to fit my dinning room table but these could also be put into a vase or an Easter basket. The eggs could also be hung on an Easter tree.

ChocolateEggs2_300x235.jpg

Time to complete: 1 hour for eggs to dry 2 hours to decorate

Materials

  • 1 dozen plastic Easter eggs
  • 1 can of Krylon Fusions paint in brown
  • Odds and ends of ribbons, string beads, ribbon roses and ribbon flowers
  • Glue gun and glue sticks
  • Crochet thread

Instructions

Spray paint the eggs brown. Decorate any way you like with the ribbons, string beads, and flowers. The eggs that I bought had two little holes in the end of them that I strung some crochet thread through so I could hang them.

Shepherd's Hooks

Materials

  • 6 wire hangers
  • Wire cutters
  • Channel lock pliers

Instructions

Cut the hooks off the wire hangers with wire cutters. With large channel locks he straightened each piece of wire. On each end of wire make a half inch turn up and then slightly squeezed together to make a hook. Using a tomato paste can bend each end to make a curve. Wrap tightly slightly passed the half way mark on the can as the wire will spring back some. Cut wire in half. You now have to Shepherd's hooks to hang your eggs from. They can be spray painted white or gold. I left mine as is for the sake of time.

The Base

Materials

  • Styrofoam
  • Easter grass

Instructions

Glue Easter grass to the Styrofoam.

About The Author: Debra Frick is a mother of 5 and a grandmother to 8 grandsons and one granddaughter. She is a published author and poetress. Recycling and saving money are her passions. She also loves crocheting and cooking. She is also a pet rescue volunteer and has many pets of her own.

Jump to Feedback | Post feedback
Related Links:
Previous: ThriftyFun Recipes - March 19, 2008 ThriftyFun Next: Refinishing a Wood Coffee Table
1x1
 Feedback
1x1
1x1
1x1
1x1
 Sponsors
1x1
1x1

Post by Sewing Granny (117) | (03/22/2008)
Profile |Contact
I like this idea a lot.

Report Spam or Abuse


Post by perfumed fan (529) | (03/19/2008)
Profile |Contact
What a loving tribute to your mom.

Report Spam or Abuse


1x1

Post Feedback:
Login using the form on the top of the page to post feedback if you have registered with ThriftyFun. If you have not yet registered, click here. It's FREE!. If you are not registered you can post feedback as a guest below. Please don't use your email address for your name because spam robots can dredge it from our site. Please do not post your feedback more than ONCE. We need to approve all guest feedback and it may take from minutes to hours for that to happen.
(1x1 graphic )
Your Name

Subject

Feedback

text tool text tool text tool text tool

Image Upload: Add an image to your post! Click the "Browse" button below and select an image from your hard drive. Please only select gifs or jpegs. If you have any problems, just email the image to images@thriftyfun.com


If you want to post your email address for responses from readers, obscure it in some way like put spaces between the name and @ sign and service address with (remove spaces) behind it or name (at) server (dot) com . This is for your protection from those creepy Robots.

(1x1 graphic )

© 1997-2008ThriftyFun.com - Design by Cumuli Design
Disclaimer: ThriftyFun.com cannot accept any responsibility for any injury or damage that you may cause to yourself, others, or property when following any advice given on this site. Read the full disclaimer. If you find any information on ThriftyFun.com or in our newsletters that is either erroneous and/or potentially harmful to others, please Contact Us, immediately.