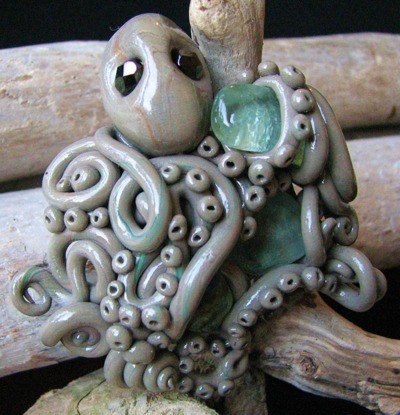
I use a lot of different colors of polymer clay in my jewelry-making, which inevitably means that I end up after a bit of time with otherwise, inadequate scraps in every color. Don't throw out those pieces! Ball them together and make this charming octopus fellow.
Approximate Time: 1 hour
Advertisement
Supplies:
scraps of polymer clay
2 matching beads for eyes
can of clear spray lacquer (quick-dry)
3 pieces sea glass/craft glass
baking sheet
oven
pencil with eraser or cotton swab
Instructions:
Heat oven to 300 degrees F.
Ball together all of your polymer clay scraps.
Mush and knead the clay until warm and a uniform color (may take 10 minutes).
Form a ball approximately 1 1/2 inch in diameter for use as the octopus' head.
Make two indentations with pencil's eraser/cotton swab where you want the eyes to go, about half of the depth down as is your beads' depth so that the beads end up sticking up out of the surface of the head when placed.
Take your two beads and put them into the indentations, pressing firmly into the clay to set.
Make another ball from the clay, about an inch across.
Advertisement
Take the remaining clay and divide into nine equal parts.
Roll eight of those pieces of clay into "snakes" by taking balls and lengthening them into tapered, long shapes; these are the octopus' tentacles.
Flatten the inch-across ball of clay slightly; this will become a base for attaching the head and wrapping the tentacles around the 3 pieces of glass.
Place the head onto the top of the flattened ball of clay, pressing firmly so that they stick to one another.
Choose a piece of sea glass/craft glass, and press onto the clay disc.
Wrap your tentacles, one by one, around and over the glass pieces, one after the other until the space of the clay disc is not only covered in coils and spirals, but spills over just a bit to hide the "base" you are using to hold everything together.
Advertisement
Take the ninth section of clay and form dozens of tiny balls, as small as you comfortably can.
Place these on the visible parts of the tentacles, pushing them into them with the point of a pencil to form the suction cups of the octopus (need not be on every single surface).
Bake in preheated oven for ten minutes on a baking sheet.
Turn off oven and let cool completely, about a half of an hour.
Spray very lightly with clear spray paint lacquer and let dry overnight, until no longer tacky.
Name your new friend, who can adorn a necklace as a focal component, grace your fridge as a magnet, or become part of a very interesting display of driftwood and shells in your home's decor! The possibilities are limitless!
I adore this guy! Thank you so much for sharing this o-so-creative craft with us! I desperately want to try it but i know it will never be as adorable as yours! He is precious!
This is wonderful! I have been flirting with the idea of using polymer clay. I will save this great idea for when I do begin using the clay and have leftovers.
He is beautiful! I'm not sure it is as easy to make as you make it sound but I think I may have to try it. He is just so cute! Thanks for taking your time to instruct us on how to make him!