Vermicomposting (composting with worms) is easy, odorless, cheap, and great for the environment. It takes up little space, can be done year-round and no pets will love your garbage as unconditionally as the tiny Red Wiggler!
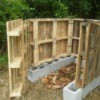
To house your worms you need a wooden or dark-colored plastic box equipped with a cover. Worms need a moist, dark environment to ensure they don't dry out. Bins can be ordered online or purchased at nurseries or garden stores, but it's easy (and inexpensive) to make your own. See instructions below.
Place your worm box in an area that maintains temperatures of between 55-75ºF. This provides the optimum environment for worms to convert waste to compost. Basements or large closets work well, or the daring might consider incorporating their bins into a coffee or end table.
Bedding needs to hold moisture, yet remain light and fluffy so the worms have adequate air. Worms eventually eat the bedding along with your garbage so avoid shiny magazines and colored inks-they're toxic. Paper towels, corrugated cardboard or newspapers work best. Cut them into strips one inch wide. You'll need about 4-6 lbs (dry weight) of bedding for a 1"x 2"x 2" box.
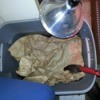
Worms need to keep moist to breathe. Too much moisture and they'll drown. Before adding bedding to the bin, dip it in water for a few seconds then shake off the excess. Also, drop in one or two handfuls of soil to provide the worms with some grit for digestion.
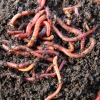
The garbage to worm ratio is approximately 1:2. If you generate 1 pound of compostable garbage a day, you'll need about 2 pounds of worms. A good rule of thumb is 1,000 worms (1lb) to start, twice that if you're going to be feeding them your garden waste as well. Under ideal composting conditions, worm populations grow quickly. Most of the hatchlings and capsules (cocoons or eggs) are lost during compost harvesting. The population of your ranch will remain in check according to the amount of food available to sustain it. Order composting worms from a specialty or online garden store. Regular earthworms won't work well for composting.
Dump your worms directly onto the prepared bedding and spread them out. Leave the lid open. Redworms dislike light, so most will move down into the bedding quickly. Inspect those still on the surface after an hour and remove them if they are unhealthy or dead.
Add scraps to your worm box as you generate them, cover them with an inch or so of existing bedding and close the lid. Put waste in a new location each time you add it and check the worm's progress every two weeks. Fluff up the bedding and monitor the moisture as things compose and compact. A good air supply will keep the box free of odors.
After 3-5 months, the compost will be ready for harvest. Food scraps or bedding added within the past 3 months may be left in the bid for further worm action. Here are three easy ways to harvest compost:
2 x 2 box (2-person box)
Materials and Equipment:
Construction:

About The Author: Ellen Brown is an environmental writer and photographer and the owner of Sustainable Media, an environmental media company that specializes in helping businesses and organizations promote eco-friendly products and services. Contact her on the web at http://www.sustainable-media.com
Add your voice! Click below to comment. ThriftyFun is powered by your wisdom!
Great article! My mom used to keep a compost bin (sort of a walled- in area about 3'x5') in the back yard. One of the few garbage items she didn't put in there was potato peels. I don't know where she got this info, but she said they would cause blight on tomato plants. She never added worms to the bed but we always had plenty.
Can you use the finished product in your house plants?
What if worms get into houseplants?
Add your voice! Click below to comment. ThriftyFun is powered by your wisdom!