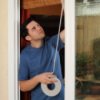
You can weatherstrip your doors even if you're not an experienced handyman. There are several types of weatherstripping for doors, each with its own level of effectiveness, durability and degree of installation difficulty. Select among the options given the one you feel is best for you. The installations are the same for the two sides and top of a door, with a different, more durable one for the threshold.
Tools: Knife or Shears, Tape measure
Evaluation: extremely easy to install, invisible when installed, not very durable, more effective on doors than windows.
Installation: stick foam to inside face of jamb.
Tools: Hammer, nails, Tin snips, Tape measure
Evaluation: easy to install, visible when installed, durable.
Evaluation: easy to install, visible when installed, not very durable.
Installation: nail strip snugly against the closed door. Space nails 8 to 12 inches apart.
Tools: Tin snips, Hammer, nails, Tape measure
Evaluation: easy to install, invisible when installed, extremely durable.
Installation: cut to length and tack in place. Lift outer edge of strip with screwdriver after tacking, for better seal.
Note: These methods are harder than 1 through 4
Tools: Hack saw, Hammer, nails, Tape measure
Evaluation: difficult to install (alignment is critical), visible when installed, durable but subject to damage, because they're exposed, excellent seal.
Installation: cut and fit strips to head of door first: male strip on door, female on head; then hinge side of door: male strip on jamb, female on door; finally lock side on door, female on jamb.
Evaluation: very difficult to install, exceptionally good weather seal, invisible when installed, not exposed to possible damage.
Installation: should be installed by a carpenter. Not appropriate for do-it-yourself installation unless done by an accomplished handyman.
Tools: Screwdriver, Hack saw, Tape measure
Evaluation: useful for flat thresholds, may drag on carpet or rug.
Installation: cut sweep to fit 1/16 inch in from the edges of the door. Some sweeps are installed on the inside and some outside. Check instructions for your particular type.
Tools: Screwdriver,Hack saw,Plane,Tape measure
Evaluation: useful with wooden threshold that is not worn very durable, difficult to install (must remove door).
Installation: remove door and trim required amount off bottom. Cut to door width. Install by sliding vinyl out and fasten with screws.
Tools: Screwdriver, Hack saw, Plane, Tape measure
Evaluation: useful where there is no threshold or wooden one is worn out, difficult to install, vinyl will wear but replacements are available.
Installation: remove door and trim required amount off bottom. Bottom should have about 1/8" bevel to seal against vinyl. Be sure bevel is cut in right direction for opening.
Evaluation: very difficult to install, exceptionally good weather seal.
Installation: should be installed by a skilled carpenter. Install by moving sash to the open position and sliding strip in between the sash and the channel. Tack in place into the casing. Do not cover the pulleys in the upper channels.
A sliding window can be treated as a double-hung window turned on its side. Casement and tilting windows should be weatherstripped with the vinyl nailed to the window casing so that, as the window shuts, it compresses the roll.
Install adhesive backed foam, on all types of windows, only where there is no friction. On double-hung windows, this is only on the bottom (as shown) and top rails. Other types of windows can use foam strips in many more places. Before applying caulking compound, clean area of paint build-up, dirt, or deteriorated caulk with solvent and putty knife or large screwdriver.
Fill extra wide cracks like those at the sills (where the house meets the foundation) with oakum, glass fiber insulation strips, etc.) In places where you can't quite fill the gaps finish the job with caulk.
Caulking compound also comes in rope form. Unwind it and force it into cracks with your fingers. You can fill extra long cracks easily this way.
Triple track, combination (windows and screen) storm windows are designed for installation over double hung windows. They are permanently installed and can be opened any time with a screen slid into place for ventilation. Double-track combination units are also available and they cost less. Both kinds are sold almost everywhere, and can be bought with or without the cost of installation.
The supplier will first measure all the windows where you want storm windows installed. It will take anywhere from several days to a few weeks to make up your order before the supplier returns to install them. Installation should take less than one day, depending on how many windows are involved. Two very important items should be checked to make sure the installation is properly done.
Make sure that both the window sashes and screen sash move smoothly and seal tightly when closed after installation. Poor installation can cause misalignment. Be sure there is a tightly caulked seal around the edge of the storm windows. Leaks can hurt the performance of storm windows a lot.
Frame finish: A mill finish (plain aluminum) will oxidize, reducing ease of operation and degrading appearance. An anodized or baked enamel finish is better.
Corner joints: Quality of construction affects the strength and performance of storm windows. Corners are a good place to check construction. They should be strong and air tight. Normally overlapped corner joints are better than mitered. If you can see through the joints, they will leak air.
Sash tracks and weatherstripping: Storm windows are supposed to reduce air leakage around windows. The depth of the metal grooves (sash tracks) at the sides of the window and the weatherstripping quality makes a big difference in how well storm windows can do this. Compare several types before deciding.
Hardware quality: The quality of locks and catches has a direct effect on durability and is a good indicator of overall construction quality.
Combination (windows and screen) storm doors are designed for installation over exterior doors. They are sold almost everywhere, with or without the cost of installation.
You can save a few dollars (10% to 15% of the purchase price) by installing doors yourself. But you'll need some tools: hammer, drill, screw driver, and weatherstripping. In most cases, it will be easier to have the supplier install your doors himself.
The supplier will first measure all the doors where you want storm doors installed. It will take anywhere from several days to a few weeks to make up your order before the supplier returns to install them. Installation should take less than one-half day.
Before the installer leaves, be sure the doors operate smoothly and close tightly. Check for cracks around the jamb and make sure the seal is as air-tight as possible. Also, remove and replace the exchangeable panels (window and screen) to make sure they fit properly and with a weather tight seal.
Door finish: A mill finish (plain aluminum) will oxidize, reducing ease of operation and degrading appearance. An anodized or baked enamel finish is better.
Corner joints: Quality of construction affects the strength and effectiveness of storm doors. Corners are a good place to check construction. They should be strong and air tight. If you can see through the joints, they will leak air.
Weatherstripping: Storm doors are supposed to reduce air leakage around your doors. Weatherstripping quality makes a big difference in how well storm doors can do this. Compare several types before deciding.
Hardware quality: The quality of locks, hinges and catches should be evaluated since it can have a direct effect on durability and is a good indicator of overall construction quality.
Construction material: Storm doors of wood or steel can also be purchased within the same price range as the aluminum variety. They have the same quality differences and should be similarly evaluated. The choice between doors of similar quality but different material is primarily up to your own personal taste.
For more information on weatherstripping and caulking windows and doors refer to Extension bulletin E- 1104, Weatherstrip Your Doors and Windows.
Source: MSU Extension
Add your voice! Click below to comment. ThriftyFun is powered by your wisdom!