social

Ritzy Glitzy Frame


Gold Post Medal for All Time! 969 Posts

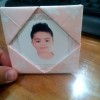
With some scrap fabric, glue, and embellishments, you can make a nice frame that is elegant and fancy at the same time. decorative photo frame


Approximate Time: 1.5 Hours

Advertisement

Supplies:

  • fancy fabric like ribbon, satin, glittery polyester, etc.
  • duel temp glue gun
  • wooden frame
  • embellishments like buttons, jewelry, etc.
  • sheet protector
  • Optional: scrap felt or foam to cover the back of the photo

Instructions:

I made my strips about 1/2 inches in diameter, and just cut lengths of what I had. No seams need to be done, since you can simply glue the end of one strip and the beginning of another on the back and keep going.

  1. At an angle, glue the end of a strip to the back. Keep wrapping till you get to the first corner. This gets a bit tricky, but keep wrapping to make sure none of the wood shows through.

    NOTE: Ovals are so much easier, but this is the only frame I had so when you do an oval, you won't have to worry about corners.

    You will have some "wings" that stick up on the corner, but you can hot glue those down later.

  2. Advertisement

  3. Once the wrapping is done, you can embellish any way you like.

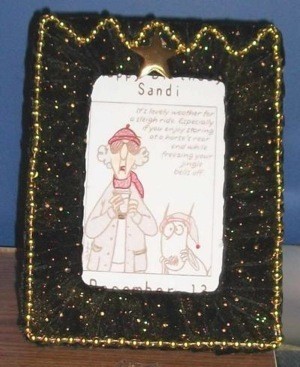
    Here are some suggestions: Wrap ribbon that matches the fabric color around the frame much like you did the fabric, but about every 1 inch or so, not overlapping.

    Put pretty buttons or old jewelry on random spots or uniformly around the front.

    Put mini mirrors (available at most craft shops in 1/2 inch squares or rounds).

    I used a Mardi Gras bead that was part of a three pack of gold, green, and purple that I got in the Dollar Tree. The star was a clearance button.

  4. I sat it over a card my friend sent me so you can see that a nice, generally 5 X 7 inch photo would go in there, but if you can trim down an 8 X 10 inch that might work too.
  5. Put the clear plastic on the back of the frame and the photo onto the plastic. If you want, make a scrap of foam or felt a bit bigger to seal in the photo.
Advertisement

OPTION: If you think you might want to swap out a photo, simply cut the photo a bit smaller than the plastic and tape it on. Forgo the backing for easy removal.

By Sandi from Yorktown, VA

Add your voice! Click below to comment. ThriftyFun is powered by your wisdom!

 
In This Page
Categories
Crafts Framing DecorativeFebruary 26, 2010
Pages
More
🐰
Easter Ideas!
🌻
Gardening
👒
Mother's Day Ideas!
Facebook
Pinterest
YouTube
Instagram
Categories
Better LivingBudget & FinanceBusiness and LegalComputersConsumer AdviceCoronavirusCraftsEducationEntertainmentFood and RecipesHealth & BeautyHolidays and PartiesHome and GardenMake Your OwnOrganizingParentingPetsPhotosTravel and RecreationWeddings
Published by ThriftyFun.
Desktop Page | View Mobile
Disclaimer | Privacy Policy | Contact Us
Generated 2024-03-26 08:17:02 in 2 secs. ⛅️️
© 1997-2024 by Cumuli, Inc. All Rights Reserved.
https://www.thriftyfun.com/tf57562804.tip.html