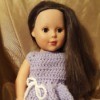
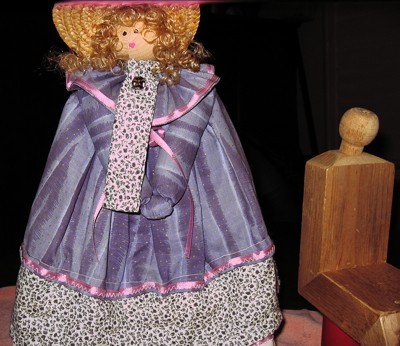
This doll was made using some bits and pieces of lumber from my husband's cabinet shop. I just couldn't bear to see that nice wood go into the trash barrels.
I'd seen Carol Duval make a doll on her TV series, and decided to try. My doll turned out pretty close to the one she made. I didn't have a pattern, so I just made her from memory and trial and error. If it worked, I used my idea, and if it didn't work, I'd find a way to go around it.
Approximate Time: About 4 hours as I sewed her clothing all by hand. I think it would go faster if you were using a sewing machine.
Supplies:
- piece of 2 x 4 inch wood
- scraps of fabric for dress, under-skirt, and apron
- good sharp scissors
- cotton stuffing for arms
- any other trim or embellishment you want to add
- pencil with eraser for making the eyes and lips
- screws and screwdriver
- faux hair and Elmer's Glue-All
- piece of 1x4 inch wood
- ribbon and lace
- needle and thread
- straw hat or make her a bonnet hat
- red paint for mouth and black paint for eyes
- round wooden ball for head
- saw and drill
- white or other paint for body and base
Instructions:
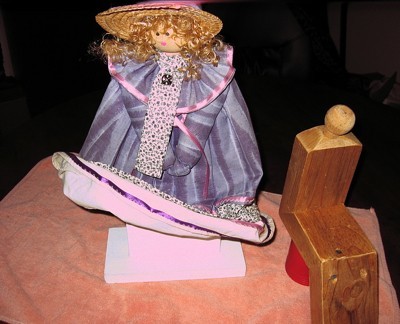
- The scrap piece of 2x4 should be between 6 and 10 inches because that will determine how tall your doll's body will be.
- The scrap piece of 1x4 wood should be about 6 inches long.
- Attach the 1x4 piece of wood to one end of the 2x4 so that it will stand alone.
- Use a couple of screws long enough to go through the 1 inch and into the 2x4. I use at least 2 screws to keep her stable.
- I used the saw to trim small amounts of wood off the top edge of the 2x4 so that it looks more like "shoulders" for the doll.
- Drill a hole up into the round wooden ball, and insert a screw head first. Glue in place and allow to dry thoroughly.
- Drill a hole into the "shoulder" area of top of the 2x4 and screw the head on.
- Now, we'll make the clothes. You'll want the dress to be long enough to reach from the shoulders all the way to the piece of 1x4 so as to cover it. Hem the bottom edge and add some lace so that the lace appears to be an underskirt.
- Turn under the top edge of fabric, and gather tightly and stitch in place around the head.
- Cut a piece of contrasting or the same fabric as the dress to form arms. The piece should be wide enough so that you're able to stuff it once it's stitched and turned to the right side. When you have it sewn and turned, tie a knot in the middle of the length. The knot becomes the hands looking as though they're folded. Stuff the arms. Remember when you're cutting the fabric for the arms, to make it long enough for both arms plus enough to tie a nice knot.
- I cut small slits in the arm and dress fabric so that I can get a screw through everything to keep the arms in place on the body of the doll. Then I make a "shawl" to go over the shoulders and tie under the head. The shawl can be made anyway you like. You could even use half a crocheted doily by sewing a ribbon at the top to keep it from fraying, then tie the ribbon into a nice bow.
- Give her an apron if you like.
- The doll should look like she's holding her hands in front of her. She could be holding a drawstring purse if you want to make one.
- Glue the hair in place on the head. With the eraser of the pencil, put one dot of black on the face for each eye. Add 3 dots for the mouth, placed in the shape of a rosebud. Keep it simple.
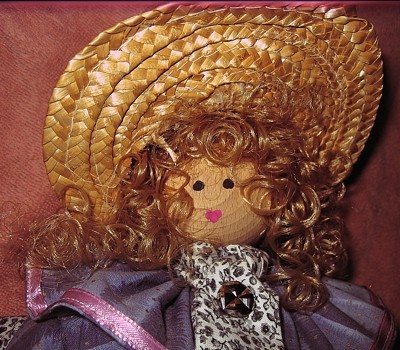
- Give her a hat, either a handmade bonnet or a purchased straw hat decorated to suit yourself.
- Give her a necklace if you like, even earrings.
She is ready to sit on the shelf to keep you company or be given to a friend.
I always name my dolls. This one is Amanda.
Any questions, just ask, and I'll do my best to help you.
The dolls can be made to sit on a shelf, by putting together the wood differently, and adding another section of wood. It requires a little more wood and work, but it works very well.
By Julia from Boca Raton, FL