Is there a way to make a really cool thing to demonstrate how bread rises?
By Sarah from Ireland
Add your voice! Click below to answer. ThriftyFun is powered by your wisdom!

A Yeast Bread lecture and demonstration preparing loaf bread, one of the classes of yeast breads with a lab having the students prepare their own Loaf Bread following the techniques and skills of bread making.
Yeast Bread Study Sheet
Information of Yeast Breads
Cool Rise White Bread
Lab Planning SheetYeast Bread Recipes
Bread Home Assignment
Ingredients needed for demonstration and for each unit to prepare Cool Rise White Bread:
3 1/2 cups flour
1 tbs. yeast
1/2 tsp. sugar
1/4 cup warm water
7/8 cup milk
1 tbs. sugar
1 1/2 tsp. salt
1 1/2 tbs. margarine or shortening
cooking oil
Ingredients for yeast experiment:
3 small custard cups
3 tbs. yeast
3 tsp. sugar
hot water
warm water
cold water with ice cubes
Attachments
Lab_Planning_Sheet.jpg
Yeast_Bread_Study_Sheet.doc
Yeast_Bread_Study_Sheet_Key.doc
Information_on_Yeast_Breads.doc
Cool_Rise_White_Bread.doc
Yeast_Bread_Recipes.doc
Home_Assignment_Form.doc
Lab_Planning_Sheet.pdf
Yeast_Bread_Study_Sheet.pdf
Yeast_Bread_Study_Sheet_KEY.pdf
Information_on_Yeast_Breads.pdf
Cool_Rise_White_Bread.pdf
Yeast_Bread_Recipes.pdf
Home_Assignment_Form.pdf
Background For Teachers:
The teacher needs to have a basic understanding about yeast breads; the characteristics that identify them; how to prepare them using different methods; identify and know how to prepare the three classes of yeast breads - loafs, rolls, and deep-fat fried; identify the basic ingredients and their functions; know words like leavening, proofing, rising, ripe test, carbon dioxide as they pertain to yeast breads.
This demonstration and lab will take the students through all of the steps during class to prepare a loaf of bread as the bread rises in the refrigerator for up to 48 hours. It is baked the following class period.
Because it is a cool rise bread, it contains more yeast than a regular bread recipe for one loaf of bread. Some of the students may think this bread tastes a little yeasty, but they will devour it anyway. It is an excellent recipe for the students to see how to make loaf bread during a class period.
You will need to watch the time very closely to lecture, demonstrate and have the students complete their lab. It could be done in two days.
Student Prior Knowledge:
The student needs to know what yeast breads are and how they differ from quick breads. They should know how to prepare different yeast breads using different methods and what ingredients are used in the making of yeast breads.
Intended Learning Outcomes:
The student should be able to identify the characteristics and ingredients used in yeast breads from quick breads, and how to prepare them as rolls, loaf breads or deep-fat fried.
Instructional Procedures:
Hand out the Bread Home Assignment and the Yeast Bread Recipes. The recipes contain several bread recipes that may be used for their home assignment. Some of the other recipes are my favorites and some will be used in later labs.
There will be two home assignments for this yeast bread unit. One will be to prepare some homemade bread at home and the other to prepare rolls that will be given at a later date. The students can prepare one of the recipes in the packet or one that their family prefers. The student needs to bring the paper signed, identify the recipe used and attach a slice of bread for credit. It will be due the day of the test.
Go over the recipes in the packet to identify the ingredients, time it takes to prepare and how many loaves each recipe will make. I tell the students that they need to prepare the bread at home and not use a bread machine. I want them to mix the ingredients together, knead the dough, let it rise, shape the bread in a bread pan, let it rise again and bake it for credit.
Hand out the Yeast Bread Study Sheet, Information on Yeast Breads and recipe for Cool Rise White Bread.
Lecture on Yeast Breads as you demonstrate preparing the Cool Rise White Bread for the class. Use the study sheet as a guide.
Talk about the differences between Quick Breads and Yeast Breads.
What is yeast? Show the importance of the temperature of the water through an experiment. Have three custard cups on the countertop with three different temperatures of water - Warm water, cold water that has had ice cubes in it and hot water that has been heated in the microwave. Sprinkle in some yeast and sugar, stir and have the students observe during the lab the changes that occur. Discuss these with the class on the importance of the temperature of the water.
Demonstration: Prepare the recipe for the Cool Rise White Bread explaining and going through the steps. While kneading the dough, talk about the ingredients, their functions, the nutritional value of bread, classes, etc. After the dough is kneaded sufficiently, let the dough rest.
Lab: The students will quickly prepare the recipe for the Cool Rise White Bread as it was demonstrated in class. When they are kneading the dough, I like every student to have an opportunity to practice kneading the dough. If there are four students in the unit, each student needs to knead the dough for 2 - 2 1/2 minutes each. After their dough is kneaded, let it rest.
Demonstration: Have the students watch how you shape the dough while their dough is resting. If the students want to make Cinnamon Swirl with their dough I will show them how to do it. Once the dough is rolled out into a rectangle, lightly spread some water on the top, sprinkle with sugar and cinnamon. Continue to shape according to directions. Put shaped loaf into bread pan. Brush oil on the top and cover with saran wrap and label dough.
Lab: Students will go back to their units and shape their dough. Put it in the bread pan, cover with saran wrap and labeled and put in the refrigerator to rise until next class period.
Allow enough time for the students to complete lab and demonstration. Make sure the units are clean before they leave, especially the countertops. Good luck.
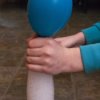
Hello, How about this? Hollow out a loaf of already baked bread and then insert a balloon. ( I would use an oblong balloon) The middle of the loaf will fall just a little, but you can insert the balloon and blow it up to demonstrate how the process works? Good luck, this was just a thought.
Add your voice! Click below to answer. ThriftyFun is powered by your wisdom!