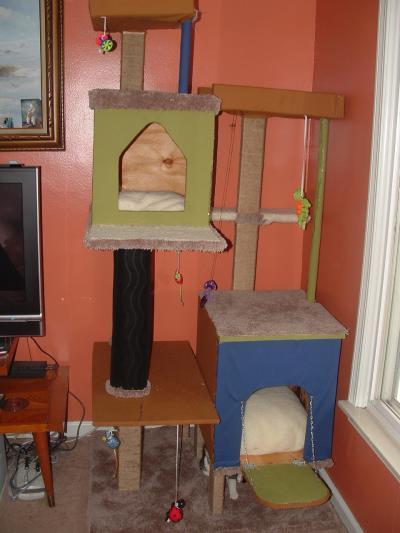
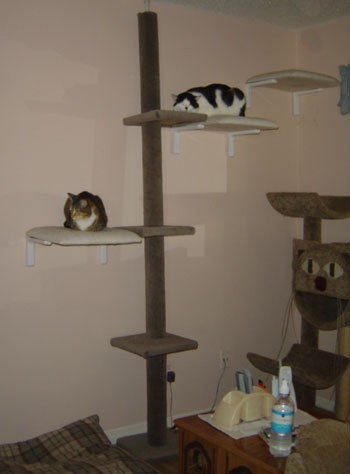
All in all the huge cat condo/gym cost me about $350 in materials and took me most of 3 solid days to make it. It is completely self standing and the cats love it. I made it very sturdy and it took most of a 12 x 8 foot piece of carpet remnant.
Dave
This page contains the following solutions.
Welcome to my Kitty World! I have 4 adult Siamese cats and we always have kittens. My husband Leo and I decided one day, we were going to go out and replace the scratching post that my husband made many years ago.
Cat tree too small? Our cats love to climb so we bought a floor to ceiling cat tree, but found the shelves were to small for our cats to enjoy. So we took the seats of some dining chairs that we no longer were using and placed them by the tree to make the shelves a nice landing spot for naps...
My Mom has a cat and she loves to crawl into boxes and other things to hide. I have this idea in my head about making her a cat condo or playhouse. I have some large boxes that I will be using.
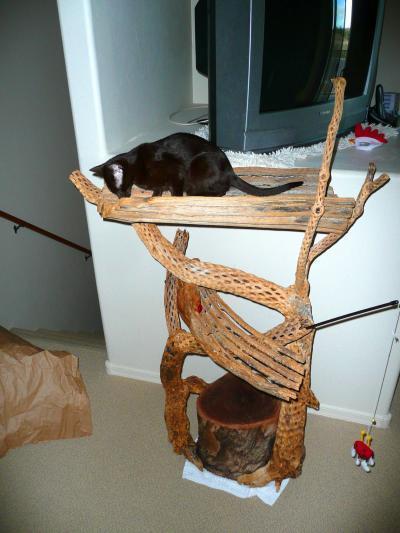
Here is a very simple outdoor cat tree. While this doesn't sit outside it is made for outside (Our Havana Browns are strictly indoor cats). The base is a cutoff piece of Mesquite stump.
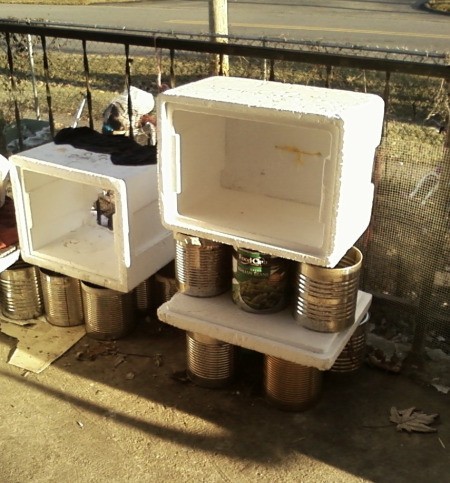
I have several recyclable things on my patio that I have turned into play areas for my cats. I get these Styrofoam boxes in the mail when my siser sends us turkeys and the fixings for holidays.
Here are the questions asked by community members. Read on to see the answers provided by the ThriftyFun community.
I would like instructions for how to make a cat tree?
By mc from San Lawrenz Gozo
We had a horrible had storm last year and had a rather large branch with several forks fall into our yard. My husband took a 5 gallon bucket and some concrete and set the branch upright in it. He trimmed off all the small twigs and we had a wonderful cat tree. Once the wood dried, it shrank a little and we had to redo the concrete.
I want to make a cat tree out of some recently fallen branches (we had a nasty storm that destroyed a lot of our trees), but do I have to wait for the branches to dry before I use them? How could I dry them when they're too big to fit in the oven? The branches are birch and dogwood.
By Caitlin G.
I don't know if this helps but when lumber flooring is cut it needs to sit for a length of time (can't recall if it's days or weeks) inside the house so it can acclimate to the environment before being installed.
Try a web search of woodworking or DIY sites. Posters to their message boards can give you advice.
How do you build a cat tree with scratchers?
By Susie from Banning, CA
You can get design ideas by looking at the commercially made ones and draw a plan based on the good parts of those you like and make it the size you want. You can try going to carpet stores and ask for carpet samples if you don't mind different colors on it. Also buy sisal rope and use that on a few places for a different texture to dig his claws into.
The commercially made ones that we have use a heavy duty cardboard tube that is really made to pour concrete into to make posts. At the top of each round piece is a flat piece of particle or similar, and at the bottom also. Those pieces are square and larger than the post size. You do not want this part too skinny though, you want to be able to cut a hole in at least one of them for the cats to hide in. The larger one that we have there is a post that goes right through it and that is what the square pieces of particle board are screwed into, make sure it is screwed tightly.
The bottom of our larger one has a square bottom, then three 2x4's that support a piece of plywood which is then topped with the cardboard tubing which has a hole cut out for a bed, inside you would carpet the bottom or put in a nice soft pillow as a bed that you can take out and wash.
My suggestion would be go and look at those in a store or look online for designs you like and go from there. Our cats were given a tall one for Christmas which is not even three months ago and they already have the post leading to the top bed which has a hole on one side for kitty to crawl up to the top which is a piece of plywood covered with carpet and has 3" sides on it, it is not enclosed like the other bed area, anyway that post is all in shreds already, of course we have twelve cats that use it. Buy liquid catnip and spray it down when you present it to the kitty or kitties and it will draw them to it.
Every time I spray mine it is like a magnet they all gravitate to it. I am not able to upload any pictures at this time or I would send a picture, sorry. I hope this helps.
I have a homemade 2 ft. carpeted wood scratching post for my cats, but on a whim I bought a cheap cat post with fleece-covered base and top ledge, with a sisal-covered post in between. It is too short (18 inches), but they used it anyway, standing at some distance away so they could stretch on it (cats "love" sisal).
The sisal needs to be replaced, but I really want to replace the cardboard tube post with a longer one. I have the cardboard tube, but I cannot figure out how to get an end cap on it to attach to the wood base and ledge. Either end of the tube will have a threaded rod to screw into the base/perch, but I don't know how to cap the post to screw the rod into it. The store bought one has a plastic cap that is fitted inside the tube, but I don't know how it is attached or where to buy one. Any ideas?
By Kelly H
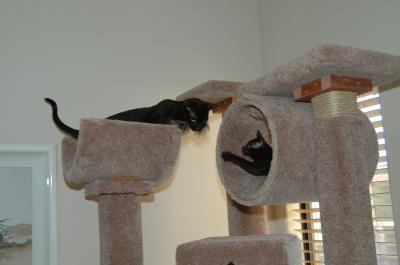
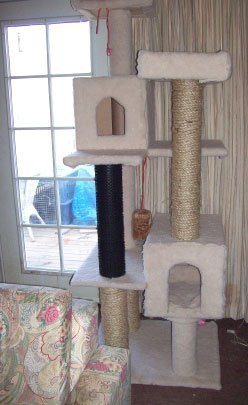
Check out these photos.
Thank you so much for sharing your plans! This was my first project so I had to invest in tools, but I was looking for a good excuse to buy tools anyway. At first, I had a difficult time with this project because I wanted precision.
You guys are awesome. I had no idea what I was going to do, but I followed your instructions and made a huge cat tree!