 I wanted to share my personal experience and tips for any of you considering doing this. I researched this project thoroughly before I actually took the plunge, and in my opinion, this method produced the best results.
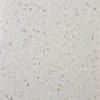
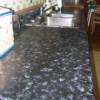
For inspiration, search online for granite colors. Print out 3 or 4 that you like.
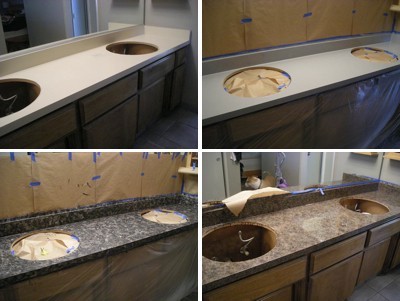
With the Rust-Oleum paint, sanding or priming is not required. The primer is built into the paint. When applying the Rust-Oleum paint, use the sponge rollers for big areas and paint brushes for corners and back splashes. Work fast, it sets up quick. Make sure you're in a ventilated area or turn the fan on if you're in a bathroom. This stuff is potent! Let dry (about an hour, maybe 2). If you prefer another coat, you can. I did. I felt better about 2 coats. Let dry.
To create the faux granite look you want, pour only the color of craft paint you're going to be using at the time onto a paper plate. They dry fast. You will have to keep adding paint to the plate. Use a new paper plate for each color. Start however you want. I did light to dark then back to light. You will have to play with the colors to get the look you want. I used the sea sponges mostly. I used the feather duster for the middle color and the chunked out brushes for whenever I needed a different looking texture. Use the smaller art brushes or stencil brushes for the corners and tight spaces. If you mess up on an area or don't like how it looks, don't panic. The craft paint is water base. Wet a paper towel and rub until it comes off. The Rust-Oleum paint will not come off. Nifty!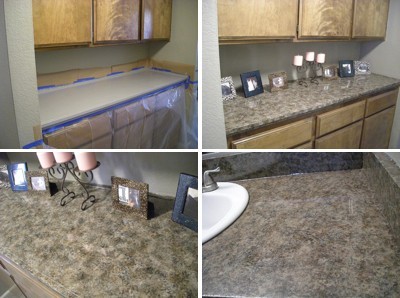
Once you have the look you want, let it set up for about 20-30 minutes. Come back and rub your hand over it. You will be able to tell it's dry. If it feels a little rough, it's because the craft paint tends to make "peaks" where you have used the sea sponges. I used a 240 grit sand paper and VERY lightly sanded over the counter top. Then I wiped it down with damp paper towels. Make sure all the grit from the sand paper is off. Let it dry.
If you're painting a large area, get someone to help you with the Envirotex. This varnish is not forgiving of mistakes. You will need to work quickly. You will need someone to mix and pour it while someone spreads. The directions that are included in the box tells you everything you need to know. Read them front to back. Twice. Pay attention to the edges and do what the box says. If your fan is still on at this point - turn it off. Close off the vent to whatever room you're in and close the door if you can. This helps with the drying time and keeps stuff from floating in the air and landing on top of the wet varnish. I had a few "cooties" in my final outcome. Cat/dog hair and/or dust. If you're a glutton for punishment, once it's dry, you can lightly sand the counter top and reapply the Envirotex again. I left the master bathroom how it dried, but I redid the middle bathroom and I wish I would have left it alone. It's all up to you.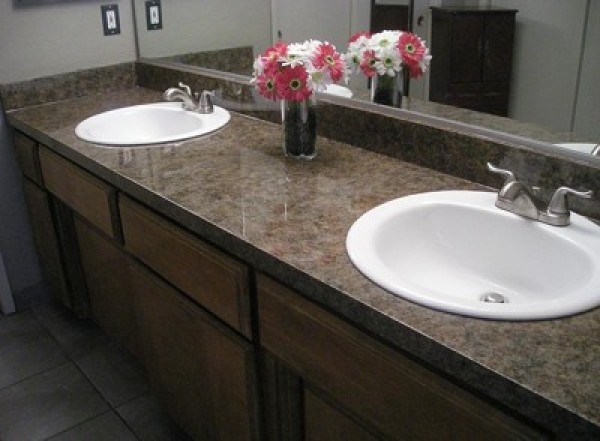
Once everything is dry (24-72 hours, depending on the temperature in your house), you can start unmasking. The tape that has any dried Envirotex will have to be cut with a razor blade. You can remove the masking tape once its semi set up if you like. I didn't want to risk dragging or pulling the varnish. The razor blade actually wasn't that bad.
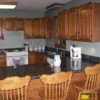
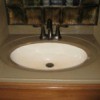
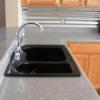
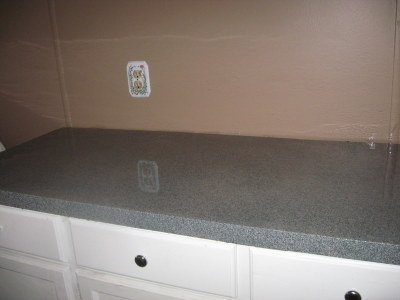
I have included before, during, and after pictures. I also did the counter in the built in cabinets in my hallway. You can do virtually any surface you want!
By Michelle from Bakersfield, CA
This page contains the following solutions.
I just finished creating faux granite countertops and I'm so thrilled! It was easy and the total cost for each countertop was about $70.
Here are the questions asked by community members. Read on to see the answers provided by the ThriftyFun community.
I am getting ready to faux-granite paint my counter. I have blue painter's tape around the walls and sink. My questions is: how well will the tape come off after the Envirotex cures? Is there a trick? I've been looking online, but can't find anything.
By LeAnn
Usually, you carefully remove the tape while the paint is still wet. When it dries, some paint can peel off with the tape, the tape can lift the paint, or the paint will seal the tape on the wall.
ThriftyFun is one of the longest running frugal living communities on the Internet. These are archives of older discussions.
I would like to know more about faux granite counter tops.