If you have trouble planting small seeds such as carrots and radishes without having to do lots of thinning of young plants, the perfect answer is seed tapes.
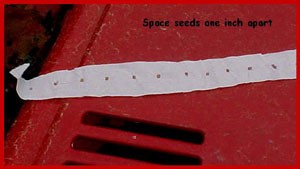
We just planted radishes and carrots in our garden using seed tapes that we made. Start with a piece of toilet tissue. Length is not important, but 5 sheets long is easy to work with. Cut it into strips about an inch wide. Lay the strips on the table, and measure off in 1 inch increments.
Put a tiny spot of Elmer's glue at each inch mark and, using a toothpick with a little glue, place a seed at each mark. You could make a pencil mark for each inch, but what I did was to lay a ruler down and glue a seed at the inch marks lined up with the ruler.
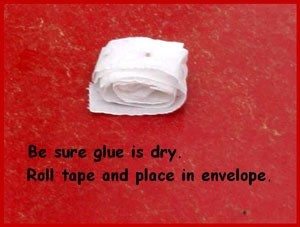
As they dry, check them often to make sure they are not sticking to the table. When completely dry, roll them up and store them in an old envelope marking the outside with the kind of seed they are: Danvers Half Long Carrots, French Breakfast Radishes, etc.
When you are ready to plant, make a shallow trench and lay them end to end in the trench; then cover them with soil. Pat the soil down and gently water the row. Cover with cardboard strips to keep them from drying out before they can germinate. Check every few days until the sprouts break through the soil; then uncover them. Keep them watered. When you start to harvest them, take every other plant to make room for the others to grow a little bigger.

This page contains the following solutions.
I empty the packet of seed on a plate. I unroll masking tape in front of me. Sticky side up, I dampen my index finger. It helps, to pick up the seeds. I then place two seeds, down on the tape, then two more seeds down on the tape, six inches apart.
Seeds have different spacing and depths (it's on the package). Rather than digging individual holes and having inconsistent depths and distances of my garden plantings, I created my own seed tape for a neater prettier look. It works great for flower beds too.

Contrary to popular belief most seeds will germinate for several years. Now is the time to make seed tapes from those leftover seeds from this year's garden.
I thought of this just today. It's a bit time consuming, but it does have its advantages. It's another one of those 'knit one, purl two' thingies, meaning you can pick it up when you have a few minutes and stop at any time.
Once winter turns the corner toward spring, it seems like garden tasks can stack up quickly. One technique that is a real time (and money) saver during planting is using seeds tapes.
I've made seed tapes by mixing a little flour and water together, painting it onto paper towels, and sprinkling the seeds on. They stick to the flour and water and the paper towel rots away in the ground.
This is great for small seeds. Dissolve cornstarch and water in saucepan Put pan over heat and stir so mixture wont get lumpy. When the mixture begins to boil and thicken remove from heat and let cool.
Here are the questions asked by community members. Read on to see the answers provided by the ThriftyFun community.
How do I make homemade seed tape?
Hardiness Zone: 3b
By Joe Hyde from BC
Mix 1 tablespoon cornstarch in 1 cup of water and boil till thick and translucent. This is your "glue." Then cool it.
I use a cheap brand of toilet paper, but I know others use newspaper or paper towels. You want a paper that will rot away quickly in the soil. Use strips for rows or wider pieces for square foot gardening.
Dab the glue at the appropriate spacing for your seed variety -- or closer if you are willing to thin if necessary. You may want to put the glue in a zipper bag and cut off the corner to dispense small dots.
Place a seed on each dab, or several seeds if that kind is a poor germinator like parsnips. (Don't double up on beets or swiss chard as they have multiple seeds in each "seed" already.) Let dry. You may then roll it up and store until ready to plant. Be sure to label the bag if you do this!
Plant at the appropriate depth. Use fine soil to cover the seeds to be sown very near the surface. Keep moist until established.
Enjoy! You can do fun things with this, like alternating seeds of red and green lettuces, purple and green kohlrabi, etc.
P.S. This is a good winter project. Also good for kids. And definitely easier on the back!