EllenB
Gold Post Medal for All Time! 858 Posts Once winter turns the corner toward spring, it seems like garden tasks can stack up quickly. One technique that is a real time (and money) saver during planting is using seeds tapes. Although most seed companies carry ready-made tapes, you're left stuck with using whatever seeds choices they offer. Follow these six easy steps and make your own.
Materials Needed:
- newsprint (or other biodegradable paper)
- ruler & pencil
- plastic sandwich bags
- scissors
- toothpick
- all-purpose flour
- water
- seeds
Five Easy Steps
- Start by cutting off sections of newspaper into _ to 1-inch wide strips. Steer clear of toxic colored ink that put more unwanted heavy metals into the garden (and your plants).
- In a plastic bag, mix 1/2 cup of flour and a little water together until the mixture reaches a glue-like consistency (like thick gravy). Expel as much air as possible, reseal the baggie and set the mixture aside for now. This will be the "glue" that will adhere your seeds to the tape. The glue, along with the newspaper, will readily biodegrade as your seed sprouts.
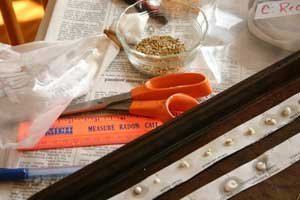
- Lay the strips of newspaper out flat on a table (laying them across a cookie sheet will make clean-up easier). Using a ruler, mark off the proper spacing for the seeds according to the back of the seed packet. I recommend leaving a little space at one end of each strip to label the tape. If your seeds didn't come in packaging, use a seed catalogue or garden book as a guide to determine spacing.
- Use the scissors to snip a tiny hole in one corner of the baggie. Start with small seeds and a very small hole at first. You can always make the hole bigger as you graduate to larger seeds. Use the baggie like a pastry bag and dab small globs of glue along the pre-marked spots on each tape. Do one tape at a time to prevent the "glue" from drying too quickly. Place a seed on the top of each glob and if necessary, use a toothpick to gently press it into the "glue."
- After the glue has dried, roll up the tapes and place them in individually marked plastic bags. Keep the bags in a cool, dark place until you're ready to plant them. You can make sure the seeds stay dry by adding a small amount of salt to each bag. When it's time to plant, simply unroll the tapes and place them seed side up in pre-dug rows. Cover them with soil and water just like you would if you were sowing seeds freely.
Unleash Your Creative Potential
Take advantage of the precision of seed tapes and use them to create straight, perfectly spaced rows-or lay them out in crazy patterns. Create flags, checkerboards, and geometric patterns of color. Write your name in flowers or plant a flag for the fourth of July. The tapes can be cut and arranged any way you choose so you're only limited by your imagination.
Whether planting vegetables or flowers, seed tapes will help free up time and money during spring planting by helping conserve expensive seeds, maximizing garden space and reducing the amount of thinning you'll have to do later.
About The Author: Ellen Brown is an environmental writer and photographer and the owner of Sustainable Media, an environmental media company that specializes in helping businesses and organizations promote eco-friendly products and services.
Add your voice! Click below to comment. ThriftyFun is powered by your wisdom!

Ruth Kennedy
Bronze Feedback Medal for All Time! 174 Feedbacks April 26, 20080 found this helpful
wow...great idea thanx will try that one need yr....I have wanted to try these ones but soo expensive and this one is cheaper...thanx for sharing

March 11, 20100 found this helpful
Thank you for sharing. I will be making up some seed tapes today. It will be a great project for the granddaughter to be a part of. What fun. :)
Add your voice! Click below to comment. ThriftyFun is powered by your wisdom!