social

DIY Sharpie Mug


Bronze Feedback Medal for All Time! 158 Feedbacks
January 25, 2016

DIY_Sharpie_Mug
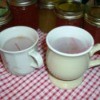
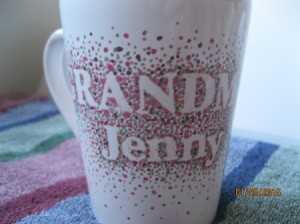
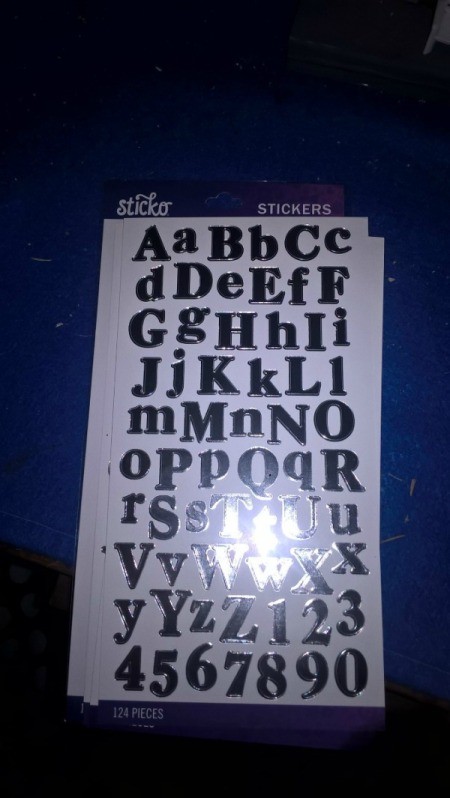
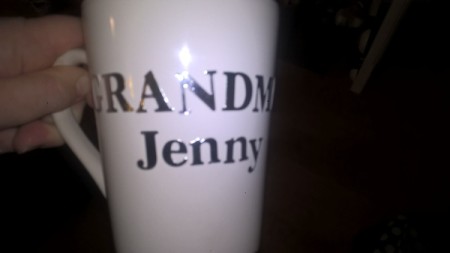
I've seen this project all over Pinterest and have tried a couple of different methods. All promised that you could use regular Sharpies and it would work. None of them worked. They'd end up washing away or the marker would chip off. It was seriously disappointing! One day, I read that the secret was to use oil-based Sharpies. I was worried about trying again, just to watch all that hard work wipe away. But, it actually worked! My kids made a mug for their grandma and wrote their own messages on the other side. It's a nice way to personalize your cup. You can use the sticker method, or design it any way you might like.

Advertisement

Total Time: About 1 hour, plus drying and baking time!

Source: pinterest

Supplies:

  • ceramic mug - I found this one at Dollar Tree, apparently, "the cheaper, the better".
  • stickers to create a message
  • oil- based Sharpies, they are kinda expensive. I suggest you use one of those 50, or even 60% off coupons for the craft stores!
  • rubbing alcohol
  • cotton ball or napkin

Steps:

  1. Wash and dry your mug. Clean the outside of the mug with a cotton ball with rubbing alcohol on it. This cleans the surface of oils and helps the ink adhere. Try to not touch the area where you will be creating your design. You don't want the oils from your hand to get on your nice, clean surface.
  2. DIY Sharpie Mug
     
  3. If creating a dotted message, apply some stickers to the surface of your cup. Put them on the cup lightly, so you can move them around, if need be. Once you are happy with the placement, press down on the stickers. The markers will bleed underneath the stickers if they aren't on there well.
  4. DIY Sharpie Mug
     
    DIY Sharpie Mug
     
    Advertisement

  5. Start with your first color and start adding dots. The ink will stay wet for a minute or so, and will smudge if your hand goes over that spot. Try to be careful. If you mess up, wipe it away quickly with a tissue. Or, you could use nail polish remover on a Q-tip to remove the mistake.
  6. DIY Sharpie Mug
     
    DIY Sharpie Mug
     
    DIY Sharpie Mug
     
  7. It works best to concentrate the dots around the letters, then gradually add less and less, the further you go away from the letters. Use your other colors, if using more than one. I avoided putting any marker on the top of the mug, where you put your mouth. I just think it's the safest way to go. I don't want to drink marker, along with my coffee!
  8. DIY Sharpie Mug
     
    DIY Sharpie Mug
     
    Advertisement

  9. Once done, let the mug dry for 24 hours. Carefully peel off the stickers. These were pretty stubborn and took a little work to get off.
  10. Put the mug on a cookie sheet and put it into a cold oven. You don't want to add this to a pre-heated oven, or it may crack! Turn the oven on to 425 degrees F. Once the oven is pre-heated, set your timer for 30 minutes. It's a good idea to open a window because there is a slight odor when you are doing this step. It's not super strong, but it may bother some.
  11. After 30 minutes, turn off the oven. Leave your mug in there. Once the oven is completely cooled, take the mug out. Some of the colors of the dots changed. I was bothered by this, but have since read that it's normal. Next time, I will only use 2 colors, since it looks liked I only used 2 or 3 colors! The instructions say that you can put this in a dishwasher without it taking off any of the marker. I can not attest to this, because we don't have a dishwasher. But, it is holding up nicely with hand-washing!
  12. Advertisement

Comment Pin it! Was this helpful? 8

Comments


Diamond Post Medal for All Time! 1,246 Posts
January 25, 20161 found this helpful

This will be a good gift to myself since my name is not common and mugs NEVER come in my name! ;)

Reply Was this helpful? 1

Bronze Feedback Medal for All Time! 158 Feedbacks
January 27, 20160 found this helpful

Attosa- I didn't even think about that! Well, I'm sure you will do a great job on your personalized mug. Thanks.

Reply Was this helpful? Yes
Categories
Crafts GiftsFebruary 24, 2016
Pages
More
😎
Summer Ideas!
🐛
Pest Control
🌻
Gardening
Facebook
Pinterest
YouTube
Instagram
Contests!
Newsletters
Ask a Question
Share a Post
Categories
Better LivingBudget & FinanceBusiness and LegalComputersConsumer AdviceCoronavirusCraftsEducationEntertainmentFood and RecipesHealth & BeautyHolidays and PartiesHome and GardenMake Your OwnOrganizingParentingPetsPhotosTravel and RecreationWeddings
Published by ThriftyFun.
Desktop Page | View Mobile
Disclaimer | Privacy Policy | Contact Us
Generated 2023-07-15 23:11:02 in 3 secs. ⛅️️
© 1997-2023 by Cumuli, Inc. All Rights Reserved.
https://www.thriftyfun.com/DIY-Sharpie-Mug.html