Want something different that will have people thinking you are so clever or you have lost your mind, one of the two. Try making a miniature bureau from empty greeting card boxes.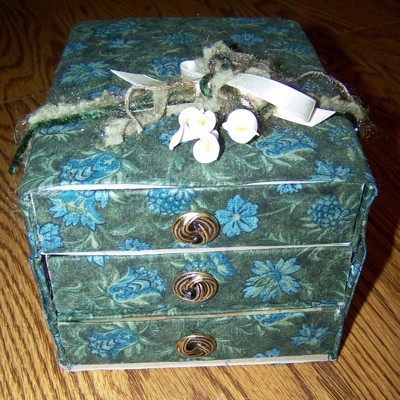
Approximate Time: 3-4 hours?
Please read through the entire directions before starting and if you have any questions feel free to contact me.
Remove one end of each box lid to use for dividers in the drawers. Trim off 1/4 inch along the long side and 1/8 inch along the narrow end of each divider. The bottom of the boxes will be the drawers.
With your wrapping paper cut strips the width of the inside of your drawers. Water your glue down some so it is spreadable. Place glue on the inside bottom of the drawers along the edges and in the corners, spread it out so it isn't in thick lines. Line your boxes with the paper you have cut into strips up and over the dividers.
Now cut strips the length of your boxes and cover the outsides of them. Don't worry about the back end it won't show. I covered the front of my drawers with my fabric, but you could cover it with your paper when you line your drawers. If you do, make sure to start underneath the drawer a half inch or so.
Now slide the drawers into their box lid with the bottom of the drawer and the top of the box lid together so the box is open; poke two holes through the center back 1/4 inch apart through both parts with a thick needle or awl. Separate the two boxes a little over half or however far open you want your finished drawers to open. Refer to the photo.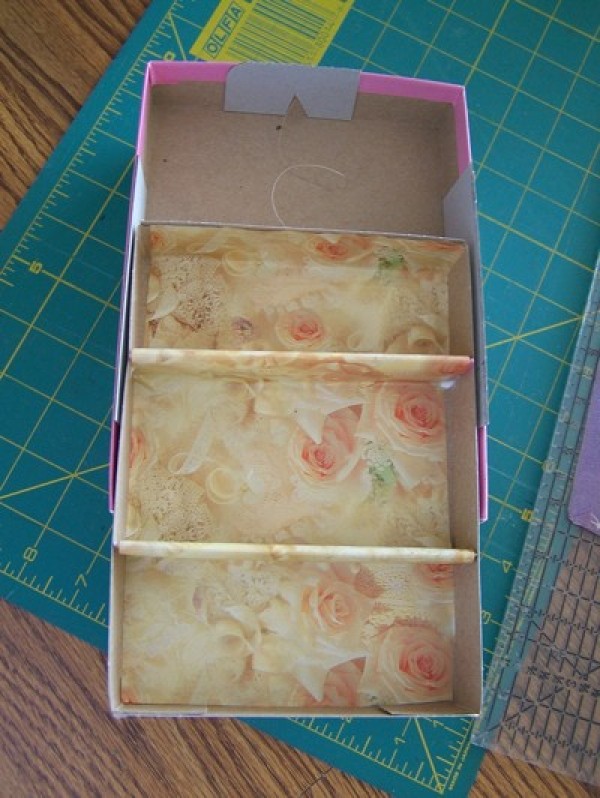
Cut string around twice that length and bring it through the holes in one box from the inside out and back in; tie a knot in one end close to the box and put a dot of glue on the knot. Repeat with the other box and the other end of the string making the string tight at the distance you have set for the opening of your drawers. Finish with a dot of glue again. Do this for all three drawers. These are your drawer stops.
My box lids were too close to the same size as the inside (my drawers) so I had to make room for them to slide. In order for your drawers to slide freely you need to build spacers along the sides and back to lift the box up off of the drawer below. I took a piece of sturdy cardboard the same thickness as the card boxes or thinner, I had saved some from another project. This cardboard has to be thin or it will make your drawer tight to slide. Cut two pieces 3 1/2 inches long and 1/8 inch taller than you outer box lid and one piece 2 1/2 inches long by 1/8 inch taller for the back of each box.
On the back pieces cut a "v" so it will fit over your string that you attached to work as a drawer stop. Glue these along the sides to the outer box. You can see them in the one picture showing the sides of the boxes. Cut a piece of this same cardboard for a top to your bureau and glue it to the edges of your top box.
Stack your boxes squarely and temporarily tape the back corners and a spot along the sides. Then run a line of glue along the "spacers". Let your boxes set until the glue is dry making sure they stay lined up on the spacers. Pull your drawers out a couple of times to make sure you haven't glued them in place and that they slide freely.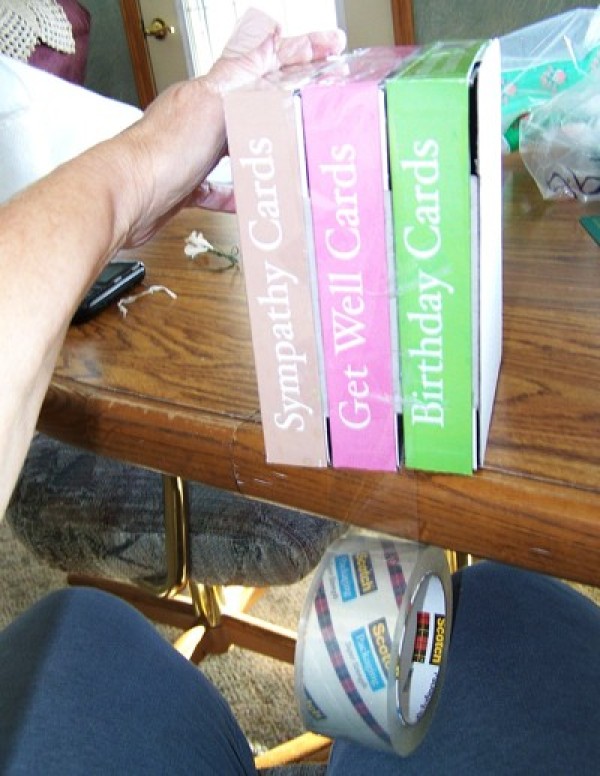
When all is dry it is time to move on to covering the outside. With tape that is wide enough to cover the middle box and cover both gaps between the outer two and the middle one wrap the entire unit. Make two wraps if you need to, but make sure it is stable.
Take your batting and cut it to fit in one piece up the sides, across the top and down back. Glue or tape it together and to the bottom of the box. Measure from the bottom up one side across the top down the other side and across the bottom, add an inch. Measure the length from front to the bottom of the back and add an inch. Take these two measurements and cut this size piece, make sure to measure twice and cut once, this should cover the whole box plus an inch both ways, minus the front.
Fold a 1/2 inch seam under on the front edge of your fabric, line up the center of your fabric with the center of the top of your bureau and pin it to the batting. Continue pinning a couple more times along the front edge. Now go back and work the fabric under the cardboard to cover any that shows. Make a slit where the need arises then put a drop of glue on the slit. Continue until you have all the front covered then turn the box over so you can work the bottom. Glue one raw edge to the box then fold the edge of the other raw edge under for a finished seam and glue it down.
Finish the back of your box like a gift package. Folding the extra in under so it looks neat and glue or sew the edges down.
Take a sharp knife and make a slit in the center of each drawer to attach your shank buttons for drawer pulls. Push the shank through the hole and slide a piece of paper clip with a curl in one end through the shank then make another curl on the other end. One paper clip will do all three buttons.
Finish off your bureau with a ribbon and artificial flower bow and maybe even legs. You could use more buttons for the legs.
By Ann Winberg from Loup City
It's amazing what one can do with empty boxes and how the creative mind works to come up with an idea like this. Adorable! Great job!
Ann, this is a great and cute idea and wonderful way to recycle! Thumbs up! :-)
I made a travel jewelry box out of a padded check box. I covered it with quilted fabric, though you could make your own with fabric and quilt batting. I used my glue gun to hold everything in place.
Inside, I glued in batting and covered that with fabric. When I'm traveling, the batting/fabric holds the jewelry securely and keeps everything from getting jumbled or tangled, and I can put it in my luggage or carry it in my purse.
It's pretty enough to leave on my dressing table all the time. Since alll my trips are short, it's just the right size for everything I want to take with me.