attosa
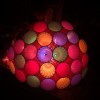
Diamond Post Medal for All Time! 1,246 Posts 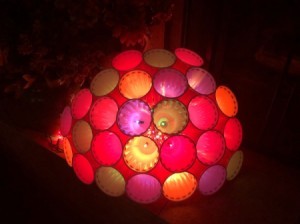 My friends went away on holiday and came back to find hundreds of Solo cups, and the remnants of what looked like a huge party, scattered about their house. There was no permission given for this blowout, of course. I thought I could help lighten things up (in two ways) by making them this decorative light with some of the cups. It was a very welcome gift, and a good laugh. Try this out if you've got some extra cups!
Total Time: 40 minutes
Yield: 1 big light
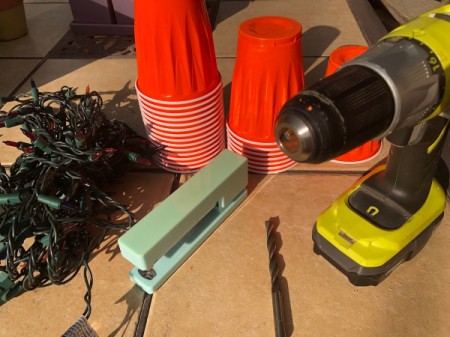
Supplies:
- 30+ Solo cups
- drill with 11/32" drill bit
- strung Christmas lights
- stapler
Steps:
- Drill a hole in the center of the bottom of a cup.
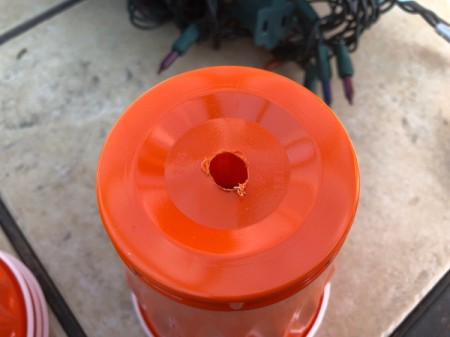
- Poke a Christmas light through just to make sure it's a good fit. You want it to just poke through without it being too loose, as not to let them slip off. Continue drilling holes in the rest of the cups.

- Staple 2 cups side by side, making sure one of the cup's lip is just over the other cup's.
- Now staple another one next to the other, staggering the cup lips again. They should eventually stagger over, under, over, under, etc.
- You can make this as big as you like, but my lower level was just a crescent made of 8 cups. Start stapling on another level on top of, remembering to stagger the lips.
- Go all the way across, stapling the cups to the ones below and the ones to their sides.
- Keep going up and across until it starts turning into a ball. You'll start using less cups the higher you get.
- When you're happy with the shape (I stopped when it was a hemisphere), turn it over and begin poking the Christmas light bulbs through the holes.
- It will look better if you don't put the same colour bulbs in side-by-side. Plug in the lights and enjoy the glow.
- It's much more dramatic in the dark!
Add your voice! Click below to comment. ThriftyFun is powered by your wisdom!
November 29, 20180 found this helpful
Gorgeous! Aren't you a genius!!! These'd look nice with white lights, too, for a wedding or the like! I LOVE it!
attosa
Diamond Post Medal for All Time! 1,246 Posts November 29, 20180 found this helpful
What a super sweet comment! Thank you so much :)
Add your voice! Click below to comment. ThriftyFun is powered by your wisdom!